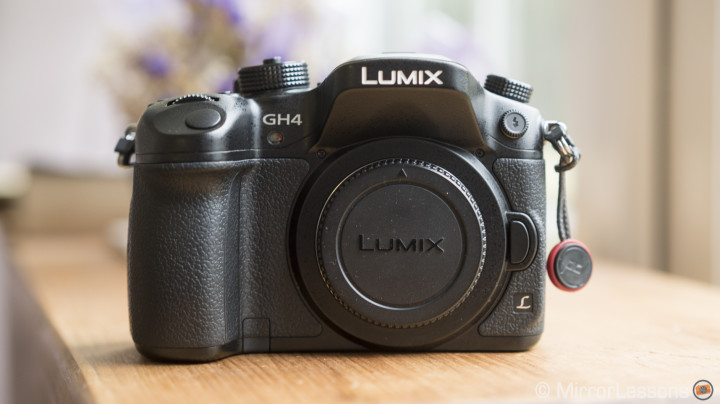
In the first part of our complete GH4 review, we focused on its still capabilities to show you how good this camera can be for taking photographs in various conditions. It is without a doubt one of the best Micro Four Thirds camera available as of today. But the strength of Panasonic’s new flagship camera lies not only in its great image-taking ability but also its stunning video capabilities. It is the best example of a camera that fuses two worlds, photography and filmmaking, continually demonstrating that they can actually co-exist and work together in one body.
[toc heading_levels=”3″]
Ergonomics and ease-of-use
As with stills, when I review a camera for its video capabilities the first thing I test is how comfortable it is to work with. The Panasonic Lumix GH4 is one of the most straightforward cameras around when it comes to still photography and I can easily write a similar conclusion for video. From the button layout and grip to the tilting screen and general operations, you quickly learn to appreciate its design. Many camera operators prefer to add a few accessories like rod support, follow focus or a viewfinder loupe to their camera, which is possible on the GH4. However it is important to note that the GH4 can be used comfortably enough straight out of the box even without accessories that enhance the usability of the camera.
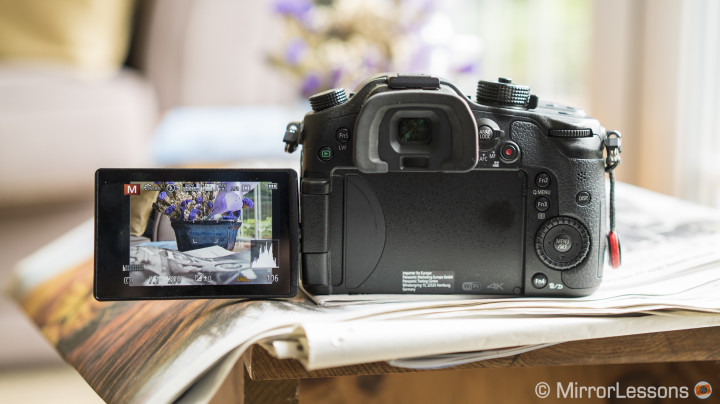
For video you will probably find yourself using the LCD screen more than the viewfinder with the exception of news-like situations where holding the camera and looking through the viewfinder will give you more stabilisation. The viewfinder is a big improvement over the GH3 and is easy to use for video as well.
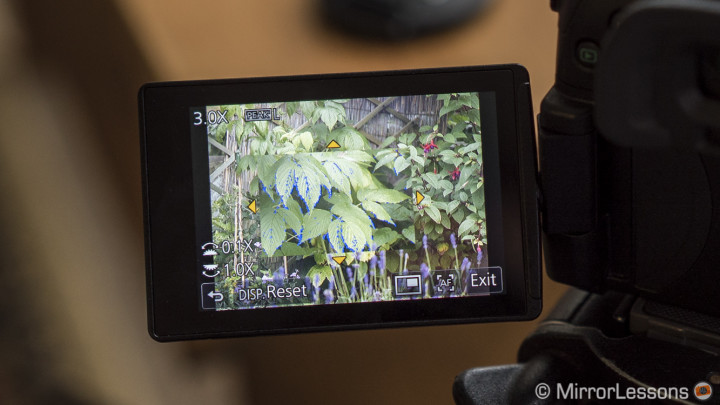
The feature I appreciate the most about the GH4 when shooting video is the manual focus assist. The peaking function is very precise and easy to use, even when shooting outside during the day when the visibility of the LCD screen decreases or when shooting a subject that isn’t static and requires you to change your focus point often. You can also have a magnified version of the focus point so that you can double check that your subject is in focus (unfortunately during recording only peaking will work). The combination of peaking, the magnifier and the touch screen makes the GH4 very pleasant to shoot with in manual focus, especially if you adapt third party or manual focus lenses.
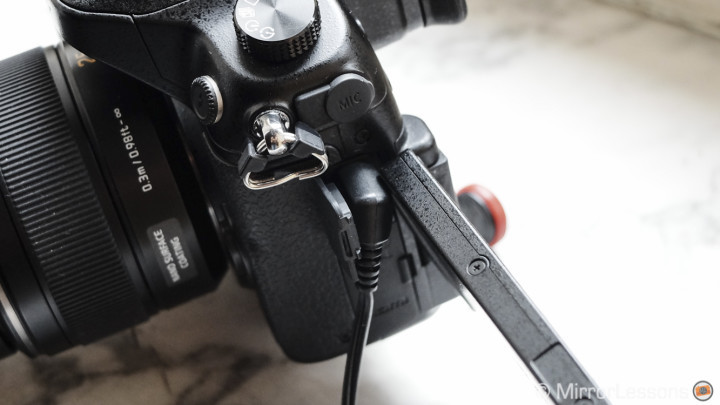
One thing I don’t like is the location of the headphone and micro HDMI ports. When the cables are connected, they limit the usability of the LCD screen especially if you want to tilt it up or down. That’s the only complaint I have about this camera regarding its design.
The GH4 integrates many settings imported from professional camcorders in order to make the shooting experience better and more complete. I’ll describe to you the most important and useful settings.
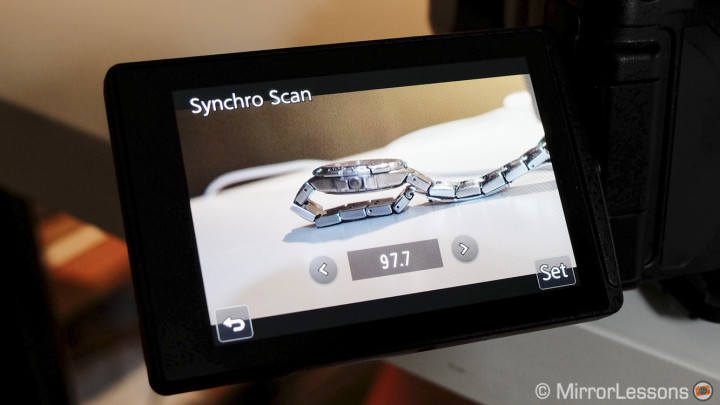
- synchro scan: instead of using the default shutter speed values, you choose from a value of 11 to 360 measured in degrees. This is very useful to reduce flickering and horizontal lines that can occur with artificial lights. For example one night while shooting in the streets of Turin, I experienced terrible flickering coming from the street lights and I couldn’t get rid of them by adjusting the default shutter speed. With the synchro scan I totally got rid of the problem by setting it to 99.2°. Flickering can also be related to the frame rate and frequency selected in the camera. I was in NTSC (59.96Hz) mode at 30fps. In PAL mode I probably wouldn’t have had any issues because the frequency is different (50Hz). It is a function you will also find very useful when there is a computer screen in your shot, especially an old CRT.
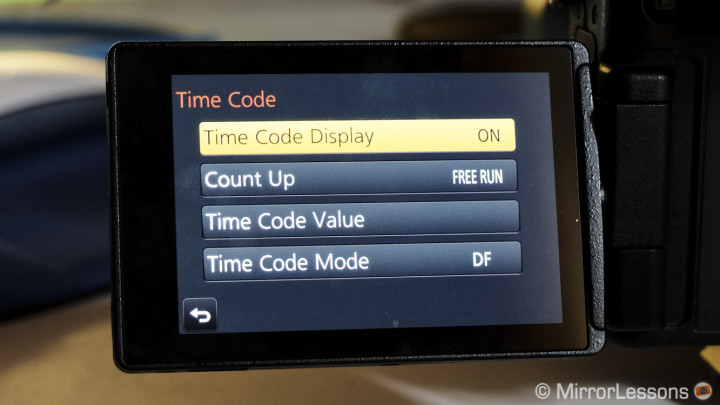
- time code: every semi and professional camcorder has a time code that will give a time identity to every recorded frame. It can be useful to count how many hours of footage you’ve shot for example. It is also used for synchronisation when you shoot with more than one camera and that’s what I did during the summer to take a very simple video of my father-in-law’s choir concert. I used the GH4 and the GH3, which also has a time code option. You can set the time code either to run when you record a clip or in free run mode meaning that it will keep running even when the camera is turned off. Free Run is the method I choose: I reset it on both cameras by pressing the button at the same time, so that both time codes match each other precisely. The precision won’t be down to the frame but enough for me to synchronise the two clips and then fine tune in my editing software. You can also enter a manual value to start from or use the current time set on the camera so that the timecode will match the time of the day. It is also useful if you shoot all day and want to quickly grab something shot between 5.30 and 5.40 p.m. for example.
Note: the video below was shot with the GH4 in 4K and GH3 in full HD, then edited on a Full HD timeline. Audio was recorded with the built-in microphone from the GH3 (not the best solution but still decent).
- zebra pattern and monochrome live view: The GH4 gives you the option of turning the EVF/LCD to Black and white. If you also activate the zebra pattern, a series of diagonal lines will appear in the areas of the image where the highlights are clipped (with the option of a fine tuning percentage level). You get the same setup we used to have on the not-so-old camcorders and broadcast camcorders. Sometimes shooting video with the B&W EVF is very helpful to check and control the exposure and contrast. I wish that I could set it only to the EVF though, as I used to do with my old Sony HDV camrcorders. The GH4 applies the monochrome setting to the live view. For this reason it will affect both the LCD screen and the EVF.

Another relevant option is that of using colour bars with 1kHZ audio noise (useful for tests when setting up a Multicam shoot).
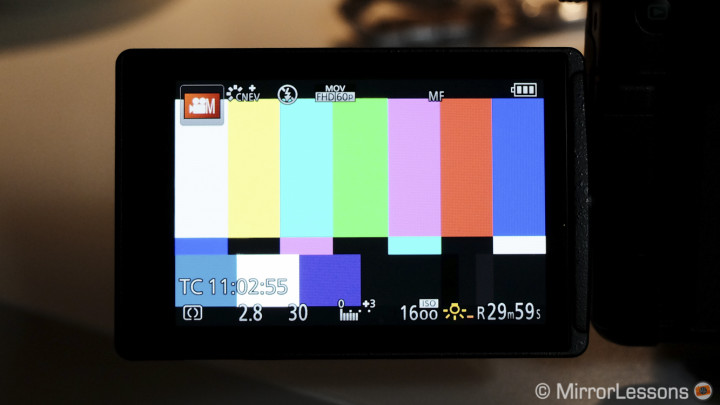
There is one thing that is very annoying about the PAL (Europe) model. The European model has a limitation of 30 minutes per clip. After that you have to press record again. It is related to (stupid) European laws. The display at the bottom right of the screen gives you the remaining time before you reach the limit but not the total amount of recording time available on the SD card. This is really irritating because you don’t know how much time you have left before you have to switch SD cards. It is the same problem that exists even on the first GH1 camera and I really wonder why Panasonic doesn’t bother to give PAL users the option of displaying the total amount of time left instead of the 29min limit only.
Image quality overview: advantages and limitations
There are many recording formats and frame rates available on the GH4. Though on one hand it shows how flexible this camera is for different types of video productions, it may also be confusing for someone who doesn’t have in-depth technical knowledge about video shooting. This is why I want to explain all the options and highlight the differences.
First of all, the camera has three different system frequencies to choose from: NTSC (59.94Hz), PAL (50Hz) and Cinema (24Hz). The first two can be chosen depending on your country of residence and to match the system used not only by the local broadcast television network but also the majority of people shooting in your country. For the Internet it matters less since the most popular platforms like YouTube accept any kind of format or frame rate. The third called Cinema will give you the option of a true cinematic 24fps (frame per second). You will have to select this frequency to enable the Cinema 4k format.

The GH4 has two 4k formats to choose from:
- 4K, also called UHD (ultra HD): it has a 16:9 aspect ratio with a dimension of 3840 x 2160 pixels. UHD is selectable between 29.97fps, 23.98fps and 25fps.
- Cinema 4K (C4K): it gives you a more cinematic and wider aspect of 4096 x 2160. C4K is only available in 24Hz system frequency and at 24fps. The frame is slightly cropped in C4k mode (x1.2).
Both formats are recorded at a bitrate of 100mbps (megabytes per second) which can seem a lot at first compared to what we are used to with Full HD codecs in this type of camera (around 28Mbps). But since 4k is four times bigger than Full HD, the compression is more or less equivalent. In daylight I haven’t found any particular limit: the footage looks beautiful and works well, which in a way is a benefit since you can shoot in 4k without having to deal with overwhelming file sizes.
The first example video I’ll be showing you was shot in Cinema 4K. I decided to do a short macro video about butterflies during my summer holidays to see how well the camera can renders details in 4K. I chose the Cinema format because that extra 1.2x crop is useful when dealing with macro situations. I used the M.Zuiko 12-40mm f/2.8 (which has a very useful minimum focus distance of 30cm throughout the entire zoom range) and the M.Zuiko 60mm macro. Neither lens is optically stabilised so I had to use a tripod the whole time. There was a lot of wind in most situations so I used the excellent warp stabiliser in Adobe Premiere Pro CC. I set a limit of 10% maximum scale in the settings so that the footage wouldn’t wind up too cropped from the original frame.
The 4k rendering is very nice in my opinion: sharp with lots of details. The GH4 offers two extra picture profiles exclusively for video, the Cine Like D and Cine Like V, very similar to the ones found in their professional camcorders (but with fewer settings to customise them). I found that the Cine Like V profile works great. I also reduced sharpness, saturation and noise reduction by -5. This way I took footage that looked more natural in terms of colour and contrast. I then slightly colour graded the footage by increasing the saturation and matching the exposure of the different shots.
The GH4 also has an interesting option that allows you to select the Luminance level between 0-255, 16-235 and 16-255. Now this is really technical and if you don’t know video editing and video grading really well, it might be more difficult to understand so I am going to keep it very simple. These values mean the amount of luminance detail from white (highlights) to black (shadows). Most video editing softwares and media platforms such as Vimeo or YouTube can only decode from 16-235. So to match this decoding process (called YUV), you should use the 16-235 value. Using 0-255 or 16-255 gives you more detail in the highlights and shadows so slightly more dynamic range, but if you don’t colour grade your footage, you might see some undesired white or black clipping. This happens because the software or Vimeo doesn’t know that there is more detail below 16 or above 235. With the editing software, you can use a color correction tool to bring down the highlights and reveal more detail. If you don’t intend to do lots of colour correction, then leave it to 16-235 which is the standard. Almost all my videos shot with the GH4 were with 16-235.
In low light, the camera does really well up to 800 ISO if there is enough light on the scene. The video below is a second example of my father in law’s choir, shot with the GH3 and GH4 (the latter does the close-up shots). As you can see, I managed to match the two cameras fairly easily by selecting the same picture style and settings. I noticed that the GH4 tends to be slightly more magenta with the same white balance while the GH3 tends toward a yellowish tint.
From 1600 ISO, the GH4 shows a considerable amount of noise in darker areas and can also show some lack of detail. The Noise Reduction that can be adjusted for each picture profile can reduce the noise but not without reducing details. I actually prefer to keep NR at -5 for low-light situations. Even if the actual noise is more visible, it looks more realistic and organic with less compression artefacts that the NR can produce. Adjusting the master pedestal up or down a little bit can help reduce the noise in the darker areas. Below is a very short video shot in UHD in Turin during the night with ISO settings between 1600 and 3200 ISO.
With Full HD, we only get one aspect ratio in 16:9 but more frame rates and bit rates to choose from. The GH4 can shoot up to 200mbps with an ALL-Intra codec in one of 50p/60p or 25/30p. There is also the option of choosing 100mbps or even 50mbps. At 100mbps, the GH4 can also shoot in variable frame rates up to 96fps which give you some nice slow motion capabilities like the examples below.
The difference between shooting at 50p or 60p versus 25p/30p is a more fluid video if you have lots of panning, tilting, movements or action. Concerning the bit rate, I honestly haven’t noticed any particular difference regarding image quality between the 100mbps and 200mbps ALL-I version for HD format, even in low light. The only difference, like the frame rate, is better quality for fast movements and action. I noticed that the Full HD 50p/60p ALL-I at 200mbps has less rolling shutter issues and jello than the 100mbps version and the 4K formats as well. Just keep in mind that shooting at 200mbps consumes a lot of space on your SD card.
Just to provide even more possibilities, Panasonic also gives you the choice to choose the compression and file type. MOV and MP4 (LPCM) are the two best formats for image quality. I use the MOV format almost all the time. There is also MP4 and AVCHD which will give you a lower bit rate compression. AVCHD is not available in 4k while MP4 also gives you the option of shooting in HD ready (1280×720) and VGA (640×480).
Like many other large sensors cameras, the GH4 has some rolling shutter issues. It is more noticeable in 4k than HD at 200mbps as stated above. There can also be jello effects especially if you are using a non-stabilised lens (that can still produce some unwanted micro jitters). However, in my experience with the camera so far, I haven’t found them too dramatic. Certainly you may have noticed some of them in the butterfly videos (especially jello effects) which are also magnified because of the combination of macro shots and wind and warp stabilisation with Premiere Pro.
So to summarise the craziness of settings, formats, dimensions, frame and bit rates, here are the settings that I advise you use:
- If you want the best resolution, shoot in 4k and then either edit in 4k or edit in HD to have cropping possibilities. Be aware that you will need a high functioning computer to handle 4k files.
- If you shoot action and include lots of fast camera movements, choose Full HD ALL-intra at 200mbps 50/60p.
- For everything else, Full HD at 100mbps is an optimal choice.
- Picture settings: Cine-Like V with -5 for saturation, sharpness and NR works great for me.
- Luminance level: 16-235
4K: not essential but extremely useful

The most exciting feature concerning the image quality capabilities of this camera is related to its 4K recording. At the time of its launch, it was the only MILC capable of recording 4k footage internally on a memory card (now the Lumix LX100 and the Samsung NX1 have this functionality).
What is so great about 4k? Well, it gives four times the resolution of FULL HD which means more detail. At the time of writing, 4k is still a format that only a few of us can really benefit from. Not every household or family has a 4k TV yet and there aren’t many computer screens at that resolution. Of course just like the Full HD versus standard definition dichotomy of many years ago, technology is evolving. For example Apple just recently launched its first iMac that has 5k resolution and an 8k camera from Sony is rumoured to be on the way.
As of now, the best media platform to play and share 4k footage is YouTube as it accepts this format. Vimeo still doesn’t play 4k videos but I guess it is just a matter of time now.
So why record in 4k then?
Well, there are many reasons. The first is obviously the desire to gather as much detail and information as possible. The second, which I find more useful, is to use 4k footage in a Full HD timeline to have more room for cropping. With still photography I am generally not a fan of cropping the original composition too much, but for video I actually find it something very convenient especially for videos you need to shoot on the run. Let’s see a few examples.
I shot the butterfly video shown at the beginning in Cinema 4k at 24fps and edited it in Premiere Pro CC on a 4k timeline: it was 4k footage with 4k editing exported to a 4k H264 file optimised for YouTube. But what if I wanted to get even closer shots of the butterflies? Remember that 4K is four times the size of Full HD. So I can import my 4k footage into a Full HD timeline and either downscale it to HD to keep the same composition or use it at its full size to crop the image. I can use the central portion of the footage without losing quality, since my footage has a bigger dimension than my HD timeline.
Of course to do this, it is important to be very accurate with your focus point because otherwise when cropping in the HD timeline, the out-of-focus areas will be more noticeable. Below is the same video but in Full HD with cropped shots, which gives a closer look at those beautiful insects. You will notice that my focus point is not always accurate since on more than one occasion I had very little time to catch these images before the butterfly flew away. During the day they can be very active and won’t sit on the same spot for a long time. You may also notice some little out-of-focus artefacts. This is not a GH4 problem but the result of the warp stabilisation. But I preferred to use it to make the footage more pleasant to watch since as I said before it was always very windy.
Another time where I found this function useful is when I recorded my father in law’s choir concert in Wales. We shot it with a GH3 and GH4 so obviously the GH3 couldn’t record 4k. I matched the two cameras with the same photo style and ISO/white balance settings, but I shot the GH4 in 4k so that I could crop the footage in the HD timeline and make it appear that the concert was shot with three cameras instead of two.
Finally I found this technique very useful during our visit to Photokina in September for our hands-on videos. Since there were only two of us, one of us had to stay in front of the camera. As such, shooting with two cameras wasn’t possible. But by shooting in UHD with the GH4, I had the chance to zoom in on details I wanted to highlight during the video without losing any quality. Here is an example below from our hands-on with the Samsung NX1. Here again you will notice that sometimes the focus isn’t precise so when I crop it becomes magnified.
There are many other applications I can think of where applying this technique would be useful. Think of an interview for example, where you can alternate between close-ups and wider shots of the person talking. Certainly an interview or any other scene recorded from different positions and angles of view will always be more entertaining from a creative perspective but if you are in a hurry, you will love this technique when editing on your computer.
The hybrid photography concept: 8mp stills from 4k footage
Panasonic has encouraged and promoted the hybrid photography concept especially in the United States. What is hybrid photography? Well, it is simply a video that contains a combination of actual video footage, stills and audio. There is nothing new about this since stills were used for video and film long before. Actually one of the most important short films of all time is “La Jetée” by Chris Marker, a French science fiction short film shot with black and white still film and then edited with music, sound and voice overs. There is only one actual piece of video footage in the entire film.
In the modern and digital era, hybrid photography is more a representation of two similar yet different arts, video and photography, that have begun to have more and more in common, and pose fewer technical difficulties when mixed together. This is where 4k resolution comes into play because its dimension of 3840 x 2160 corresponds to an average of 8MP size. Now 8MP, while not the best resolution, is still more than acceptable for web usage, where photos are usually resampled to 2MP or even less. So from your 4k video footage shot with the GH4, you can easily export still frames that can be used as actual photographs. Here is an example in the gallery below.
The results can be more than decent even at high ISO.

During my many years of filmmaking experience, my clients often asked me if it was possible to extract some images from the video footage to include them on a website or other publishing platform. I always answered that while it was technically possible, a frame grabbed from HD footage won’t look as sharp and detailed as an actual photograph. This is because of both the lower resolution and the fact that video footage is 72dpi instead of 240dpi for stills (both JPG and RAW file). 4k enhances this because of the resolution.
Panasonic recently updated the firmware for the camera to include a new mode called 4K Photo, where you can grab a frame from your 4k footage and save it on your SD card instead of doing it later from your editing software. You will have to enable it in the shooting menu before you start to record your footage and it doesn’t work in Cinema 24Hz mode. In the menu you can also select the aspect ratio and a loop recording option, meaning that the camera will keep recording and delete the old footage automatically, keeping only the last 10 minutes. Note that with this mode the camera automatically selects the MP4 format. Some other settings like the luminance level can’t be accessed (default is 0-255).

Once you are done, you simply go into playback mode, start to play the footage and pause it when you want to grab a frame (you can also rewind or flash forward frame by frame). Then you press the menu/set button and the camera will save the JPG. From an IQ point of view, the JPG saved on-camera has more resolution (180dpi) but with the naked eye you won’t notice any difference between doing this on camera and grabbing it from your 4k timeline in your editing software (or using Lightroom). The advantage with this functionality is the ability to choose the format ratio. What’s more, the JPG saved on-camera will incorporate all the exif data.
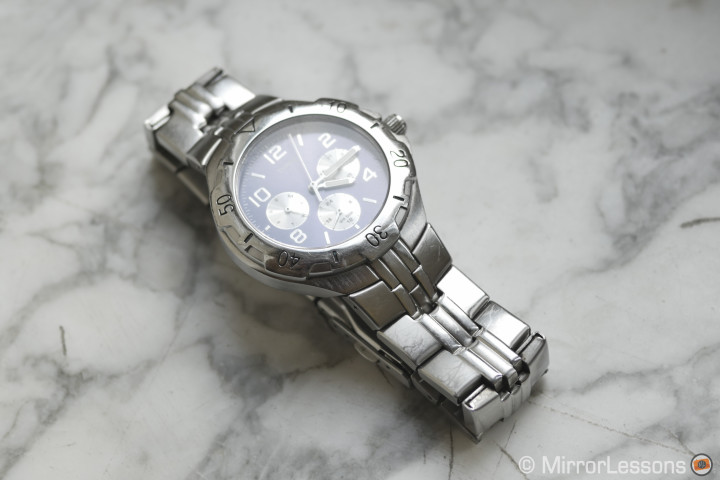
During our visit to Photokina, there were some grabbed 4K frames printed at 30 x 20 and while they look good from a distance, you could also see some limitations up close.
I’ve also heard feedback from photographers who use this function for weddings for example. Instead of taking photos, they shoot 4k for the most important moments like the ring exchange. Certainly photography purists will dislike this kind of feature and I admit myself that I prefer somehow to keep the two things separate. But this is the inevitable evolution of technology and from a technical point of view I can certainly praise Panasonic for what it has achieved. Evolution always brings positive and negative aspects (the same happened when people started to use DSLRs for video). I personally believe that any new technology can be of benefit if used within reason.
I think that professional photographers who use 4k video do it simply because they see a benefit for themselves and their clients, which is more than fair. However it isn’t a function that can replace a proper still image and the expert timing of the photographer taking it.
Autofocus, audio and battery life
The GH4 works really well in AF-C, making it one of the most trustworthy cameras around for recording video with this function activated. I honestly don’t use it a lot as I prefer to manually focus (a habit I’ve had since I started to work in the audiovisual business). But on many occasions I got impressively constant results with both Lumix and M.Zuiko lenses. Of course if you want a smooth transition between one focal point and another, the only option is to operate manually. The AF-C can be really quick for changing focus points but can also hesitate sometimes and hunt for a few seconds before locking. In low light it is less effective.
The GH4 allows you to manually set the Mic level. They’ve now integrated a dB unit instead of a less precise scale, and there is a microphone input port and a headphone output. This type of camera has very small preamps so if you are shooting a video where sound is really important, an external recording unit might be more appropriate but for quick interviews with an external microphone the camera will be fine.
Earlier reports about the GH4 highlighted a problem with audio recording where a low buzz was present. It would occur with the internal microphone and when an external microphone was connected but turned off. I noticed the same thing on my camera but I didn’t find it to be a big problem. If you record in a normal environment (a street for example) with either an external microphone or the built-in mic of the GH4, you won’t notice it. The same goes if you are doing an interview and the microphone is sufficiently close to the person speaking–you simply won’t notice it. This “buzz” is simply an electric buzz probably generated by the internal chip and electric components of the camera.
As for battery life, the GH4, like its predecessor, lasts a long time. It doesn’t reach the longevity of the GH3 because, using the same batteries, the GH4 consumes more power due to the faster processor, 4K recording, and the higher screen and EVF resolution. But the battery life is still more than decent. For video I can recommend that you use two–they will easily last the entire day.
The YAGH interface and recording options
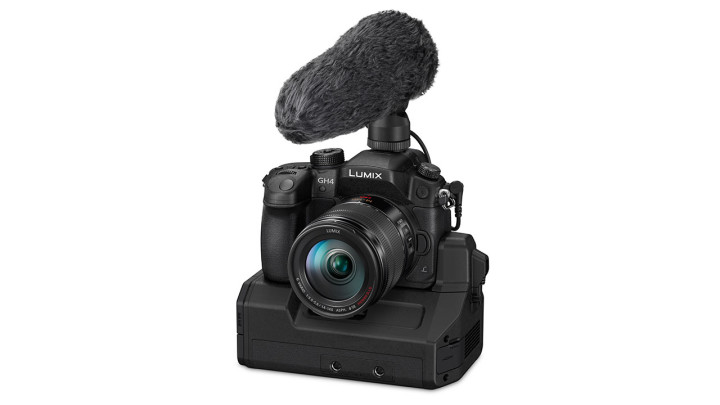
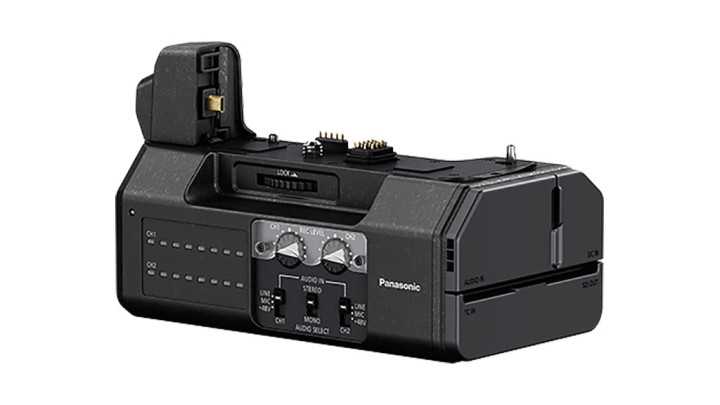
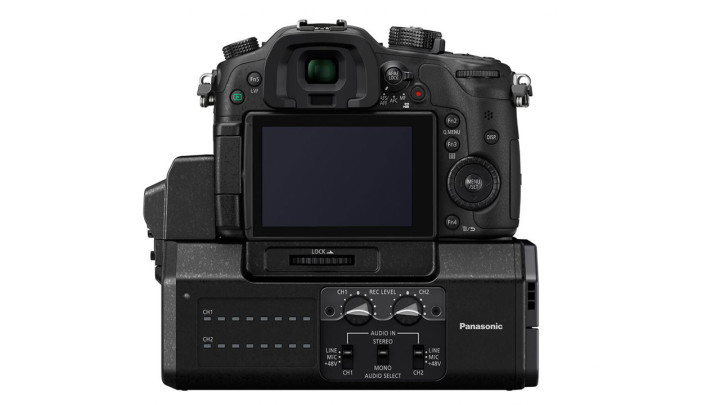
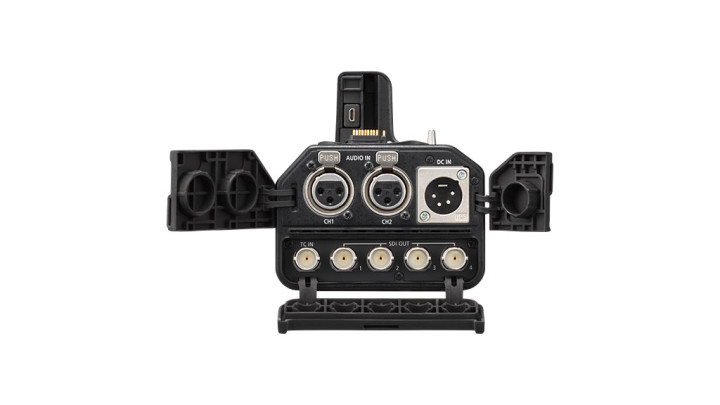
For the most demanding filmmakers and video production companies, Panasonic overcomes the limits of a smaller body by designing a complementary module (sold separately) that adds professional audio connections (XLR) and uncompressed video signal output with 3G-SDI connections. The module can be mounted below the camera and doesn’t have internal batteries, meaning that you will need power or an adaptor to use broadcast batteries in order to operate it in the field, which is not very comfortable. The YAGH interface has been designed more for Multicam and studio work where having landline power isn’t an issue. This interface also limits the use of accessories like rod support, so it doesn’t seem like a comfortable carrying solution. Its price is also higher than the GH4 itself.
I personally find it a shame that Panasonic didn’t include a smaller version just for audio that could provide XLR inputs and phantom power to its users at a much cheaper cost. Amongst all the features the YAGH interface has, audio is the most important and I am sure that documentary filmmakers for example would have appreciated a smaller and more portable version for audio.
You can also amplify the recording options of the GH4 through the mini HDMI port. The GH4 gives you the ability to output a video signal in 8bit or 10bit in 4:2:2 (selectable from the menu) using an external recorder like the Atoms Ninja. The GH4 is the first camera of this league to have 10 bit 4:2:2 capabilities. 10 bit instead of 8 simply means that the video signal is less compressed. This can be of interest to filmmakers who like to spend lots of time colour grading their footage or applying special effects to it. The better the quality of your file, the easier it is to work with it. If you don’t have this kind of necessity however, the internal recording of the GH4 is more than fine for most situations.
Conclusion
Six years ago, Canon launched a camera that changed the market for independent filmmakers, and Panasonic, more than any other brand, has been the most interesting competitor and driver of constant evolution in the digital recording sphere. With the Lumix GH4, I think that Panasonic has taken this evolution a step further. Its many recording format options (perhaps too many) gives the user extreme versatility if you know how to use them properly. If you think of the GH4 not only as a 4k camera but also as a stunning Full HD camera, you get a product capable of giving you extra resolution and crop options, slow motion and a superb codec with less compression at a very attractive price.
My conclusion about the image quality is not that different from the one I wrote in the GH4 stills review. The camera can simply deliver stunning images. It does suffer in low light where high ISO can produce too much noise and less detail. But that aside, there is no reason why this camera cannot become your best friend if you are an independent filmmaker. That is, if you don’t own it already! 🙂
 What I like about the Panasonic GH4 for video
- Nice image quality in 4k, superb in Full HD
- True slow motion at 96fps
- The most versatile MILC for video
- Good performance with AF-C with good light
- Good battery life
 What I don’t like about the Panasonic GH4 for video
- A loss of detail at high ISO.
- There are perhaps too many recording options, which can confuse a beginner.
- Given the bitrate capabilities, I would have expected a higher frame rate option for slow motion.
- European models don’t display the total amount of time left on the memory card.
- The YAGH interface option is very expensive. A smaller version for audio only would have been much appreciated.


