Five months have passed since my first review of the OM-D E-M5 mark II. I had the chance to test it before its official announcement and as such, I decided to concentrate on the many new features that camera has to offer. Being among the first to review a new product has its obvious advantages, but it is nice to come back to it a second time to check other aspects I didn’t have time to test in the first place. It is also an opportunity to reconsider one’s first impressions after reading feedback from other users. Indeed, it is something we’d like to do with every camera we test here at MirrorLessons.
When Olympus sent us the new 8mm and 7-14mm Pro lenses, I asked if an E-M5 II was available so that I could use it during my three-week trip to Canada. Using it regularly like it was my own camera while concentrating on other things (i.e. the two new lenses) was an excellent way to give it a second evaluation.
In the first chapter, I wrote about the design/ergonomics, the new High Res Mode, the improved 5-axis stabilisation and video mode. You can also read our E-M5 II vs E-M1 comparison. In this second chapter, I will add some extra thoughts about topics I’ve already covered, mention the more relevant differences between the mark II and the first E-M5, and concentrate on other things such as overall image quality, autofocus performance and the overall feel of using it for the second time.


Olympus OM-D E-M5 mark II Main Specs
- Sensor: 16 megapixel Micro Four Thirds Live Mos
- Lens system: micro four thirds
- Weatherproof: Yes (Splash, dust and freeze proof down to -10°C)
- Internal Stabilisation: Yes (5-axis)
- Autofocus: Contrast detection AF with 81 autofocus areas
- Continuous shooting: 10 fps (AF-S), 5 fps (AF-C)
- ISO Sensitivity: 200 – 25600 ISO (extended 100)
- Shutter Speeds: 1/8000s to 60 seconds, 1/16000s with electronic shutter
- Viewfinder: XGA OLED electronic viewfinder with 2,360k dots, approx. 100% FOV coverage and 1.48x magnification
- LCD Screen: flipping/rotating 3″ LCD monitor (1037k dots) with touch controls
- Movie recording: ALL-I and IPB compressions up to 77mbps, 24fps to 60fps, slow motion, Movie Clips
- Built-in Flash: No (external FL-LM3 included)
- Extra Features: High Res Shot, Timelapse, HDR, Multiple exposure, Wifi
- Dimensions: 123.7 x 85 x 38mm
- Weight: 496g (including battery and memory card)
[toc heading_levels=”3″]
The perfect design for small lenses
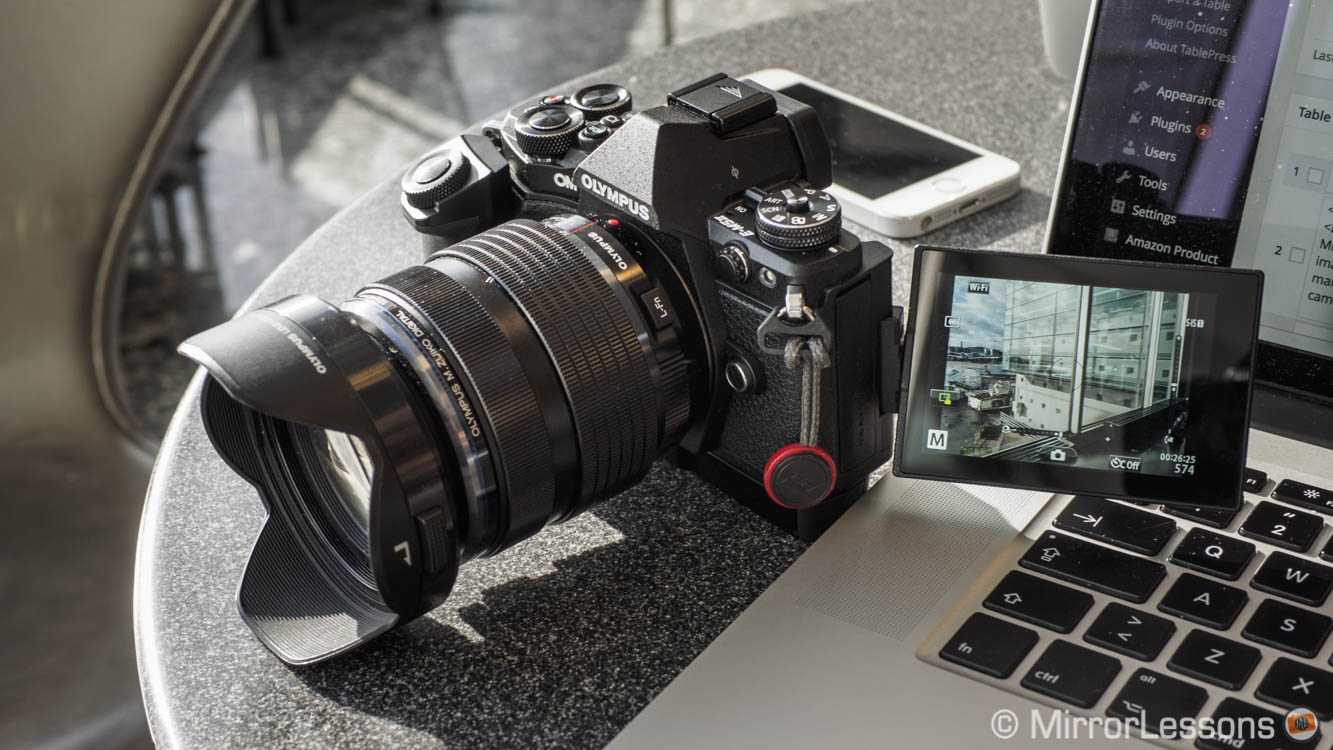
In Canada I used the Olympus OM-D E-M5 II with the new 7-14mm f/2.8 most of the time. It is a great combo and a good example of the maximum lens weight/bulk this camera can handle, unless you want to consider the optional landscape grip. (For me, the vertical grip isn’t really an option because I prefer to keep my kit as small as possible.) The grip is good but with bigger lenses you definitely miss a more prominent grip on the front.
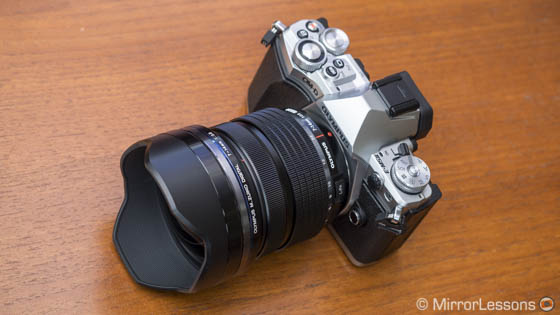
When I compared the 7-14mm f/2.8 to the Panasonic competitor f/4, I realised how much of a better match the latter was for the E-M5 II’s design.
It was a more balanced and lightweight combo. It reminded me how great this system can be with small lenses. I also used the compact 25mm f/1.4, and of course the new 8mm fisheye lens which is small and compact as well.
Perhaps I am too accustomed to the ergonomics of the OM-D E-M1 but if I were to purchase the E-M5 II, I would use it with a set of small zooms or primes. It would bring me back to the days when all I used to shoot with were the original E-M5, the 12mm f/2 and 45mm f/1.8.
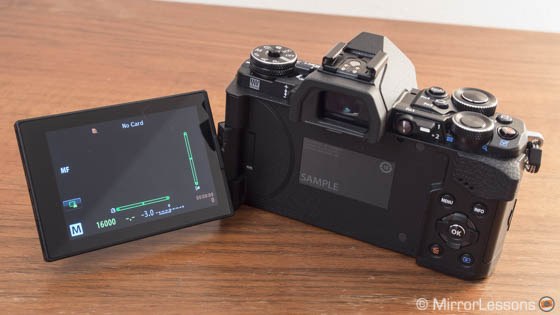
Another note is about the articulated LCD screen. I admit I have a love/hate relationship with it. There is nothing wrong with the one on the E-M5 II, but most of the time I prefer the classic tilting LCD screen for stills. I found myself having to turn and twist it every which way depending on the shot I wanted, while with the other one you just tilt it up or down. It isn’t a big deal of course, and it is true that it is more convenient for video.
As for the dials and button layout, I have nothing more to add. They are cleverly designed, work fine, are solid and the touch sensitive functions are great. You can’t really ask for anything more.
OMD E-M5 vs OM-D E-M5 mark II: ergonomics
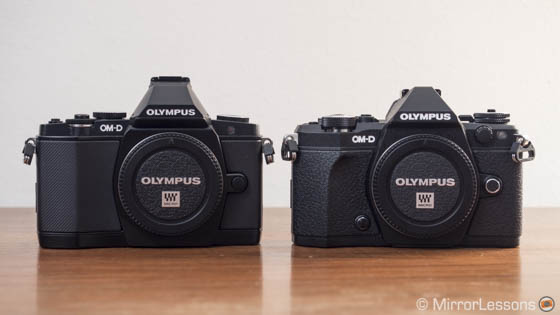
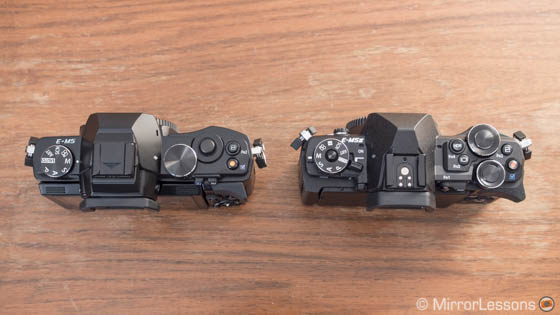
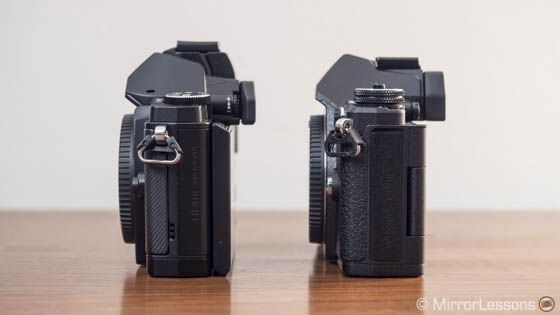
The improvements over the original E-M5 are many as far as ergonomics are concerned:
- The mark II is freeze proof in addition to being weather sealed against dust and water
- More solid and precise buttons, thicker dials
- The on/off switch has been moved on top of the camera
- The mode dial on top has a lock button at the centre
- Larger viewfinder with more resolution and faster refresh rate
- The LCD screen is also sharper with more resolution and of course can be flipped to the side instead of only being tilted
- More function buttons including one on the front and the lever on the rear
- Microphone input
Image Quality: Micro Four Thirds keeps pace
My trip to Canada was actually the third time I used the E-M5 mark II. The second opportunity came during the official launch event in Prague held by Olympus Europe. Of course it was a promotional event but they managed to create some interesting scenes to photograph, much like the Castle Leslie event two years ago for the E-M1 launch. I must admit that the company really knows how to create interesting press events.
Prague was a simple confirmation of everything good about the camera that I had revealed in the first chapter of my review. The 5-axis stabilisation is by far my favourite feature. The E-M5 mark II allows you to reduce your shutter speed like no other camera. Even with a telephoto lens like the 75mm f/1.8, it proves very effective.

The image quality is on par with the E-M10 and E-M1. If there are some differences, there are minimal. The sensor works very well. Every time I read articles by users who dislike the Micro Four Thirds sensor, I always wonder how well the camera has been tested. Of course I don’t deny that a larger sensor has its advantages. I test many cameras and many lenses and I know the difference. But when I go back to using the E-M1, the LX100 or a new MFT camera, I am always surprised by how versatile the sensor is from an image quality point of view.

I have often talked about the capabilities of Olympus cameras when it comes to colours, dynamic range and low light performance. The Olympus colours are among my favourite in the mirrorless realm, along with Fujifilm and Leica. They are natural and vibrant and although they inevitably have a digital look, they never feel artificial.

As for dynamic range, my conclusion is always the same: it is excellent but you need to pay more attention to the highlights than the shadows. This is true with every digital camera but certainly the Micro Four Thirds sensor is a little bit weaker in the highlights.
Quick tip
I usually set metering to Centre-Weight and expose properly or under-expose by 1/3 to be sure. Another good solution is to use the histogram and expose towards the right without reaching the limit. That way you can record as much information as possible but you won’t clip the highlights.

As for low light, to me the images look usable up to 6400 ISO. Of course it is always better to work with the Raw files. Regarding this topic, I can also mention something that might prove useful to many Olympus users.
Wedding photographer Luca Bertolaso shared some interesting settings for those who use Adobe Lightroom in the “Olympus OM-D Italia” Facebook group.
He also wrote a dedicated post in the Micro43 forum community that you can read here. Luca uses the E-M1 but his settings can be applied to all OM-D cameras. They are also a starting point: you can edit them according to your own personal taste and the camera you own. Luca says that for the original E-M5 for example you don’t have to tweak the colours as much. I tried his settings myself not only with the new E-M5 mark II but also some older files including a few wedding shots taken with the E-M1. They do an excellent job at reducing noise without eliminating too much detail.
E-M5 II, 1/60, f/ 4, ISO 6400 – Before: Default Lightroom settings, After: Luca’s settings. You can also compare the two crop versions by visiting the links here (before) and here (after).
[twentytwenty]


[/twentytwenty]
[twentytwenty]


[/twentytwenty]
You might like/dislike these settings but my point here is that you never know how well a camera can perform until you take advantage of every little instrument you have at your disposal. Looking at and listening to what others do or suggest can be very informative as well.
Another option worth looking into are the Huelight Camera Profiles made by Colin Walker. They offer an alternative to the Adobe Standard and Olympus profiles you can find in Camera RAW/Lightroom. I’ve mentioned them before in several of my camera reviews. With the E-M5 mark II, they tend to give less contrast and saturation than the Olympus natural or vivid profiles. Personally I find them very interesting for low-light shots especially when I want to preserve colour details in the highlights as shown in the example below.
E-M5 II, 1/60, f/ 1.8, ISO 3200 – Before: Adobe Standard, After: Camera Natural
[twentytwenty]


[/twentytwenty]
E-M5 II, 1/60, f/ 1.8, ISO 3200 – Before: Adobe Standard, After: Hulight Low V100
[twentytwenty]


[/twentytwenty]
OMD E-M5 vs OM-D E-M5 mark II: image quality
To me one of the only differences between the two E-M5s has to do with high ISO performance. The E-M5 mark II retains more detail and has less colour shift from 6400 ISO upward than the original E-M5.
High Res Shot: further considerations
Fellow photographer Mike Hendren shared some interesting thoughts in our Google+ community about the High Res Shot shifting capabilities of the E-M5 II. I quote below:
As I thought about this process of moving the sensor to capture 8 images, some only moved by ½ pixel, I began to try and imagine just how small those movements must be. Olympus executive, Setsuya Kataoka, stated that the sensor is moved just 0.0002mm for the half pixel moves (my math works out different, but lets use his numbers). A sheet of paper averages about 0.1mm in thickness. This means that the E-M5II process must precisely move the sensor approximately 1/500th of the thickness of a sheet of paper, and it has to do this 8 times in as little as one second. An incredible feat, I think!


The High Res shot feature introduced on the E-M5 mark II is certainly an exciting technology. To be able to take 40 or 64 megapixel shots with a Four Thirds sensor is an interesting option and also improves the image quality (better colour rendering) even when downsampled to 16MP (the original size of the sensor). In the first chapter I showed you what the limits of this technology are: since the camera takes 8 shots in a row and then merges them together, any small movements during this operation will result in a loss of detail.
In a real world situation, I found this function more limiting that I had thought initially.
Even a slight breeze that makes the leaves rustle is enough to cause a considerable loss in detail, so there won’t be many occasions where you can really take advantage of this function, unless we are talking about studio work with still objects. For landscape photography, water, wind and clouds are the enemy. While you can fix the clouds more easily with a little help from Photoshop, leaves and other elements are more difficult.


There can also be a loss of sharpness even when something appears to be dead still but actually isn’t. In the example below, I had my tripod and the E-M5 II with the 60mm macro set to capture the butterfly. It looked absolutely and perfectly still. I set a delay of 4s for the HRS function so that I wouldn’t risk having involuntary micro shakes when I pressed the shutter release button. However the result is not 100% perfect because the butterfly was probably moving even though it seemed perfectly still to my eyes.


The HRS is limited to 1600 ISO. I took a quick test shot at that sensitivity that you can see below. The result is very clean and of course very sharp. You can also change the noise reduction setting but it will only affect the JPGs. Applying less NR will give you a sharper JPG and the amount of noise at 1600 is acceptable.


I was also curious to see what differences I would find with a large print between the HRS shot (64mp from Raw) and the 16mp version. I ordered two 16×12 inch prints of the same exact photograph. The two files were post-processed in the same way. No surprises here: more megapixels result in sharper details. While you will only notice it clearly when looking at the prints closely, you still have the feeling that the 16MP version is softer. So certainly for large prints (even larger than 16×12), it is an advantage.

Quick tip: the hidden ORI file
When using the HRS, the camera saves two Raw files (ORF and ORI). The ORI is a 16mp version of your shot and corresponds to the first of the 8 frames the camera merges in the high res picture. ORI files can’t be opened by Lightroom or Camera Raw but there is a simple trick: change the extension from ORI to ORF and Lightroom will accept it as a normal file. However beware if you import your files directly from your SD card to Lightroom: since the software won’t recognise the ORI files, it won’t import them. You have to manually transfer them from the SD card.
Quick tip: processing the 64mp RAW file
The latest version of Adobe Lightroom and Camera Raw can open the High Res shot Raw files. However they can’t keep up with all the details and sharpness the file possesses. I tried to post-process them like I do the normal 16MP files but the output isn’t as sharp. So the best way to deal with the Raw 64mp file is through the Olympus plugin designed for Photoshop.
Before: Camera Raw rendering, After: Olympus plugin rendering
[twentytwenty]


[/twentytwenty]
However the plugin doesn’t offer much in terms of settings and the exposure/DR is limited to +-2Ev. You can also use Olympus Viewer 3 to open the files (version 1.5.0) but you cannot edit them. Personally I don’t like the Olympus software that much because it is slower and less powerful than the Adobe software.

Finally, for those who like to admire lots of pixels strung together, the image below is a panorama I stitched with 8 different HRS images. It is 64MP x 8 with some minor cropping and adjusting, so you are actually looking at a 300 million pixel photograph of Turin, its Mole Antonelliana and the Alps in the background. Click on it to access the full-sized version on Flickr!

Autofocus: is the E-M1 still better?
In the first review of the camera, I don’t talk about the autofocus performance at all, but of course it is a relevant chapter. The E-M5 mark II inherits the same autofocus system as the E-M10, which is based on the one found on the E-M1 as far as contrast detection technology is concerned. The E-M5 II lacks phase detection AF which makes it less fast with Four Thirds lenses. But is it also less effective with M4/3 lenses?
In AF single mode, I didn’t see any relevant differences. I can only say it is fast and among the most reliable AF systems on the mirrorless market. The only limit I found has to do with specular highlights in the background that can confuse the AF system but it is something that I noticed on the E-M1 as well. There is a slight improvement in low light as long as I set the smallest AF points (which I do with all the OM-D cameras). The example below is a good one: low-light and the subject is behind out-of-focus pipes and other machines (we were in an abandoned factory). The camera nailed it perfectly in all the shots I took from this angle. Heather didn’t have any problems either while using the camera for the The Retrievers concert we shot in Toronto.


I’ve often seen original E-M5 users say that the AF is good in single mode but isn’t in continuous or tracking mode. While the E-M1 is a significant improvement because of its phase detection sensor, I never found the original E-M5 that bad. It wasn’t perfect but I always managed even in difficult situations. With the E-M5 mark II, Olympus states that there has been an improvement in the AF algorithm so I decided to jump at a good opportunity to put both the AF-C and AF tracking to the test. Luckily for me, the Persechini Easter Seals marathon was on while we were staying in the town of Newmarket. The only telephoto I had with me was the compact 75mm f/1.8 and that’s the one I used for the shots above.

The best combination for this kind of sport is Continuous AF, the smallest AF point and the low burst mode that provides a decent 5fps of continuous shooting speed. If I set the burst mode to high (10fps), the camera will lock the focus on the first frame. With this combination the camera did really well and the percentage of out of focus images was around 10/15%.

It is a shame that the few times it didn’t lock properly is when the girl smiled and gave me the peace sign. The photo below is the best I got while the others that came after were focused on the background.

Of course with one single AF point you have to make sure to be very precise with your tracking. You can also try the Group Target option (the cameras chooses the best AF point within the 9 available in the group). It works but I find it less precise than the smallest single point. The ALL-Target mode (the camera chooses from the 81 areas) is less reliable. Below you can see an entire sequence shot in Low burst, C-AF and single/smallest AF point.
Using AF tracking is your third best solution, as the camera can track your subject according to its colour and contrast. However more than once the E-M5 mark II confused the runner with another behind him or insisted on focusing on the background instead, especially for those wearing a green t-shirt. A lot of runners wearing different colours with green grass behind them can confuse the camera. I did obtain a good series of shots but the hit rate was lower at around 70%.

OMD E-M5 vs OM-D E-M5 mark II: autofocus:
The E-M5 mark II has more AF points (81 instead of 35) and an updated algorithm for continuous AF. In single mode the performance is similar but I can see an overall improvement for both S-AF and C-AF. The various options including face and eye detection are the same on both cameras.
Video mode: what can be improved
The improvement in video capabilities was something Olympus users had been awaiting for quite some time. The E-M5 mark II offers a good series of settings that improve on the previous OM-D series especially if we take into account the 5-axis stabilisation that makes your footage almost as good as steadicam shots.
I used the camera for a few hands-on videos about other products while I was in Canada and I found it very comfortable to use for this type of application. I even listed the camera on my best mirrorless camera for video list because I think that the stabilisation can make a difference with for certain jobs. However there is still a lot to be done in my opinion before it can begin to rival the direct competitor Panasonic.
From an image quality point of view, aliasing and moiré can be quite present as shown in my first review and videos taken with the camera. Moiré is not something you can get rid of easily. It can be more or less an issue depending on the kind of shots you record but it is definitely worth mentioning. Also, it would be nice to have dedicate picture profiles for video. 4K is also an option that should be considered for further releases.

OMD E-M5 vs OM-D E-M5 mark II: video:
The E-M5 mark II brings several improvements listed below:
- All-I compression up to 77mbps
- 24, 25, 50 and 60fps
- 5-axis stabilisation also for video
- timecode
- audio phantom Power
- audio meters on screen
The next OM-D: what to expect
I have no idea what the next release will be, so this is all supposition on my behalf. I think we will see another camera this year. At the end of last summer, they released the E-PL7 so it could be the successor to the E-P5 that inherits some if not all the new features of the E-M5 mark II. (Let’s not forget that OM-D and Pen cameras are two separate markets.) Plus, lately there have been some rumours about a possible E-M10 mark II.
I am sure there is an E-M1 successor in the works but it could be for next year. I see two solutions for an E-M1 mark II or E-M2. First, I am guessing it will have the same features as the E-M5 mark II (better video, high res shot, same stabilisation hardware) and perhaps an updated phase detection system. It could also have a brand new sensor (more megapixels?) and a few features of its own. Personally, I wouldn’t mind a brand new sensor as it would make the camera a more relevant flagship model.
The OM-D E-M5 mark II as a travel camera

Of many genres this camera can suit, travel photography is its best application in my opinion. Nearly all its features can come in handy at one point or another during a trip. The excellent 5-axis stabilisation allows you to take shots inside a building where tripods aren’t allowed or you simply don’t want to be intrusive, and you can use the optimal settings (closed aperture, low ISO). If you don’t want to be heard, you just use the silent shutter. The camera doesn’t really lack anything.
I even found a good opportunity to use the Wifi functionalities. By remotely controlling it using the iOS app on my iPhone, I took this family photo after setting the camera up on the tripod. (Nobody was around to take the picture for us.) I didn’t even have to bother with self timer because I was able to check my composition on my smartphone screen!

 What I like about the OM-D E-M5 mark II:
- The best stabilisation system of any camera I’ve ever tested
- Excellent image quality
- Features such as the High Res shot and Live Composite/Time make it one of the most advanced Micro Four Thirds camera around
- Beautiful design and easy to use button layout
 What I don’t like about the OM-D E-M5 mark II:
- Moiré and aliasing for video can be quite significant
- With larger lenses, you need the optional landscape grip
