Though I was excited to review the Panasonic GX8 for many reasons – not least because it is the successor to one of my favourite mirrorless cameras, the GX7 – the main pull for me as a macro photography enthusiast was the enhanced 4K Photo mode.
4K Photo first appeared in its rudimentary form on the LX100 and subsequently the GH4 and FZ1000 via a firmware update. It allows you to extract 8MP stills from 4K footage in-camera with the option of 3:2, 1:1, 4:3 or 16:9 aspect ratios.
By the time the G7 appeared earlier this year, the mode had been expanded to include three different options:
- 4K Burst: 4K Burst is the standard 4K Photo mode. It allows you to shoot up to 29 minutes and 59 seconds of 4K footage at 30fps. You must hold down the shutter button to record.
- 4K Start/Stop: Essentially the same as 4K Burst except that you start recording by pressing the shutter button, and stop recording by pressing it a second time as you normally would when recording video. Good for lengthy shots.
- 4K Pre-Burst: 4K Pre-Burst records 30 shots before and after you press the shutter button, giving you a total of 60 frames. Good for precise moments when the action is fleeting.
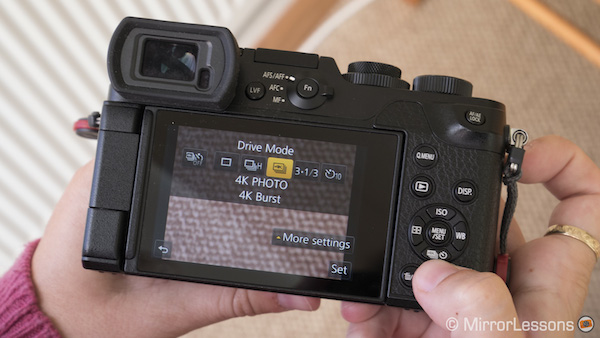
Panasonic placed so much importance on this new mode that it was even allotted its own dedicated dial on the left-hand side of the G7. Though it was relegated to the burst menu on the GX8, accessible via the down button on the 4-way pad, it is still very much the star feature for still shooting on Panasonic’s newest models.
4K Photo vs. 4K Video Footage
You may be asking: why do we need a dedicated 4K Photo mode if we can simply extract stills from 4K video footage? Well, there are two main reasons if extracting stills is your ultimate goal.

First, there is the topic of aspect ratios. While the standard aspect ratio for shooting video is 16:9, most stills are captured as 3:2, 4:3 and 1:1. 4K Photo makes it possible to shoot 4K footage at any of the aforementioned aspect ratios.
Then we have the advantage of the “loop mode” found in the 4K Photo menu. With this mode enabled, the camera will save only the five newest 2-minute video clips (10 minutes in total), erasing any footage that came before. This means that you can take hours of 4K footage without wasting space on your memory card. I personally don’t use it all that much, as I tend to choose my shots right away and delete the clip after I’m finished with it, but I can see it being useful if you’d rather not manually delete the redundant clips. Keep in mind that if there is an 8MP still you want to save from your existing footage, you must do it before the camera overwrites it with new footage.

How to use 4K Photo on the GX8
You can access the 4K Photo menu from down button on the 4-way control pad. It is the third option after Single and H Burst.

- Select one of the three modes, make sure you’ve already chosen your preferred aspect ratio, and press the shutter button when you’re ready to record.

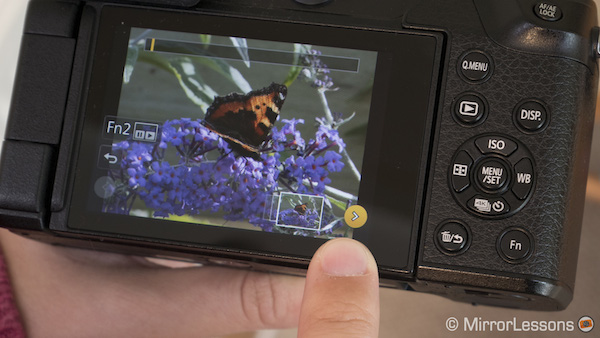
- Once you’ve recorded your clip, enter playback mode and press the 4K Photo button on-screen or select it using the up button on the 4-way pad. Then, skim through the photos by either sliding your finger back and forth along the screen or using the left and right buttons on the control pad.

- The camera only shows you 30 frames at a time, so to see the next batch, you have to press the yellow arrow button on-screen or use the Menu/Set button.

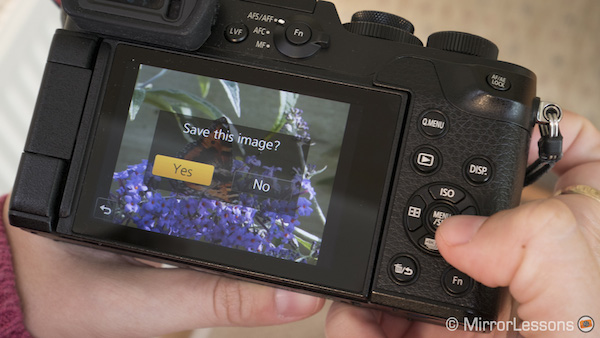
- Once you’ve found an image you like, simply save it by pressing the Menu/Set button. The image will save as an 8MP JPG. You can save as many images as you like from the clip, and you can go back to extract more images from the clip at any time as long as it’s still on the memory card.

Keep in mind that the GX8 uses an electronic shutter in 4K Photo mode so you might end up with some rolling shutter.
It is also worth mentioning that Dual IS and in-body stabilisation do not work in 4K Photo mode. The only kind of stabilisation to which you’ll have access is optical stabilisation with qualifying Lumix lenses. Given that many of the images used in this article were taken with the M.Zuiko 60mm f/2.8 macro, I would say that stabilisation isn’t essential, especially at these very fast shutter speeds.
Why 4K Photo for Insects?

4K Photo is useful for any application that involves quick movements or fast action, including sports, wildlife and macro photography of insects flying, taking off or landing. It increases your chances of capturing that “golden moment” because you have the possibility to shoot for a longer period of time (29 min and 59 sec) at 30 shots per second.

Now, it’s true that today’s mirrorless cameras all have fairly quick burst modes – the GX8 can capture full resolution Raw/JPG files up to 8fps in S-AF for example – but there are a couple of disadvantages compared to 4K Photo.
The first, and most obvious, is that you have fewer shots per second of shooting. Second, the shooting speed in burst mode slows down after the initial burst on most cameras.
Sure, you can’t shoot in Raw format or use flash with 4K Photo but it can work very well in good natural light as long as you nail your exposure.
Tips and Tricks

For photography of insects in flight, I find it best to use 4K Start/Stop, especially if you want to capture specific and unpredictable instances such as the moment an insect lands or takes off. As I mentioned above, this mode is the equivalent of shooting a video; it lets you shoot continuously for nearly 30 minutes without having to hold down the shutter button while you record.
For different kinds of “action” photography, you may find that the other modes suit your needs better. For example, if you wanted to capture the precise moment your child blows out the candles on his or her birthday cake, you may prefer Pre-Burst. Not only does it take a shorter clip but it also takes 30 frames before you press the shutter button, just in case you react too slowly.
(On a humorous note, I also find 4K Burst quite useful for insects when I want to scare them into flying off. When the silent mode is turned to OFF, the electronic shutter makes such a noise that they soon fly away to escape the racket!)

Your settings will ultimately depend on the amount of available light and the position of your subject with respect to the light. It goes without saying that the more well-lit your subject is, the better.

On a very sunny day, I find the following settings ideal on the GX8:
Shutter speed:
- Between 1/1000 and 1/2000 for bees and insects that hover around flowers
- At least 1/2500 for butterflies, dragonflies or flies taking off and landing
Aperture:
Try to keep it as closed as possible to increase your depth of field. When an insect lands or takes off, it may move behind or in front of your focus point. The more depth of field you have, the higher your chance of keeping the insect in focus.
In very good light, you may be lucky enough to use apertures as slow as f/8 whereas in poorer light, even f/2.8 may not be enough.
ISO sensitivity:
To capture insects in flight, you may as well forget about using lower ISO sensitivities such as 200 or 400 because you’ll have to use apertures and shutter speeds that are too slow.
I find ISO 800 to be the best compromise, though I have used 1000, 1250 and 1600 in dire situations. By ISO 3200, the loss in detail is too severe to capture the very fine details on an insect’s body. The example below taken at ISO 3200, 1/4000 and f/5 shows more noise and less detail. This is partly due to the compression of the JPG, which has been extracted from an already compressed 4K video file.
That said, my feeling is that it is always better to have an in-focus shot at a slightly higher ISO sensitivity than a blurry shot at a lower ISO.
C-AF or MF:
S-AF works well but I find C-AF more appropriate if the insect is actively moving around before it takes off (although it sometimes takes the GX8 a moment to refocus on the subject). You can also use MF to pre-focus on the area of the frame where you think the insect will fly but this method is much more hit-and-miss. In Pre-Burst mode, be aware that you cannot focus by half pressing the shutter release button as you normally would before recording. The camera will adjust the focus automatically and can be quite slow at times.
Since it is nearly impossible to predict the direction in which an insect will fly, it is better to place some distance between yourself and the insect. This is especially true if the insect has long wings. Ideally, the insect should fill 1/6th to 1/8th of your frame with plenty of space around it. This may mean you have to crop a little in post-production to adjust the composition but it is better than ending up with half of an insect’s wing or abdomen outside of your frame.

You may also notice that the GX8’s battery life, while very good, drains faster when you use 4K Photo than when you shoot normal stills. To preserve the battery life during my trip to the Ynys Hir wildlife reserve where many of these shots were taken, I avoided using the LCD as much as possible and turned off the camera when I wasn’t using it. This allowed me to use the 4K Photo mode for nearly 5 hours with some battery juice to spare.
Conclusion
4K Photo is by far my favourite new feature on the most recent Lumix cameras and many photographers are already achieving amazing results with it. (If you need proof, just check out our interview with digiscoper Tara Tanaka who uses 4K Photo on the GH4 for her bird photography!)
To tell the truth, though, I believe that many photographers are awaiting the arrival of 8K. While the resolution and compression of the 8MP files are good for web usage and small prints, 8K (about 33MP) could easily be the proverbial straw that breaks the camel’s back for many sports, wildlife and macro photographers considering the switch over from DSLRs. Plus, the fact that lenses like the Lumix 100-400mm f/4.0-6.3 and M.Zuiko 300mm f/4 on the way definitely sweetens the pot.
Speaking strictly as a photographer interested in insects, if I had one wish for future generations of Lumix cameras, it wouldn’t be higher resolution but better high ISO performance.
Being able to use ISO sensitivities as high as 3200, 6400 or even 12800 with minimal loss in quality would make it possible to take full advantage of the GX8’s fastest shutter speeds (1/8000 and 1/16000) and use slower apertures for more depth of field.
Of course, with low-light monsters like the Sony A7s and A7s II currently storming the market, I’m sure it is only a matter of time before we see an improved ISO performance on Micro Four Thirds sensors. All we can do is wait patiently for that day to come!

