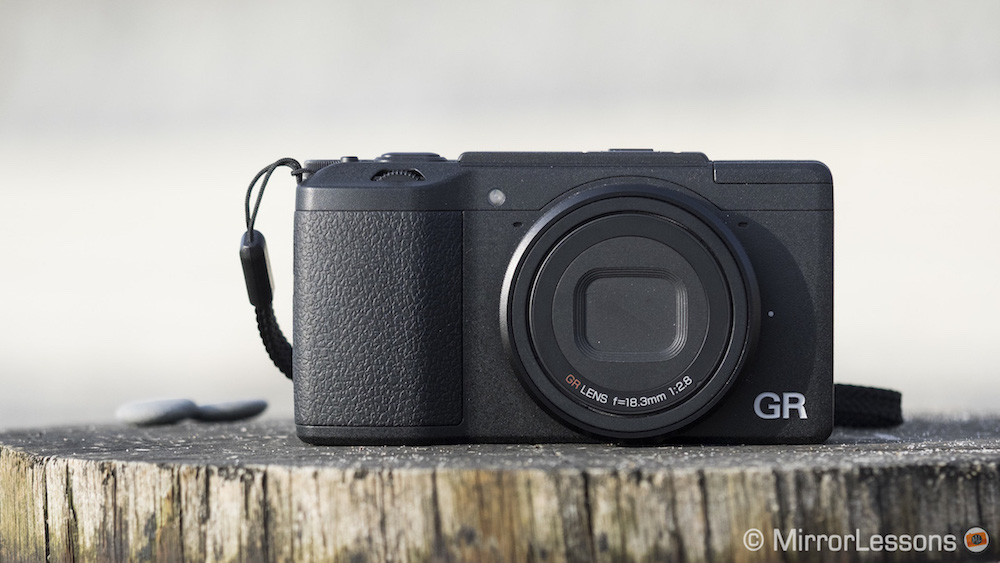
As many of you know, Mat and I recently conducted an in-depth comparison between the Fujifilm X70 and the Ricoh GR II. Since the comparison was preceded by a full review about the former, it only seemed right to wrap up our time with these two premium compacts by sharing our thoughts about the latter as well.
Since I only had two weeks with the GR II, this review will not be quite as in-depth as some others you will find on MirrorLessons or other websites run by long-time GR users such as Olivier Duong or Eric Kim. However, I do feel we’ve developed a good sense of why it has become such a popular model for street photography, travel and more.


- Sensor: 16 MP CMOS
- Lens system: 18.3mm (28mm equivalent in 35mm format)
- Weatherproof: No
- Internal Stabilisation: None
- Autofocus: Contrast detection AF with 9 areas
- Continuous shooting: 4 fps
- ISO Sensitivity: 100 – 25600 ISO
- Shutter Speeds: 1/4000 to 300 seconds
- Viewfinder: None
- LCD Screen: fixed 3″ LCD monitor (1,230k dots)
- Movie recording: Full HD up to 30fps
- Built-in Flash: Yes
- Extra Features: WiFi, NFC, bracketing, interval shooting, multiple exposure, Interval composite
- Dimensions: 63 x 117 x 34.7mm
- Weight: 251g (including battery and memory card)
[toc heading_levels=”3″]
Design, Ergonomics and Ease of Use
The Ricoh GR II has hardly changed from its predecessor in physical terms, save the addition of a flat raised plate on the top for WiFi compatibility.
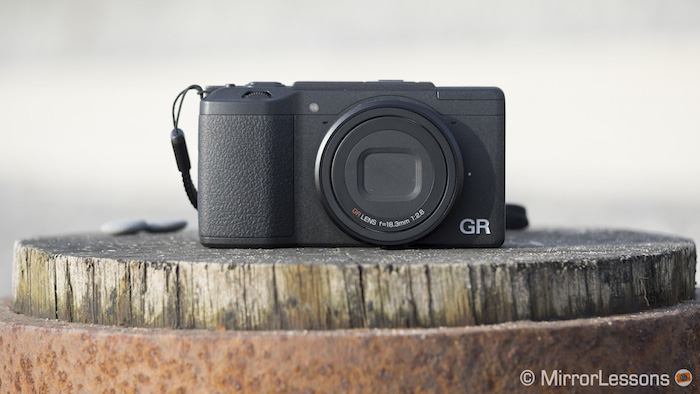
It has a discreet black magnesium alloy body, measuring only 111.7 mm x 61 mm x 34.7 mm and weighing 215 grams with the battery. It is both small and light enough to carry around inside a jacket pocket.
Featuring a rubberised grip on the front and a thumb rest on the rear, it is very comfortable to hold even for long periods of time.
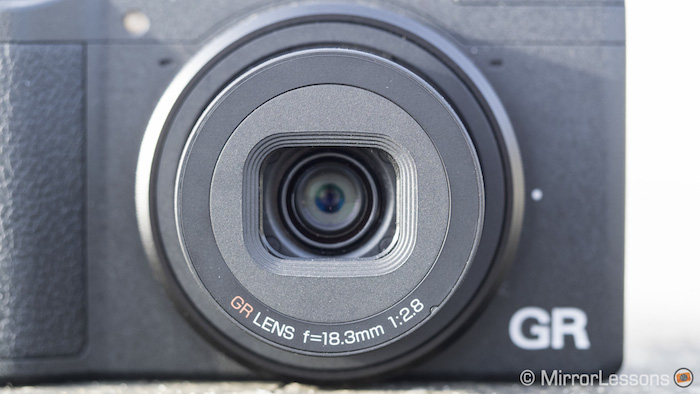
The 18.3mm lens (28mm field of view) is fixed and extends when you turn the camera on much like an ordinary point-and-shoot. It is quite plain, featuring neither an aperture ring nor a focus ring. In the place of a lens cap, there is a lens shield that opens and closes over the front element. You have to buy the GH-3 lens hood separately.
Something I immediately grew to like on the GR II was the layout of the controls on the rear.
For someone coming from any other mirrorless system, it can take some getting used to but overall, I find the positioning of the various buttons, dials and toggles very intuitive.
A good example is the Adj. ISO toggle near the top which, despite its ambiguous name, is very useful if you want to change your settings post-haste. By default, it gives you access to five different settings – ISO Speed, Picture Size, Aspect Ratio, Focus and Exposure Metering – but you can customise them if you wish. To scroll through these settings, all you have to do is push the toggle and jog it left and right with your thumb. If you press left and right without pushing first, the toggle will adjust the ISO value.
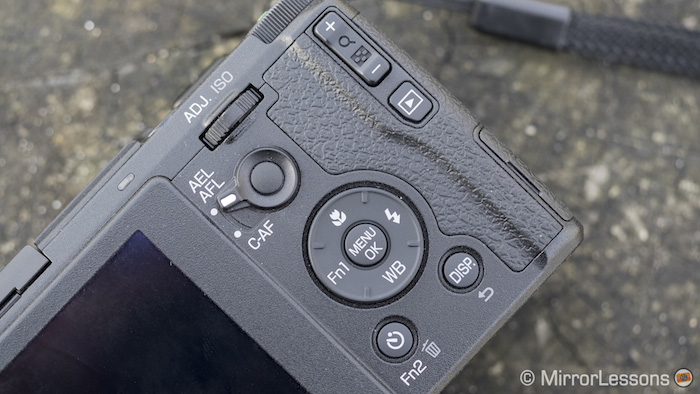
Some other controls I liked were the flat elongated shutter button, the PSAM Mode dial on top with its locking function and the exposure compensation toggle that doubles up as a magnification toggle in playback mode. I also appreciated the placement of the customisable Effects/WiFi button on the right-hand side of the body because it is easy to access with your thumb when you support your camera with your right hand. In addition to this button, there are also two Function buttons you can customise with your favourite settings.
The only thing that let me down in terms of the design was the rear 3-inch LCD panel.
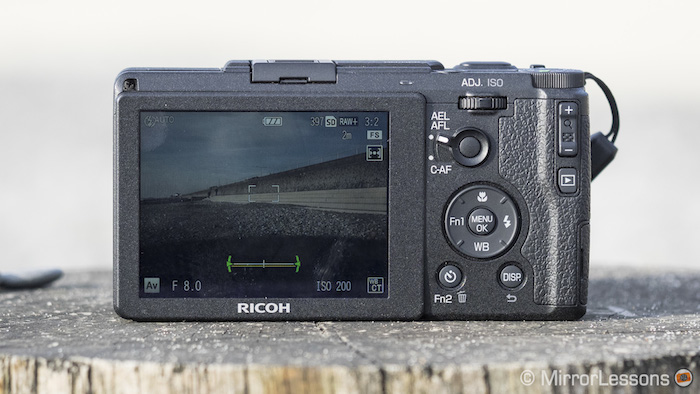
It has 1230k dots of resolution but it doesn’t tilt and isn’t touch sensitive. Why Ricoh didn’t consider this a necessary update to the GR series is a mystery to me, especially since many of today’s mirrorless cameras have at least one of these two functionalities.
It also lacks a viewfinder but I consider this less problematic since leaving one out has allowed the body to be more compact and portable. It is true that some companies have managed to give their compact cameras a viewfinder – think the Sony RX100 IV and the Lumix LX100 – but they tend to be more expensive. If you find yourself in need of a viewfinder, there is always the external GV-1 optical viewfinder which works on any compact camera with a 28mm field of view.
The camera has both a built-in flash with +/-2EV of compensation and a hot shoe to mount accessories.
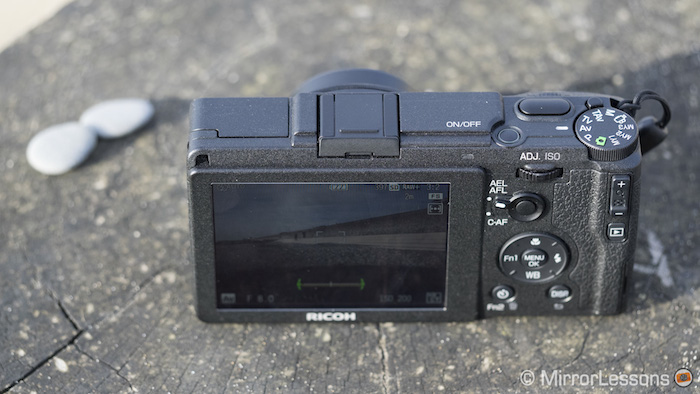
It also has a leaf shutter mechanism that goes up to 1/4000s at f/5.6 and above and 1/2500s from f/2.8 to f/4. It allows for near-silent operation and high speed sync with flash. Since 1/2500s can be limiting in bright sunlight, the camera also comes with a built-in 2-stop ND filter to compensate.
Image Quality – The sensor
The Ricoh GR II, like its predecessor, has a 16MP APS-C Bayer sensor and lacks an anti-aliasing filter, allowing it to resolve a higher level of detail than sensors that have one. It outputs both JPGs and Adobe’s very flexible DNG RAW files.

The files from GR II are some of the sharpest I’ve ever seen from a digital camera and this can be attributed to both the lack of an anti-aliasing filter and the lens, which I’ll discuss later on. The differences become particularly noticeable when you compare the GR II files to those of another brand as I did in my Fujifilm X70 versus GR II comparison.

The dynamic range of the RAW files is good overall, giving you about 2 stops of flexibility in post production. It is about as easy to recover the shadows as it is to bring back details from the highlights. If you push the files too much, you may encounter excessive noise and some colour cast in the shadows, so it is best to get your exposure right in the first place. There is a Dynamic Range Compensation option with Off, Auto, Low, Medium and Strong options that expands the dynamic range of the JPGs.
[twentytwenty]


[/twentytwenty]
I found that the default colours of the GR II files are colder and less saturated than those from other cameras but you can of course change the appearance of the files in post-production.


It comes with two sets of picture profiles. The first consists of Standard or Vivid from the Image menu, plus two customisable options. Second are the Effects profiles, which are natively accessible from the Effects button on the side of the camera. They too only affect the JPGs. By pressing the Fn2 button, you can manually adjust the saturation, contrast, sharpness and vignetting of these profiles.
The two B&W profiles in particular are renowned for their contrast, character and film-like grain and are often used by street photographers for this reason. You can see a small collection of images taken with the the Black & White and Hi-Contrast profiles below.


The GR II has a native ISO range of 100 to 25600, all of which are available as RAW files and JPGs. Much like other cameras with an APS-C sensor, it performs well up to about 3200 ISO, or 6400 ISO depending on your tolerance for noise and loss in detail.
Interestingly, the GR II seems to favour detail retention over noise reduction, so you will notice that while your files remain sharp even at the highest values, they also become quite noisy and lose some saturation from 12800 ISO and above. Keep in mind that you can adjust noise reduction in camera with Off, Auto, Strong, Medium and Weak options but once again, this only affects the JPGs.


You can find a full set of high resolution images taken at each ISO sensitivity here.
Image Quality – The lens
One of the characteristics that makes the Ricoh GR series so desirable for street, travel and to some extent landscape photography is its 18.3mm lens (28mm field of view).
It has an aperture range of f/2.8 to f/16, which is enough for a variety of applications. When paired with the minimum focus distance of 10cm, you can actually achieve quite a smooth and pleasant bokeh between f/2.8 and f/3.5.


The sharpness of the lens through the entire aperture range is quite astounding, which is helped in no small part by the missing anti-aliasing filter. Peak sharpness in the centre can be found between f/4 and f/8 but the results are excellent at f/2.8 as well. As for the corners, I was quite amazed to discover that they are nearly as sharp as the centre at f/4 and f/5.6, and are only a little less sharp at the other apertures.


You can find a full set of high resolution images taken at each aperture here.
Chromatic aberration, distortion and vignetting weren’t an issue but flare did appear on occasion in the form of a purple dot close to the light source. Remember that you can protect the lens by purchasing the GH-3 lens hood for the GR series.

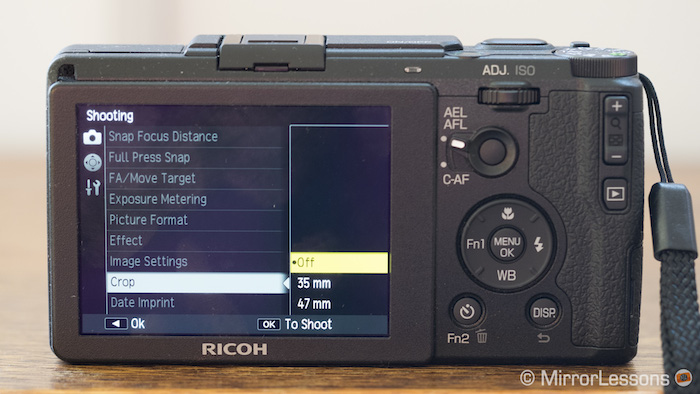
An interesting feature of the GR II is the digital teleconverter with the option of either 35mm or 47mm. The camera performs a crop in-camera so you can avoid cropping in post-production. Keep in mind that the crops will reduce the megapixel count to 10MP for 35mm and 6MP for 47mm.
There is also a wide conversion lens (GW-3) for the GR II. It turns the 28mm field of view into 21mm. I didn’t have the chance to try it myself but it appears to have good reviews.
Autofocus, Manual Focus and Performance
Considering that the Ricoh GR II has a contrast detection AF system that hasn’t changed from the original GR, I wasn’t expecting it to be as fast as the autofocus from other cameras with hybrid autofocus systems. That said, the camera didn’t disappoint. The autofocus in single AF is quick and accurate, and is more than enough for street, travel and landscapes. It is a little more sluggish in low light but this is a flaw shared by many digital cameras.

There are a total of four different autofocus modes you can choose between: Multi AF, Spot AF, Pinpoint AF, and Subject Tracking.
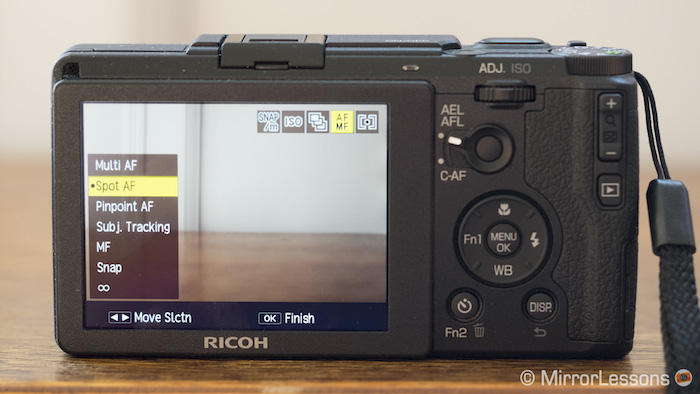
Multi AF picks the autofocus points for you, while Spot allows you to choose a specific AF point. Pinpoint is exactly like Spot except that you can choose an even more specific point. Finally, Tracking is supposed to track moving subjects. (You’ll see why I say “supposed” below!)
The GR II has a maximum continuous shooting speed of 4fps with a buffer capacity of up to 10 RAW files in a burst or 999 JPGs. I tried using the 4fps burst with C-AF, focus priority and tracking but the results weren’t very effective. For example, when I asked Mathieu to run towards me, none of the shots ended up in focus. When I then asked him to walk towards me, only a 3-4 in a burst of nine were in focus.

The moral of the story is that the GR II isn’t and will never be a sports or action camera but I doubt this matters to street photographers anyway.
Besides, where the GR II lacks in C-AF and tracking capabilities, it redeems itself with the wonderful Snap Focus mode which works much like zone focusing on a manual focus lens.
You can set the autofocus to a fixed focus distance (1m, 1.5m, 2m, 2.5m, 5m or infinity) and the camera will display a distance scale on the left-hand side of the LCD screen. Depending on the aperture chosen, it will show you how large your in-focus zone is. Since the camera doesn’t need to lock onto a subject or scene, focus acquisition is instantaneous. On the GR II, I found that choosing 2m with the aperture set to f/11 lets you have everything from 1m to infinity in focus.
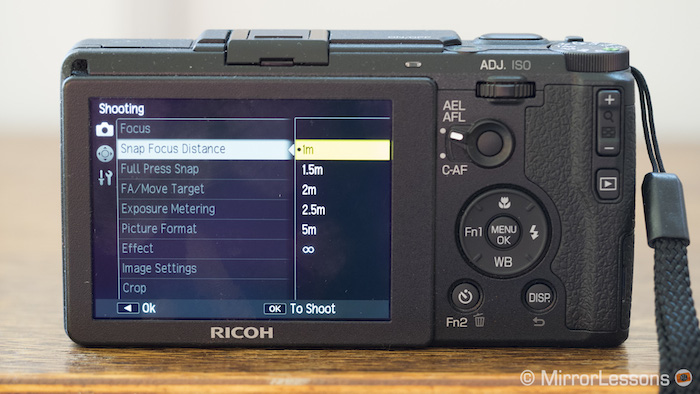
You can also select an option called Full Press Snap that you can use with a normal AF mode. If you fully press the shutter button (without half pressing first), the camera switches instantly to snap mode to take the shot and focuses at the distance set in the menu for the snap focus mode. You also have a Auto-Hi option where the camera additionally switches to Auto ISO.

It is possible to manually focus with the GR II but sadly, it isn’t a particularly comfortable experience. Unlike other cameras with a dedicated manual focus ring around the lens, the GR II requires you to adjust focus by first pressing the macro button (the up button on the four-way control pad) and then turning the front control wheel.
What’s more, it isn’t very easy to reach the various manual focus assists such as magnification and the four different Modes that resemble focus peaking. To access them, you have to press the Fn2 button after entering the ambiguously named FA/Move Target section.

As for the performance, the camera powers on and off quickly and is very reactive. When it falls into sleep mode, it also wakes up fairly quickly when you half press the shutter button.
Video and Other Features
Video is something of an afterthought on the Ricoh GR II, shooting in only Full HD at 30fps. The footage displays a lack in sharpness and excessive aliasing. Sadly, you can only change the exposure compensation while you record. It would have been nice if they’d provided the option to change the shutter speed, aperture and ISO values as well.
While video is lacking, the GR II has a plethora of other features to keep photographers happy. One such feature is Interval Composite which allows you to take an infinite number of successive images that produce one composite. It is very useful for star trails and light painting as you can see below.

There is also a multiple exposure mode that lets you layer an infinite number of exposures in-camera.

The pop-up flash works well enough for casual photography with its +-2 stops of compensation but for more serious flash work, you’ll need an external speed light.

Like most other cameras, the GR II has a two-second timer and a custom option that lets you take up to ten images at a set interval of up to ten seconds. For interval shooting, you can take an infinite number of images at intervals between one second and sixty seconds.
Additionally, there are a number of bracketing modes that include: AE bracketing (1/3 and 1/2 EV), WB bracketing, WB preset bracketing, Effect bracketing, DR bracketing, and Contrast bracketing. All modes only affect the JPGs except for AE bracketing, which produces RAW files and JPGs.
Finally, we come to the WiFi and NFC capabilities. The GR II has both, which is evidenced by the extra hump on top of the camera and the addition of a WiFi symbol beside the Effects function button. You can remotely control the camera and transfer images, and the app has many options to access all the camera settings. However you can’t download the app from the Apple or Android store. Once you connect to the camera’s network, you have to open a link in your native smartphone browser (Safari or Chrome).
Conclusion
As I stated in the conclusion of our Fujifilm X70 vs Ricoh GR II comparison, the camera has many strengths and very few weaknesses.

Of all the 16MP APS-C sensors I’ve tested, the GR II delivers the sharpest results I’ve ever seen. Now, I know sharpness isn’t everything, but there is something quite incredible about being able to pick out every minute detail in an expansive landscape or cityscape. However, I admit it is less important for street photography, for which the obsession with perfectly sharp images is often reviled.
Something else that made me want to run out and pick up a GR II of my own were the black and white profiles. There are amongst the nicest colour profiles I’ve ever seen from a digital camera thanks to the punchy contrast, deep blacks and film-like grain. I can now understand why so many street photographers rave about them.
Finally, I have to say that I was very impressed by the intelligent layout of the buttons and dials. Very rarely did I have to go into the menu to adjust a setting unless it was to do something very specific such as change the function of a function button. Most settings were easily accessible from either the Adj. ISO toggle or the various buttons around the body.
What didn’t I like? My only real bugbear was the LCD screen. Coming from cameras with LCD screens that articulate and have touch capabilities, I found myself missing these features for low-angle and high-angle shots where it is impossible to see the screen.
I wasn’t too impressed with the manual focus mechanism either, as I find a dedicated focus ring more comfortable to use than a dial. However, it is unlikely that you’ll ever have to use traditional manual focus with a camera like this anyway, especially considering that it has excellent manual modes like Snap Focus.
Finally, I’m sure many of you are wondering whether it is still worth going for the original Ricoh GR. My answer is a resounding “yes” as long as you don’t need the WiFi/NFC capabilities. The two are essentially the same camera, so if you can find the GR at a good price, grab it before somebody else does!
 What I like about the Ricoh GR II:
- Compact and portable with a good build quality
- Very good ergonomics and button/dial layout
- Many smart functions like Snap Focus and Interval Composite
- The black and white profiles are among the best I’ve seen from a digital camera
 What I don’t like about the Ricoh GR II:
- The LCD doesn’t articulate and isn’t touch sensitive
- Manual focusing isn’t easy with this camera
- Poor video quality (but it is unlikely you’d use this camera for video shooting anyway)
- Not so different from the original GR
Do you own the Ricoh GR or GR II? If so, let us know what you think of it below!
