When I began editing photos and videos on my computer nearly 10 years ago, the first software I ever used was Adobe. Since then, I’ve become so accustomed to Adobe products that I rarely feel the need to look at other software alternatives. It’s not necessarily because I consider Adobe to be the best but rather because they have been part of my workflow for so many years.
Happily, my work for MirrorLessons has given me the opportunity to look at software from other brands. I’ve been impressed by Iridient Developer and I’ve also used Nik collection in the past (now owned by Google and available for free). So when Macphun asked me if I wanted to try their new HDR software, I thought it was worth taking the time to explore the app given its very reasonable price point.
Update: our review of Aurora HDR 2017 is now online!
MacPhun is an American company that was founded in 2008 by two college friends who decided to design photography software. They started with iPhone apps and became popular with Mac software like Tonality. Aurora HDR is their latest creation and was developed in collaboration with Trey Ratcliff, a renowned travel photographer who has contributed significantly to HDR’s popularity on the net.
Note: Aurora HDR is currently only available for Mac computers but Macphun is working on a Windows version.
Specs and system requirements
- Version tested: Aurora HDR Pro 1.2.2 (2691)
- Operative system: Max OS X 10.9.5 Mavericks or newer
- Processor: Core 2 Duo from late 2009 or newer
- RAM: Minimum 4 GB
- Hard drive space: 2 GB
- Display resolution: 1280 x 800 or higher (Retina displays supported)
- Image formats: PNG, JPG, TIFF (8-bit and 16-bit), GIF, PSD, .CR2, .NEF, .ORF, .RAF, .ERF, .ARW, .RW2, .PEF and more
- Color Profile settings supported
Ethics statement: Macphun kindly provided us with an evaluation copy of Aurora HDR to test. We were not asked to write anything specific about the software in exchange for the opportunity and were not provided any other compensation of any kind to publish this article. All opinions we express regarding Aurora HDR are our own. Within the article, there are Macphun affiliate links. If you buy something after clicking the link, we will receive a small commission. To know more about our ethics, you can visit our full disclosure page. Thank you!
[toc heading_levels=”3″]
Interface and ease of use
Downloading and installing the software is easy (make sure to select “Allow apps downloaded from everywhere” in the Security and Privacy preferences of your Mac computer). During the installation, you have the option to add plugins for Lightroom, Photoshop, Photoshop Elements and Aperture. Alternatively you can install them later on. The app doesn’t have a main preferences menu which means there aren’t any other settings to deal with. Right from the word go, the software is ready for use.
The first positive impression I had when launching the app was the clean and organised interface. It doesn’t take very long at all to familiarise yourself with it.
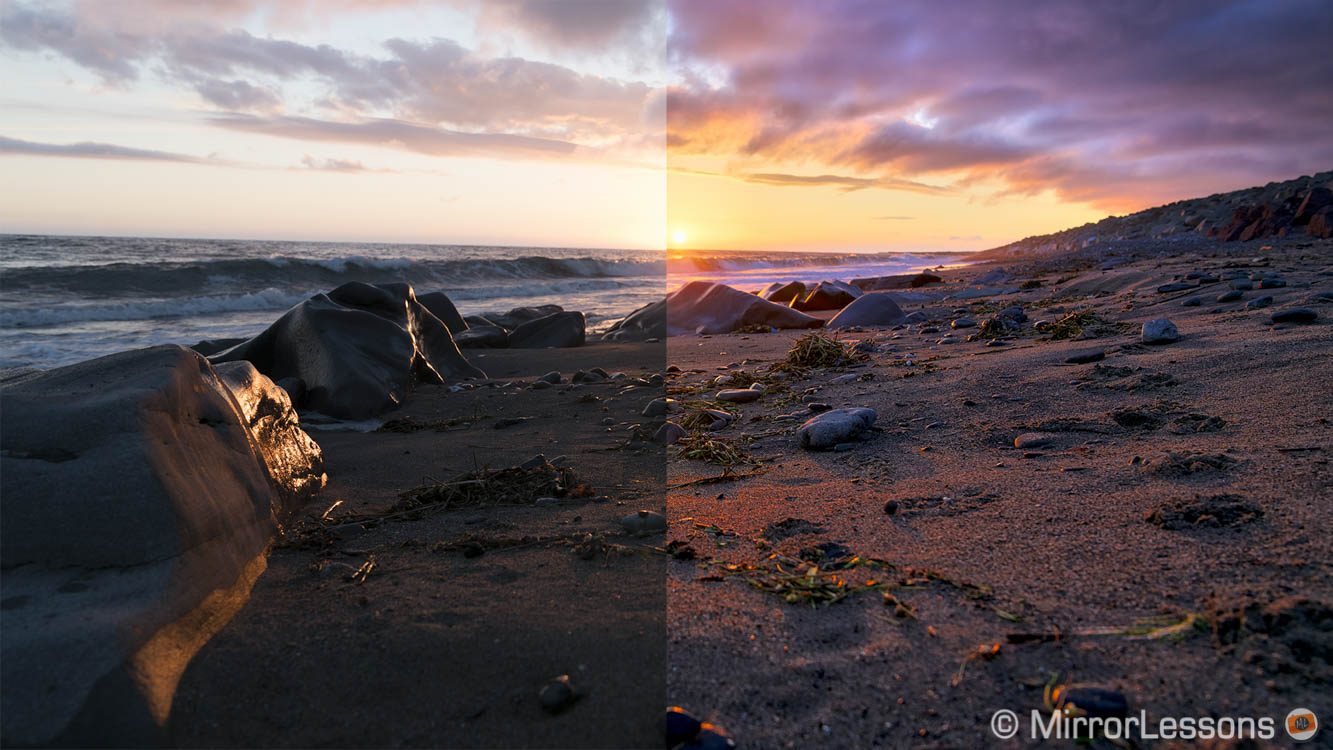
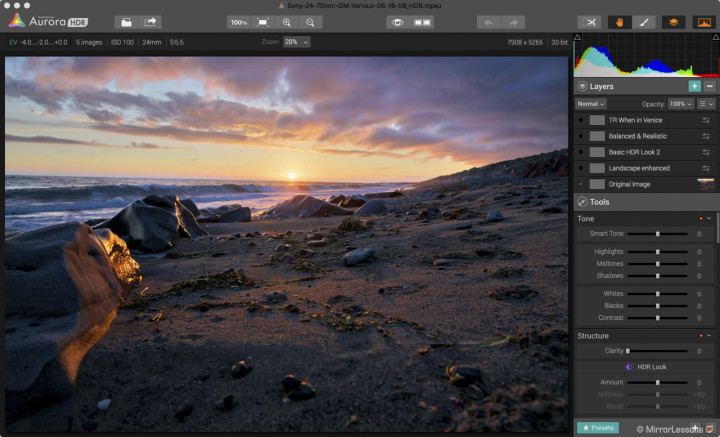
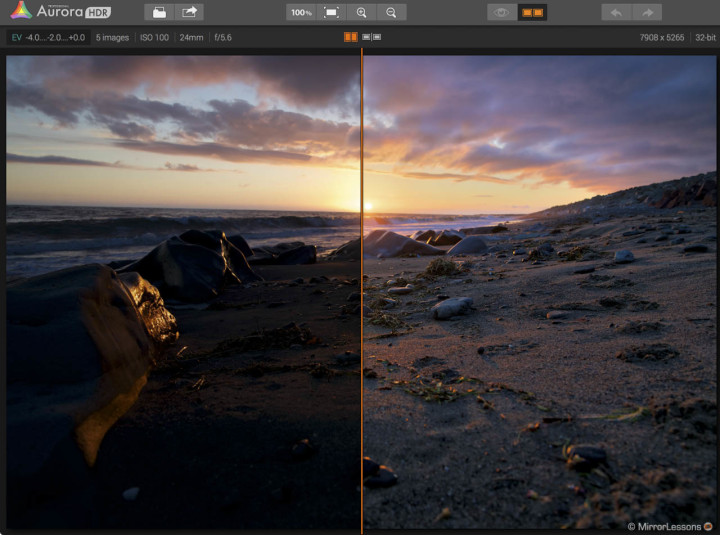
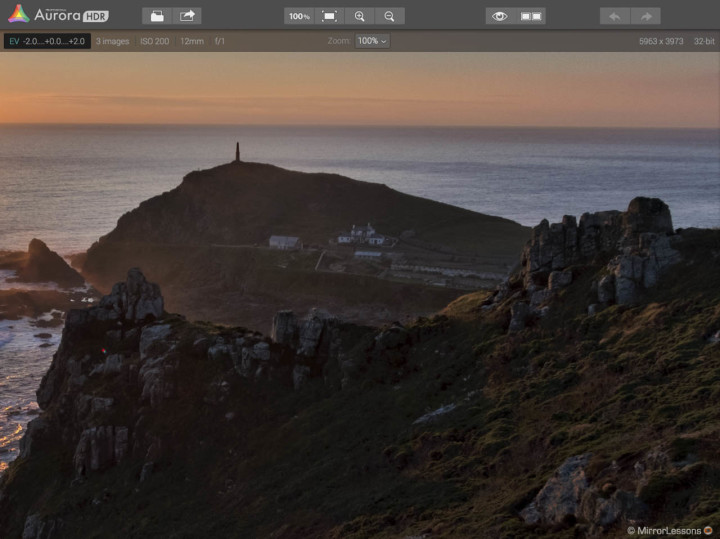
On top you’ll find a toolbar with a selection of buttons to perform various operations such as Open Files, Share Image, Zoom Options, Undo/Redo, etc. Two of the most useful tools are the Preview and Compare buttons: you can rapidly switch between the original single middle exposure or the mapping result (the default HDR look after the files are merged) and the post-processed version.
In the top left corner, some of the EXIF data and bracketing differences are displayed. In the top right corner, you can show/hide main functionalities such as the crop tool, layers and masks.
On the right you’ll find the main vertical toolbar. It features a histogram (that can be hidden), the layers tab and all the post-processing settings (tone, colours, curves, etc). Finally at the bottom you can show or hide the preset previews.
Many functions and display options can be triggered with shortcuts on the keyboard. For example you can hide the Presets window with the Tab key or show the Compare option with the “;” key. One small complaint is that there isn’t an option to personalise some of these shortcuts.
Overall I found the software fast and responsive on my MacBook Pro Retina Late 2013 (2.3 GHz i7, 16GB RAM, Nvidia GeForce GT 2048 MB and SSD drive). Keep in mind that the software will require lots of memory if you work on several high resolution HDR images one after the other. If the physical memory (RAM) of your computer is full, the Mac will start to use the virtual memory on your hard drive, so make sure that you have enough GB free, otherwise your hard drive will fill up completely and the computer will stop all activity. You may want to keep non-essential apps closed as well.

The time it takes to merge bracketed images depends on the options you select when importing the files (alignment, ghost and CA corrections), the number of files and their resolution. For example merging 5 images shot with the Sony A7r II can take up to 3 minutes. The software is much faster with three X-T1 files (15s without corrections, 1min with corrections).
Once the HDR picture is created, the app gives you a real-time preview of all the settings you changed or presets you applied. During the entire testing period, the software only crashed once while saving a file. An orange progress bar (very neat design by the way) appears under the top toolbar to notify you that there is an on-going process in the background.
The only annoying behaviour is that every time you zoom in or out, the image goes back to its original look while the software re-loads all the settings you applied. It can take several seconds to show the image correctly and it happens when you move the image around as well. This can significantly slow down your workflow if you are constantly zooming in/out and moving through the different zones of your image to adjust specific areas.
The only tool I miss is a history tab (that’s my Lightroom influence right there). You can only go backwards or forwards one step at a time but when doing heavy post production, you might need to go further back to a specific change. However this issue can be partially solved by using layers as I’ll explain later on.
An HDR image with settings, masks and layers applied can be saved into a proprietary .mpau file to access later on. Note that depending on the resolution and number of layers, the file can be larger than 1GB. You can’t open more than one image at a time.
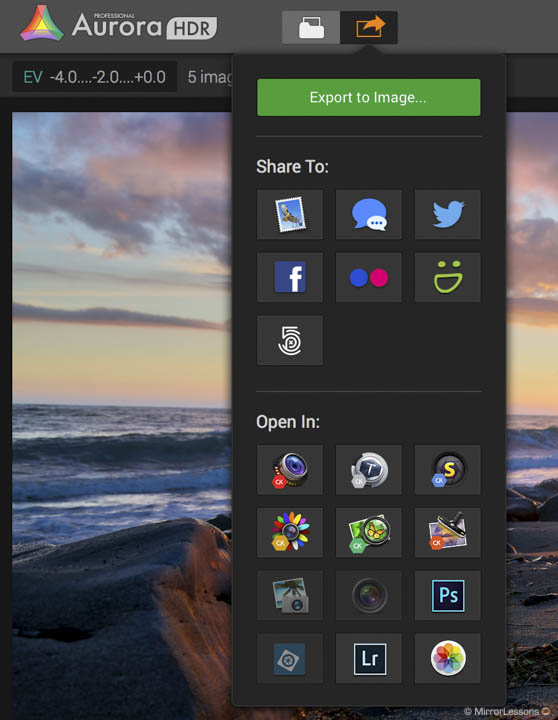
Finally you can export the result in the most popular image formats including .psd (Photoshop). You can also save the image in HDR format (.hdr, .exr or .tif). With the Apple Share icon in the top toolbar, you can send the image directly to a social network account, the mail app or open the file with other Macphun or Adobe software.
Loading files and automatic corrections
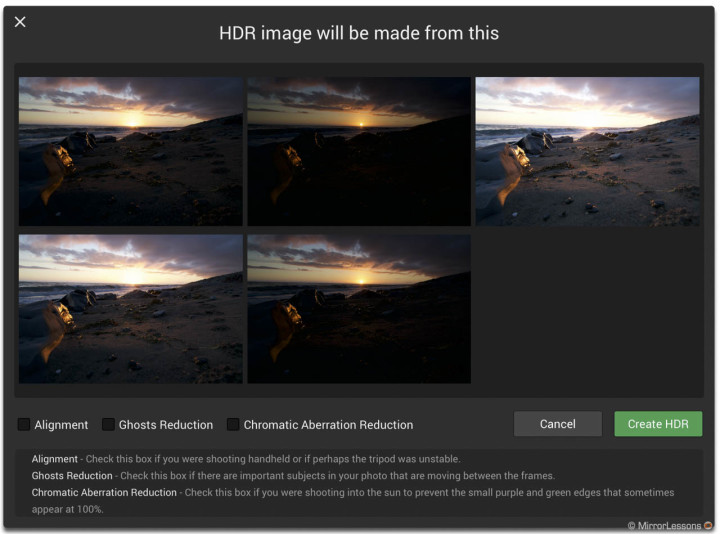
After selecting the files to import, the software shows a preview for each of them. There are three automatic corrections you can select:
- Alignment
- Ghost reduction
- Chromatic aberration reduction
Alignment is useful when merging a series of bracketed shots taken hand-held and I do that often. The software aligned all my test shots accurately. Remember that if the composition differs too much between shots, the result might not be as good.
Chromatic aberration reduction is less effective and in some shots I found that visible CA remained uncorrected. Unfortunately the software doesn’t have a manual CA correction tool and it’s something that Macphun should implement in my opinion.
Ghost correction is useful for moving elements in your bracketed images such as waves or a person walking in the background. There are four levels to choose from (low to high) depending on how fast the movement is and how much of the area is affected. You can choose which exposure in the bracketed series will serve as reference. With wind and moving leaves for example, it is best to choose an exposure that has a fast shutter speed which is likely to have fewer blurred elements.
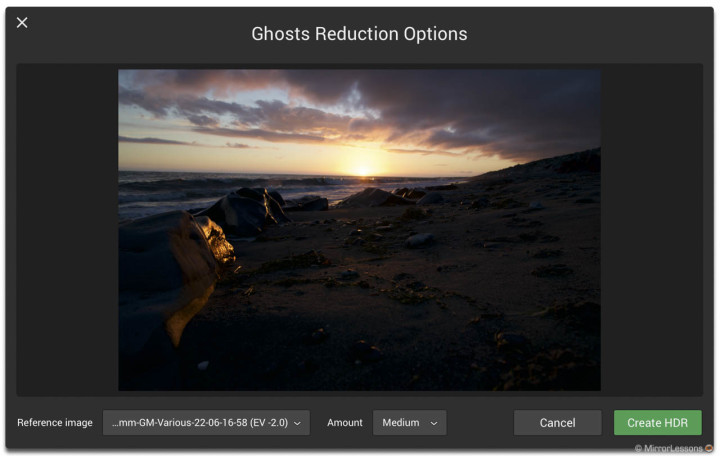
Note: if there aren’t any moving elements, deselecting ghost reduction will speed up the merging process.
The software does a good job overall but suffice it to say, the fewer movements there are, the better. For example in the image below, I didn’t notice that Heather was flipping through a newspaper in the background. The Medium level did a better job with her face while the highest level rendered the newspaper better but Heather’s face becomes distorted.
[twentytwenty]


[/twentytwenty]
One flaw of ghost reduction is that it can create lots of noise if you select a reference image that is too underexposed. I will go more in-depth about this in the noise chapter.
Aurora is compatible with the most popular image files (Tiff 8 and 16-bit, psd, png, etc) and most RAW files. However during my test period I found some incompatibility or partial incompatibility with the following cameras:
- Fuji X-Pro2: the preview is not available and I’ve encounter several issues when merging the files (artefacts and incorrect alignment)
- Panasonic GX80 and Olympus Pen F: opens the files but doesn’t recognize the bracketing sequence. The merging result has several issues as well.
Note: compatibility with RAW files and merging images taken with manual focus lens have been improved in the 2017 edition.
Another issue occurs when loading images recorded with a manual focus lens that doesn’t transmit EXIF data (no electronic contacts). Aurora HDR doesn’t have a lens database so you can’t manually select a lens profile. This means that the alignment won’t be 100% effective and can also produce a bit of a mess like the example below.
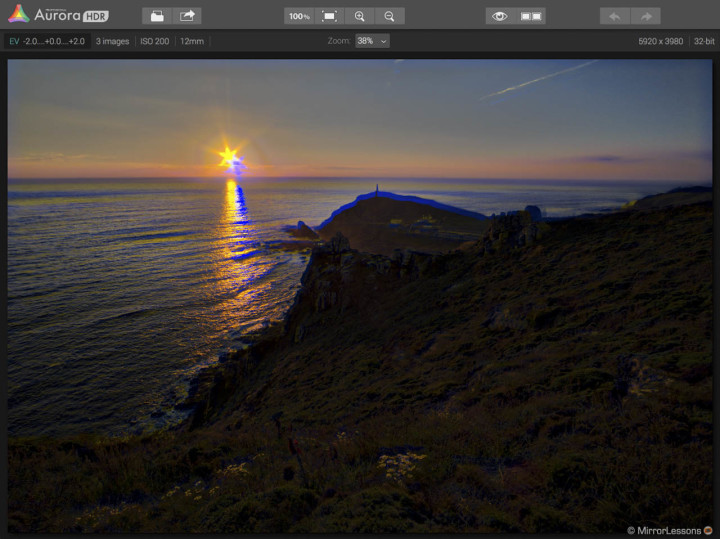
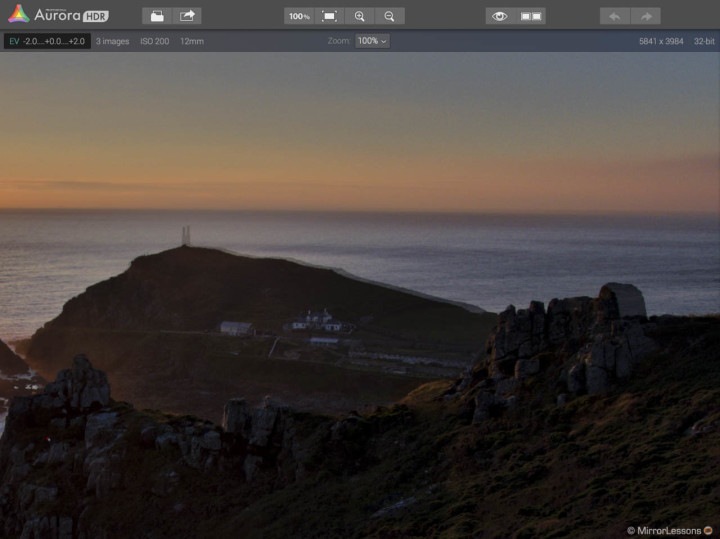
The work-around is to open the images in Lightroom or Camera RAW first, apply the correct lens profile and save the files as TIFF 16-bit with full EXIF data. Then you import these files manually into Aurora HDR. You can select alignment and ghost correction but leave CA reduction to off, otherwise it can create a mess again. Plus you don’t need it anymore since you can correct the CA of the individual files in Lightroom. The same solution worked with the Pen F and GX80 files to create a correct mapping result.
after converting first in Tiff 16-bit from Lightroom.
Long story short, with images that lack a lens profile or with RAW files that aren’t entirely compatible (preview disabled during import), Aurora HDR Pro seems to have trouble merging the exposures correctly. You need another software to prepare the files first.
Thankfully this issue has be fixed in Aurora HDR 2017. If the lens profile is included in the EXIF data (some modern manual focus lenses and all autofocus lenses), then the app doesn’t have any trouble.
HDR, the quick way: using presets and luminosity masks
Once the tone mapping RAW file is created, it already looks good and overall the mapping process of the software is excellent. You may want to enhance your image quickly without spending too much time adjusting individual settings. One of the main characteristics of the app is the series of presets that give your HDR image a distinctive look right away.
You can create stunning images with Aurora HDR in a matter of minutes if you don’t fancy advanced settings.
Once the HDR file is created, you can browse through presets with a live time preview in the thumbnails and apply the look you prefer. To facilitate the choice, the presets are divided by category (landscape, architecture, interior etc). You will also find a series designed by Trey Ractliff.
Some presets are very dramatic and punchy, which is a look I personally tend to avoid but in the end is a matter of individual taste. Other presets will give a more balanced and natural result that can work well for urban, landscape and sunset images. There are also a few black and white versions but I don’t like them very much.

Realistic / Balanced and Realistic preset

Architecture / Realistic preset

Architecture / Soft preset

Dramatic / Creative Drama preset
Note the noise on the sky (top left) and the color artefacts on the wood (right)
Some presets like the one above can be destructive if applied without further editing: a lot of noise and colour artefacts appear in the shadows. Note that there is a Denoise tool and a few tricks to get rid of noise (more on this later).
There is a reason many of these presets have been designed with a dramatic / overdetailed effect: with a few additional tweaks to the settings, you can render a more realistic and pleasant result.
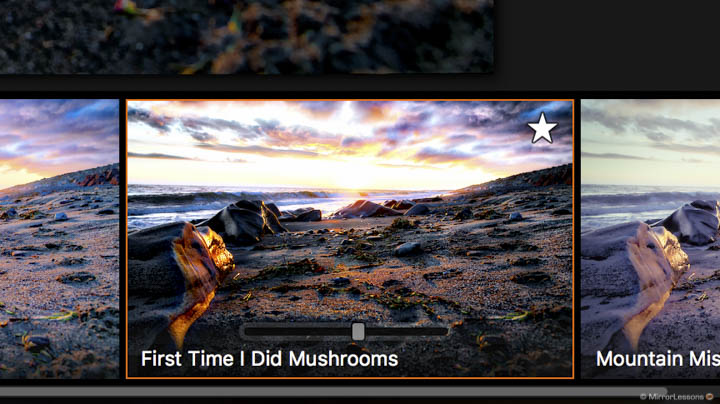
First, you can vary the intensity (or opacity) of the preset: once selected, a horizontal sliding bar appears in the preview thumbnail: moving it to the left will reduce the effect of the preset (alternatively you can also vary the opacity of the layer where the preset is applied).
[twentytwenty]


[/twentytwenty]
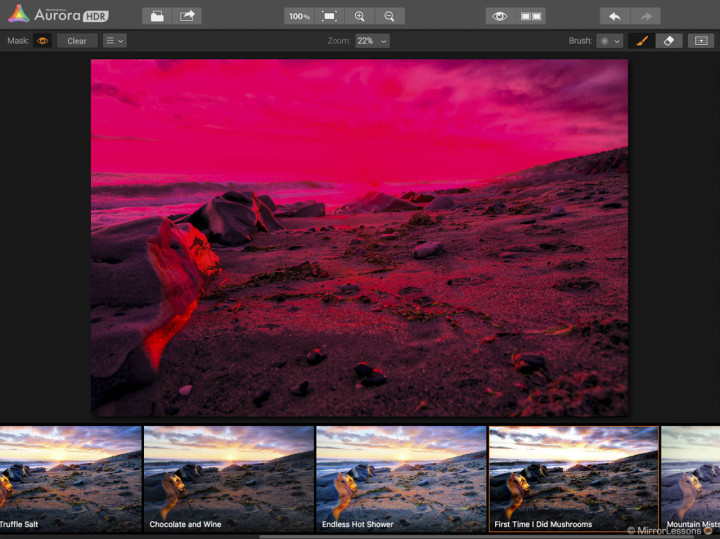
The second option is to create a new layer, right click on that layer and choose “Create luminosity mask”. The software will automatically create a mask based on the brightness of the pixels. You can then apply the preset and it will mainly affect the brighter zones without harming the darker areas. It takes less than a minute to do this and suddenly your image will no longer shout “Ugly HDR”.
[twentytwenty]


[/twentytwenty]
So the real secret of the Aurora HDR presets is that they are designed to be used with masks and layers. However they can also serve as a starting point since all the individual settings can be edited.
Perhaps the only criticism I have is that many of these presets are similar to one another despite being in different categories. I would have appreciated more variety in terms of colours and styles. My advice is to pick the ones you prefer and save them as favourites (just click on the star button to put them in the favourite folder) because you will probably end up using the same bunch every time.
You can download additional presets from the Macphun website for a total of 9 different folders. Installing them is very easy and takes only a few seconds. You can also create your own presets but for that we need to dig into all the settings available below.
HDR, the advanced way: masks and layers
While presets and simple tweaks are a great starting point, it would be wrong to assume that the software is not designed for demanding photographers and advanced post-production.
The real power of Aurora HDR becomes more clear once you start to play with all the individual picture settings, multiple layers and masks.
Let’s dig more into layers and masks first because they play a crucial role.

The purpose of layers here is very similar to other software like Photoshop. They allow you to apply certain settings or masks with more flexibility: you can deselect a layer or delete it without compromising your work. You can move them up or down, change their opacity or select a different blending mode with the layer below, the original image or a specific exposure of the bracket series. Finally, layers also help you to keep your post-processing more organised. You can create a new layer for each main stage of your post-processsing work and that makes it easy to go back to earlier stages or deselect a few effects you don’t like anymore. Note that there is a maximum of 10 layers for the Pro version and 5 for the standard version. All the settings of the toolbar are independent for each layer. So when making an adjustment, make sure to have the correct layer selected.
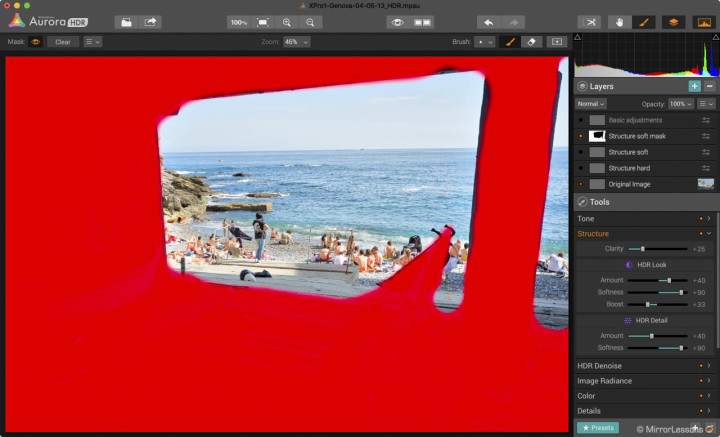
I already mentioned the Luminosity mask but there is also the brush tool to manually create your mask in a specific zone of your image that you want to correct without altering the entire frame. You can set the size, opacity and softness of the brush as well as the pen pressure. The mask area can be highlighted in red. There’s a removal tool if you want to eliminate part of the mask.
Masks allow you to apply a setting or an effect to a portion of the image only. You can see a concrete example below: the preset applied was creating too much noise in the sky plus I wanted it to only affect the foreground.
[twentytwenty]


[/twentytwenty]
The third mask option is a gradient filling mask that you can rotate, expand or diminish. You can delete the mask of a single layer with the Clear button, invert it or copy and past it to another layer. You can’t have individual masks within the same layer.
If you are not familiar with masks, there is a learning curve involved at the beginning but I have to say that Aurora HDR isn’t too complicated in this regard.
One thing I miss is a circular radial mask (Lightroom influence once again!).
HDR, the advanced way: individual settings
Now let’s have a look the most interesting tools. I won’t go through all of them since some are common to every image editing software like curves, colors, vignetting and so on. Instead I’ll talk about the tools that I found more unique for HDR work specifically.
As I said earlier, each tool is individual to each layer. You can deselect a specific tool or reset its settings to default.
Structure
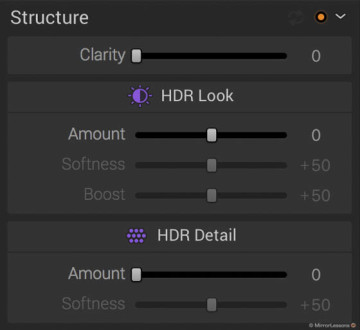
This is one of the main settings to establish the HDR look of your image as far as details and micro contrast are concerned. The Clarity, HDR Look Amount and HDR Detail Amount can make the image crisper or softer. The Softness and Boost sliders help to minimise or emphasise these details for more punchy or more subtle results. Note than when the software creates the HDR image, it automatically applies default values within the Structure tool. You may want to reset them if you wish to start with a 100% clean image.

[twentytwenty]


[/twentytwenty]
Details
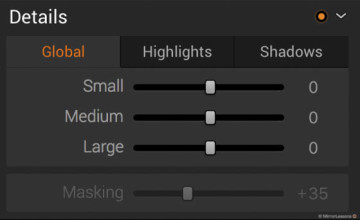
This is another interesting setting that allows you to control details across the entire image, or just the highlights or shadows. There are individual sliders for large, medium and small details:
- Small: sets the sharpness of fine details
- Medium: looks at medium sized parts
- Large: sets sharpness on contours of objects.
It’s an interesting tool to refine the details and overall sharpness of your image but most of the time I didn’t find it necessary to use it. The mapping result already has plenty of details. An excessive use can make the image look unrealistic. Here again working with masks and layers is advised.
[twentytwenty]


[/twentytwenty]
Image Radiance and Glow
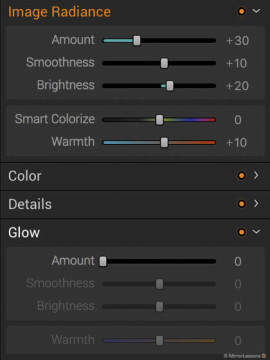
Image radiance creates a “dreamy” effect and is designed to be used for shots taken in daylight. You can set the amount, softness, or brightness and give it a color tint. I like it a lot because it helps to make the image look more natural.
[twentytwenty]


[/twentytwenty]
Glow can be useful for night shots or interior shots with artificial lights to create a glow effect. With a custom mask, you can also apply it to very specific elements.
[twentytwenty]


[/twentytwenty]
Top & bottom lighting
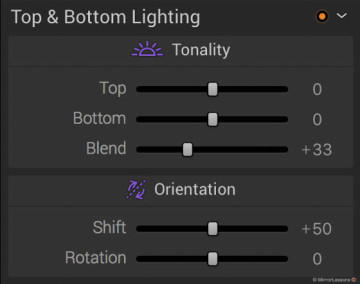
This is one my favourite tools because it simplifies one of the key issues you will face when dealing with backlit scenes such as sunrises or sunsets. The tool allows you to separate the exposure adjustment of the upper and lower areas of the image which means you can darken the sky without impacting the foreground and vice versa. The orientation as well as the shift of the transition zone can be changed. Note that this is independent from the Gradient filling mask.
[twentytwenty]


[/twentytwenty]
Color toning
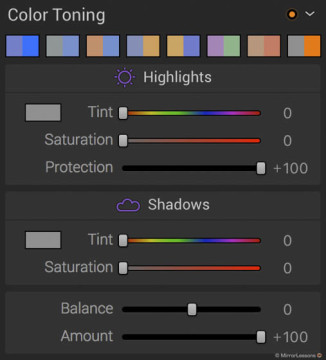
This is another tool that I love because it helps you define a more precise look for your image concerning colours. In addition to adjusting the color tint and saturation for highlights and shadows (you can manually select the colour), you can choose from a series of pre-defined colour combinations. There is a Protection slider for the highlights to ensure that the whites remain truly white. You can also adjust the balance and amount of the 2-way colour combination.
[twentytwenty]


[/twentytwenty]
Noise, colour artefacts and RAW versatility
The first thing to mention about noise relates to the first step of our HDR workflow: ghost reduction. If you choose a reference image that is too dark, it can lead to serious colour noise appearing in the darkest areas of your shot.

-2Ev exposure chosen as reference for ghost reduction

-1Ev exposure chosen as reference for ghost reduction
The solution is to choose a brighter exposure as a reference but there can be other consequences as well. In the example below, choosing a +2Ev image minimised colour noise under the bridge but also created an unpleasant “shadow” on the water.

In this specific example the middle exposure was the best compromise. It produced some colour noise under the bridge but kept the water texture much cleaner. But to me this definitely looks like a limit of the software. If I merge the same images with Lightroom, there is no colour noise whatsoever no matter which ghost reduction level I select.

[twentytwenty]


[/twentytwenty]
Ghost reduction problems aside, when you apply some presets or start to become overzealous with all the different settings, you can easily wind up with noise and artefacts in your image. They can be more or less visible depending of how far you push these settings. Luminance noise is more likely to appear in the sky or clouds while colour noise can be annoying in the shadows.
Aurora includes an HDR Denoise tool. To be completely honest though, I am not very impressed by its performance.
What it does is soften the image until noise becomes invisible or less invasive. It works well when noise is present in a uniform zone without specific details like a blue sky. In the example below, some noise is visible in the top left corner. I first draw a mask on the blue zone including the sea on the left which has some noise as well. However when applying the noise reduction, I lost significant detail in the water. I then create a separate mask for the sea with less noise reduction applied.
In other situations where the sky includes more details like clouds, the HDR Denoise tool alone is not enough. Not only do you need to create different masks on the affected areas but in addition to the Denoise tool, you need to play with the Structure tool. The latter helps to reduce the excessive details created by the HDR Look setting. It’s a matter of balancing the two settings to find an optimal result.
Noise in the shadows become more difficult to deal with. The HDR Denoise tool doesn’t doesn’t have a separate luminance and colour noise adjustment. So if I apply it to the shadow area, it softens the details but doesn’t get rid of colour noise. Here as well I have to combine the settings of other tools (Color tone and Color filter) to reduce the noise.
[twentytwenty]


[/twentytwenty]
There can also be colour artefacts with larger blocks of red or green appearing in some portions of the image. Here as well, you need to work with a mask because the Denoise tool won’t be very helpful. Instead you need to play with the Color filter tool and saturation to hide the artefacts. Color artefacts in the sky can be more difficult to eliminate.
[twentytwenty]


[/twentytwenty]
One last aspect I noticed is that Aurora doesn’t seem to be able to take advantage of the full flexibility of the RAW files especially when it comes to shadows.
If I try recover shadows too much, an unusual amount of colour noise is produced. Let’s see another example below: 5 shots taken with the A7r II in London. Because I was shooting hand-held, I had to choose an underexposed reference image which produced more dark than bright images in the bracketed series. Lightroom was able to use all the information regardless, delivering lots of detail and containing noise in the dark areas. By comparison, the Aurora HDR version became unusable when I tried to recover shadows too much.
[twentytwenty]


[/twentytwenty]
The above issue may or may not be a problem depending on how you record your shots. On a general note you need a fairly well-balanced AE bracketing sequence to post-process your image heavily: your exposure reference needs to be in the middle with the same number of under and overexposed images. You will experience more limits with an underexposed sequence in Aurora.
Aurora also lacks a proper RAW developer tool. It doesn’t have an exposure adjustment or a true white balance setting to name a few. The latter can be annoying: with Lightroom you deal with Kelvin units. No matter how strong your white balance is, the true whites of your image are not affected. Aurora has a temperature slider that seems to be just a simulation. It doesn’t work in Kelvins but percentages (-100 to +100). The result is different and the Aurora setting looks more like a color tint.
Note: color temperature has been improved in Aurora HDR 2017.
[twentytwenty]


[/twentytwenty]
Price, versions and 2017 edition announced
Even after this in-depth demonstration, there is still some extra information to talk about. The first is the price which is a very positive aspect: the standard edition costs $50 (or €50 or £29) while the pro edition is nearly $100 (or €100 or £78). Personally I don’t find it expensive at all considering all the features it has. It is the most complete and advanced HDR app you can find for your Mac (and soon Windows) computer. There is also a free trial which leaves you little excuse not to give it a chance. The software can be purchased directly via the official website.
The Pro version is naturally more complete but also includes important features such as:
- Native RAW support
- 10 layer limit instead of 5
- Unlimited number of brackets
- Plug-in support
- Luminosity mask
- Automatic de-ghosting
If you occasionally deal with HDR images and want something more advanced than your RAW software, the standard version should be enough. If you often work with HDR, then the Pro version is advised especially for the RAW native support and luminosity mask option.
Just recently Macphun also announced the new edition: Aurora HDR 2017 that is available on pre-order and ready to download starting September 29th. There are several improvements. You can find all the information in our full review.
Conclusion
Aurora HDR Pro is a very powerful software and I’ve been impressed by its stable performance and specific tools designed for HDR work. It is not too difficult to master thanks to the user-friendly interface and Macphun also provides tons of video tutorials (some of them are 1 hour long). The presets combined with a couple of extra tips (the Luminosity mask above all) allow you to create great looking HDR images in a couple of minutes. If you want to go in-depth, there are lots of tools to control every aspect and every area of your photograph.
Not everything is perfect however. The Denoise tool tends to blur details too much: having luminance and colour noise as two separate settings would help. The ghost reduction tool can introduce lots of colour noise if you don’t pick the right options. The software also lacks true RAW development settings like exposure, white balance, distortion and CA correction. A better RAW and Tone mapping algorithm could also provide more versatility when dealing with shadow recovery.
I am sure that some of these flaws can be fixed with future updates and the 2017 edition is a good answer already. Combined with some of the upcoming features like batch processing, I could see Aurora HDR becoming a completely independent software and the best option for photographers who deal with HDR on a daily basis.
 What I like about Aurora HDR Pro:
- Simple and user-friendly interface
- Powerful and very stable software
- Good tone mapping algorithm that makes your image look great from the start
- Using layers and masks is easy and very effective
- Presets and luminosity masks can finalise your HDR image in a matter of minutes
- Advanced series of tools to control every aspect of your photograph
- Suitable for both amateur and advanced users
- Very reasonable price
 What I don’t like about Aurora HDR Pro:
- Some presets can create excessive noise and artefacts
- Ghost reduction can produce a large amount of colour noise with the wrong settings
- The Denoise HDR tool tends to blur details too easily
- No true RAW development for exposure, white balance, manual distortion and CA corrections
- Limited versatility when recovering shadows
- Settings applied on the image are re-loaded every time you zoom in or out
 Nitpicking:
- No shortcut customisation
- No watermark option when exporting the image
- Some RAW files are not truly supported yet (Fuji X-Pro2, Olympus Pen F, Lumix GX85 for example)
 To consider:
- No Windows version for now but the company is working on it
- The 2017 edition has just been announced and fixes some of the issues listed above
Sample images
Below you can find the final version of some of the images seen in this article as well as a couple of extras I post-processed with Aurora HDR Pro. Click on any of them to open the full res version.

Preset (Architecture/Warm Sunset), luminosity mask, Color Toning, Denoise in the shadows and basic adjustments. 4 Layers used.

Structure applied on custom mask (foreground), basic adjustments and image radiance. 4 Layers used.

Custom structure and tone, basic adjustments, details and image radiance. 5 Layers used.

Preset (Dramatic / Small details) with luminosity mask, basic adjustments and Denoise/structure reduction on the sky with custom mask. 4 Layers used.

Preset (Landscape / Realistic) with luminosity mask, basic adjustments, Denoise mask on sky and sea. 5 Layers used.

Preset (Architecture / Warm sunset), basic adjustments, Denoise and colore correction on bridge and pavement with 4 different masks. 7 Layers used.

Preset (Landscape / Deep) with luminosity mask, basic adjustments and Denoise mask in the sky. 3 Layers used.
RAW files exported to Tiff 16-bit from Lightroom first.

Preset (Landscape / Deep) with luminosity mask, basic adjustments and Denoise on luminosity mask. 3 Layers used.
RAW files exported to Tiff 16-bit from Lightroom first.

Preset (Landscape / Balanced) with luminosity mask, basic adjustments and Denoise mask on the sky. 3 Layers used.
RAW files exported to Tiff 16-bit from Lightroom first.

Preset (Balanced and realistic) 75% opacity, basic adjustments, color toning and Denoise mask in the clouds. 5 Layers used.
To download a trial version of the Aurora HDR Pro software, you can visit the official Macphun website.
