A few weeks ago I shared my in-depth review of Aurora HDR Pro, a powerful software designed by Macphun and Trey Ractliff for users who love HDR photography. Despite a few weaknesses, Aurora proved a solid performer for advanced HDR editing thanks to the use of layers, masks and unique settings designed for this technique.
Today the company released the new version of the app called Aurora HDR 2017 and we had a chance to test it in the past two weeks. It doesn’t revolutionise the previous version but it does introduce interesting new features while improving and fixing others.
Note: in this article I will only concentrate on the new features and improvements compared to the previous edition. If you want to find out more about the software, I invite you to read my review of Aurora HDR Pro.
Main specs
- Version tested: 1.0.0 (865)
- Operative system: Max OS X 10.9.5 Mavericks or newer
- Processor: Core 2 Duo from late 2009 or newer
- RAM: Minimum 4 GB
- Hard drive space: 2 GB
- Display resolution: 1280 x 800 or higher (Retina displays supported)
- Image formats: PNG, JPG, TIFF (8-bit and 16-bit), GIF, PSD, .CR2, .NEF, .ORF, .RAF, .ERF, .ARW, .RW2, .PEF, .DNG and more
- Color Profile settings supported
Ethics statement: Macphun kindly provided us with an evaluation copy of Aurora HDR to test. We were not asked to write anything specific about the software in exchange for the opportunity and were not provided any other compensation of any kind to publish this article. All opinions we express regarding Aurora HDR are our own. Within the article, there are Macphun affiliate links. If you buy something after clicking the link, we will receive a small commission. To know more about our ethics, you can visit our full disclosure page. Thank you!
What’s new in Aurora HDR 2017
The 2017 edition introduces several new features and improvements, some of which are more substantial like the Zone System for Luminosity mask or Batch Processing while others are more minor. In this first chapter, I will analyse what is new in comparison to the previous version.
Batch processing
One of the highlights (and a requested feature from many users) of Aurora HDR 2017 is batch processing: you can now process multiple series of brackets at the same time.
In the open files window, you simply select Batch processing and a second window opens: you can drag or load a series of files or folders and choose to include subfolders as well.
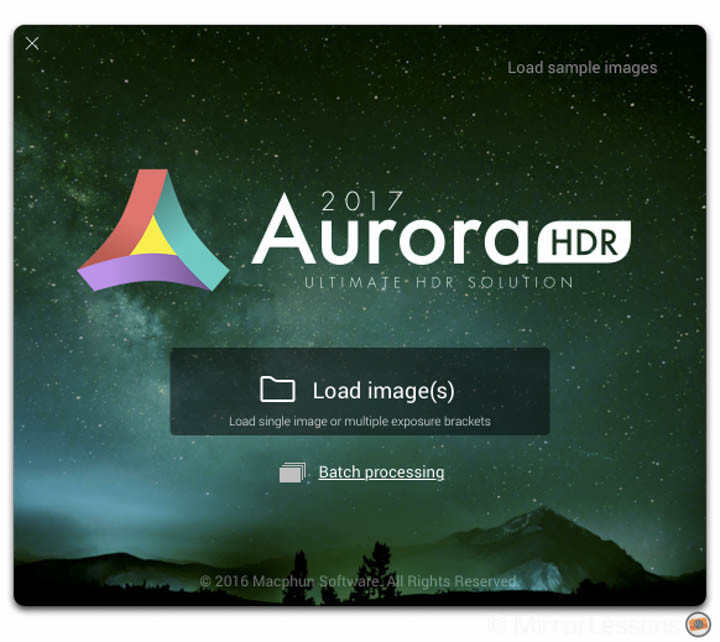
A next window will display all the bracketed series Aurora has detected: you can choose to exclude individual photos.
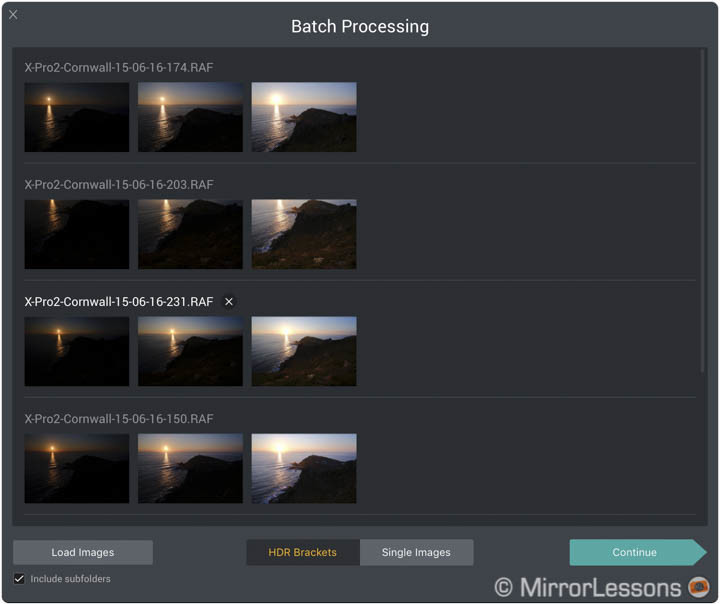
Once you click to the Continue button, a fourth window appears with all the settings available. You can choose the location to save the final files and the naming options. You can apply a preset from the ones provided by Macphun or the ones you created yourself. You can include alignment, ghost and chromatic aberration reduction, as well as choose the type of files the software should create at the end of the process (JPG, TIFF, etc).
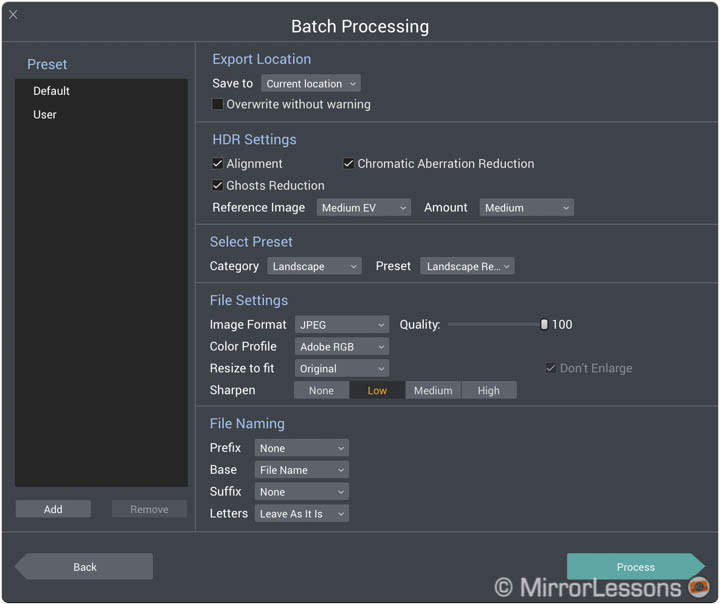
Batch processing makes sense for a series of brackets of the same scene with the same light conditions, where you know that the same preset will work for every HDR image created.
You can’t apply different presets to different bracketed series. You may want to open a single bracketed series first, make all the adjustments necessary and save the result in a custom preset to choose later on when you batch process the other images: that way you make sure they will look exactly how you want.
Note that batch processing can take some time depending on how many bracketed series you merge, how many files there are per series, the resolution of those files and the settings you select (ghost reduction will slow down the process). For example, it took almost 15 minutes to created 5 HDR images from 5 bracketed series of 3 shots each taken with the Fuji X-Pro2 (24MP).
Zone system, Radial and new options for masks
Masks are a very important part of serious digital image post processing. The previous edition of Aurora already contained good tools in that department but a few things were missing. The 2017 edition fixes that.
One of the most useful features found in the previous version of the software is the luminosity mask. One click of the mouse and the software creates a mask based on the brightness of your pixels. For example it can help to give your image a more balanced look when you apply a preset with dramatic effects that would otherwise result in too much contrast and detail.
[twentytwenty]


[/twentytwenty]
Macphun expands this option with a new feature called Zone System: instead of applying the luminosity mask automatically to the entire brightness range of your image, you can select which areas of the tonal range you want to create the mask from. For example you may want to apply a setting or a preset only to the darker zones.
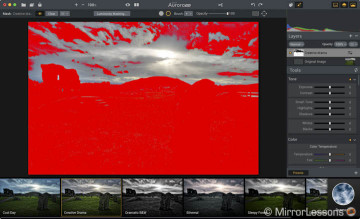
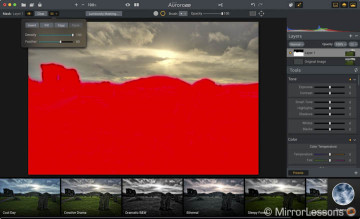
You can create the mask either by going to the mask options or simply using the histogram on the top right. There are 10 zones to choose from. The software will preview the zones you select via a green striped pattern. Note that once the mask is applied, it can’t be edited again. If you are not satisfied, you have to clear the mask and start over. I advise you to create it on a separate layer to keep everything more organised.
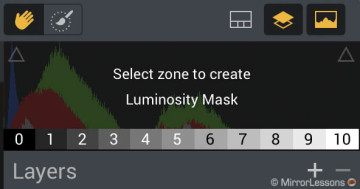
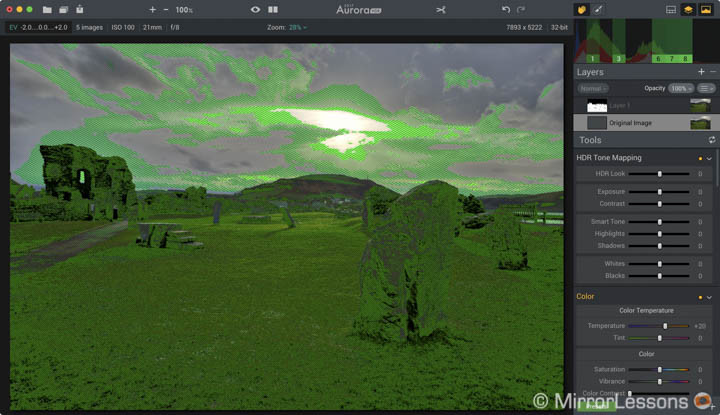
What’s great about the Zone system is that it is very easy to use and doesn’t require any complicated operation. To try this in Photoshop for example is more time consuming. Here you can create a custom luminosity mask and refine it to isolate the zones you want in a matter of seconds.
One very important setting you must check at all times when using the Zone System is the Feather option, which is accessible once you click on the mask button and open the sub row of options on top of the image. If it is set to 0, you can end up with some weird artefacts like the example below.
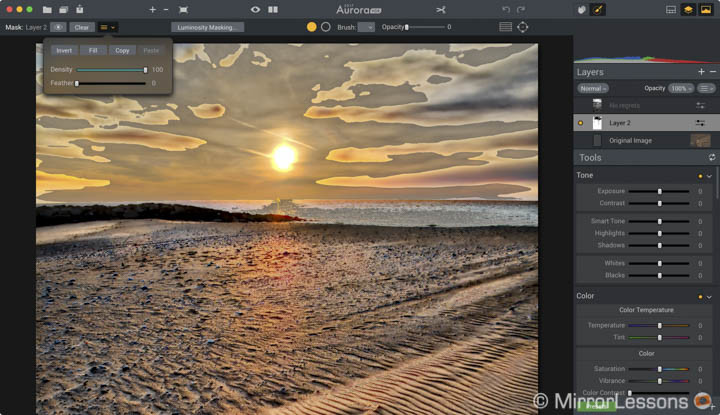
Zone system can create weird artefacts in the highlights especially.
The feather slider will help make the mask blend with the rest of the image and this is very important in the highlight zones especially.
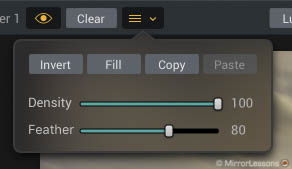
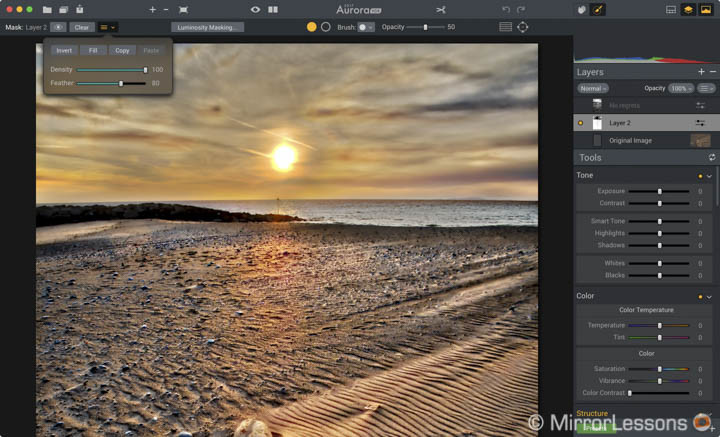
Since there are only 10 steps available, sometimes part of the mask will appear in a zone you don’t necessarily want it to. Once you’ve selected the zones you want, you can use the brush and erase tools to refine it. Think of the Zone system as a quick and easy way to create a complex mask including precise contours around elements without the need to paint it manually or use the lasso tool as you would in Photoshop. Also, because you work with the tone range, you are sure that every element within the same tone will be included in the mask. Let’s see a concrete example.
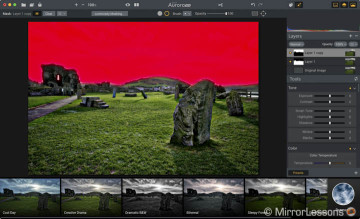
In the image below, I wanted to separate the sky from the ground to apply to different type of presets. I could have drawn the mask manually on the sky but the Zone system makes things easier. First I selected all the darkest zones until I had added most of the foreground covered in green.
Then I refined the mask by covering the last bits in the foreground that didn’t get through, and erased the zones of the mask on the sky. I then duplicated the layer, inverted the mask and voilà: the sky and foreground are completely separate in less than a minute.

Final image: I applied two different presets to the sky and the ground, then made a few extra adjustments.
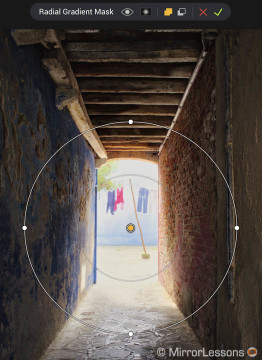
One nice addition I was waiting for is the radial mask.
I use it a lot in Adobe Lightroom and it is one thing I missed in the previous edition. You can vary its size as well as its form but there doesn’t seem to be a way to change the feather value. That being said, it is very useful and I will definitely use it a lot with the software.
[twentytwenty]


[/twentytwenty]
For all the mask types, there are new settings as well. Each one can be instantly inverted. You can vary the feather (as seen before) and the intensity of the mask. Macphun also states that the mask painting performance has been increased by 50%. I can’t confirm that exact percentage but I find it smoother to use than before.
Polarize filter

The polarise filter is a new addition that will affect the sky and the haze of your image. If you don’t abuse its settings (there is only one slider available so it is quite straightforward to use), the result is balanced and effective. It gives the sky in your image just that extra punch it needs. It works well on single exposures too.
[twentytwenty]


[/twentytwenty]
Defringing Tool

You can minimise chromatic aberrations by selecting the dedicated option when merging the images but sometimes you can’t get rid of everything right away. Aurora HDR 2017 includes a new Defringing tool that aims to get rid of purple fringing you may find at the corners of your image. However it is not powerful enough: it can get rid of the portion that is just outside the border of an element but it can’t get rid of everything. There is definitely room for improvement.
What’s improved
Now that we’ve seen all the new features, let’s analyse what has been improved compared to the previous edition.
Interface and ease of use
The first relevant difference is the new interface: the top bar is thinner which gives more space for the image and the buttons are smaller. The whole design is more minimalistic and elegant. Personally I really like it and you won’t feel lost if you’re already familiar with the previous edition. The only thing I couldn’t find at the beginning was the erase tool in the mask section, now represented by an empty circle with grey borders next to the brush tool, which in turn is now shown as a plain orange circle.
[twentytwenty]


[/twentytwenty]
When you open your bracketed shots, there is now the possibility to remove one or more images before starting the merging process. When you export the images, you now have the option to resize them and apply a sharpening setting.
Layers are still present and there are a couple of extra functions for them too. You can now directly create a layer based on its type: Texture, Original Source and HDR bracket. Original source is quite useful as it creates a layer based on the original mapping result (without any effects and settings applied). With HDR bracketing you can create a new layer that corresponds to one of the exposures used in the bracketed series. There are also more blending options, including Darken, Color Burn and Lighten.

Like the Pro edition, Aurora HDR 2017 has native RAW file support and now includes better support for the DNG format. I also noticed that the compatibility with certain RAW files (GX85, Pen F, and X-Pro2) has been improved: the alignment as well as the chromatic aberration reduction doesn’t create problems anymore.
One thing that surprised me about the version I’ve been testing is the lack of compatibility with files created with the previous edition of the app. With Aurora, you can save your HDR work in a .mpau file (now .mpaur on the 2017 edition) but the new software won’t open the files created with the previous edition. Here as well I hope that a software update can fix this. The same thing goes with custom presets. In addition to the one provided with the software, users can create their own but there doesn’t seem to be a way to import the ones created in the old software in the 2017 edition.
Speed and performance
Macphun claims the new software is faster and indeed I noticed that the merging process takes less time than before. For example I was able to merge 5 shots taken with a7r II in less than three minutes while before it could be take more time than that. It’s not a huge difference but a welcome one.
The performance itself will vary depending on the type of files you are working with and the capabilities of your computer. However there are still a few things I find annoying: when you zoom in or out of your image, all the settings applied re-load every time and that can take several seconds. By the way, the maximum zoom level has been increased to 3000% now.
Tone mapping and tools
The 2017 edition introduces a more advanced Tone Mapping algorithm that claims to retain more detail in the shadows and better highlight recovery. I merged the same shots with the old and new versions to see the difference and the 2017 version does indeed do a better job. The image is flatter with more details in the shadows and better details in the highlights. The shadows also look cleaner with less noise.
[twentytwenty]


[/twentytwenty]
Two things that are still present and largely covered in my review of the Pro edition are a) the amount of noise than can appear in the shadows when applying ghost reduction, and b) some limitations for shadow recovery if the bracketed series is not perfectly balanced with the same number of under and overexposed shots.

Note the color noise on the top left corner.
The colour temperature has been dramatically improved over the previous edition. If you apply an extreme value, you will still get an excessively strong dominant colour tint but for corrections up to 50%, the result is now much more balanced and realistic.
[twentytwenty]


[/twentytwenty]
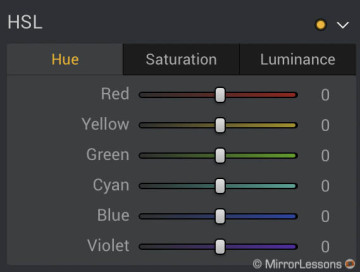
The Color Filter tool has been replaced with the more common HSL tool where you can now find Hue adjustments in addition to Saturation and Luminance.
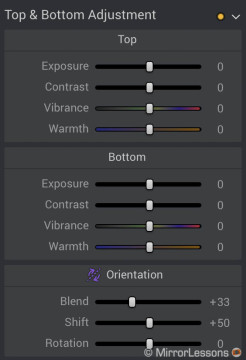
Finally, one of my favourite tools, the Top & Bottom Lighting, is replaced by Top & Bottom Adjustments: there are more options to control the top and bottom areas of your image (exposure, contrast, vibrance, warmth) which makes this tool even better than before.
New presets
Aurora HDR 2017 will come with over 70 categorised HDR presets, some of which will be available to download from the official website after you purchase the app. Among them you will find new presets designed by Trey Ratcliff, as well as other well-known HDR photographers like Serge Ramelli and Captain Kimo.
Some of these new presets feel more personal and have a less dramatic and exaggerated look in comparison to the previous edition. Note that the preset has a different effect depending on whether you apply it to the original image or to a layer. This is because the original mapping result has some exclusive settings that aren’t available with layers. Remember that you can also vary the strength of the preset.


Conclusion
Aurora HDR 2017 doesn’t revolutionise the previous version of the software but it does bring some relevant improvements. Macphun aims to perfect the aspects that already worked well, improve areas where some work was needed, and add new features to make the software more complete while meeting customer demands.
I appreciate the batch processing because it is easy to use and reliable. The new polarise filter is effective if applied with care. Some of the adjustment tools now have more options (HSL, formerly Color Filter, and Top & Bottom Adjustments). Colour temperature has been dramatically improved and you don’t get a dominant colour tint right away anymore.
The new user interface is more elegant, minimalistic and gives more space to the image which is a good thing. The compatibility with certain RAW files (X-Pro2, Pen F, GX85) has been enhanced and the software is faster at creating the HDR image. However it still reloads all the settings each time you zoom in or out which can slow down your workflow if you have lots of images to post-process.
The new tone mapping engine is capable of pulling out more details in the shadows and highlights, creating a richer base to work with. However ghost reduction can still produce colour noise and should only be used when strictly necessary. The HDR Denoise tool is still too aggressive and tends to soften details too much.
The new Zone system for the Luminosity mask helps you create more complex masks without “painting” manually with the brush. It is easy to use and you can get the job done in a matter of seconds.
As for the rest, you get all the other tools and features that make Aurora HDR the most complete HDR software out there, including layers and specific tools designed for this photography technique. The 2017 edition is definitely a relevant update and brings Macphun one step closer to becoming an undisputed leader in the category.
Check price of Aurora HDR on Macphun
 What I like about Aurora HDR 2017 edition:
- the new interface is minimalistic but still user friendly and gives more space to the image
- batch processing is easy to use and effective
- Zone system for the luminosity mask allows you to create complex masks very quickly and effectively
- the radial mask is a welcome addition
- the polarise filter gives good result if not overused
- the tone mapping algorithm pulls out more details in the shadows and highlights while producing less noise
- colour temperature has been dramatically improved
- some tools like Color Filter or Top & Bottom Adjustments are now more complete
- the software is faster than the previous version
- new presets have a more personal and interesting look
 What I don’t like about Aurora HDR 2017 edition:
- You can still encounter colour noise when using ghost reduction
- Still some limits for shadow recovery if the exposure of the bracketed series is not perfectly balanced
- the software re-loads all the the settings each time you zoom in or out and it takes several seconds in most cases
- the Defringing tool is not very effective

