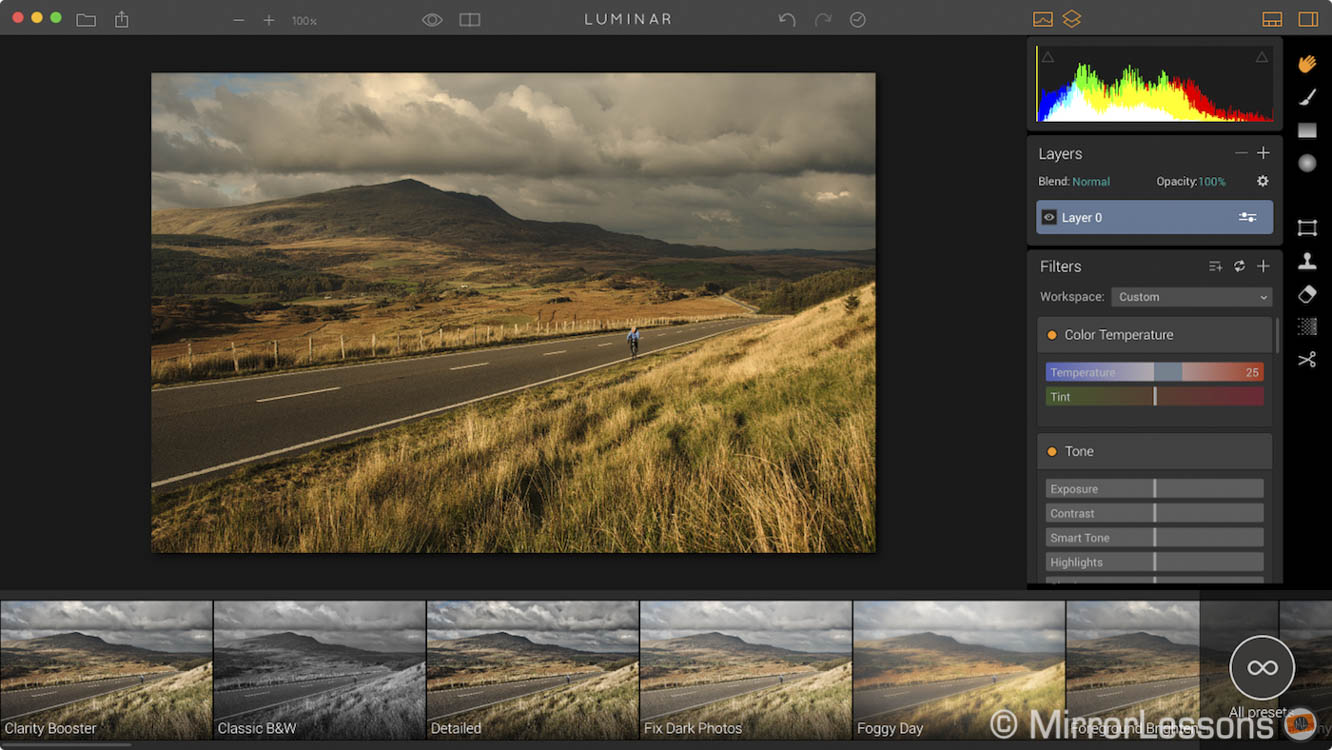
After releasing the new version of their popular HDR Software, Macphun unveiled a brand new app for photographers: Luminar. It is an all-in-one photo editing solution that includes RAW format compatibility, a user friendly interface, presets, layers, masks and advanced tools for the most demanding photographers.
I had the chance to test different beta versions for the past few weeks. This article is a comprehensive review of the features with personal notes about the things that I like and those that might need improving.
Update: I recently added some more thoughts and considerations after seeing the final version. These new findings mainly concern RAW processing and Fuji RAF files.
Macphun’s goal is to design a software that can be appealing to both beginners and expert photographers. Does Luminar succeed? Let’s find out!
Main specs
- Version tested: 1.0.1 (2616)
- Operative system: Max OS X 10.10.5 or newer
- Processor: Core 2 Duo from late 2009 or newer
- RAM: Minimum 4 GB
- Hard drive space: 2 GB
- Display resolution: 1280 x 800 or higher (Retina displays supported)
[toc heading_levels=”3″]
Ethics statement: Macphun kindly provided us with an evaluation copy of Luminar to test. We were not asked to write anything specific about the software in exchange for the opportunity and were not provided any other compensation of any kind to publish this article. All opinions we express regarding Luminar are our own. Within the article, there are Macphun affiliate links. If you buy something after clicking the link, we will receive a small commission. To know more about our ethics, you can visit our full disclosure page. Thank you!
Interface, ease of use and presets
If you are using other Macphun software, the interface of Luminar will be pretty familiar to you. If not, it won’t take long to learn how to use it. It is very straight-forward, elegant and well-organised.
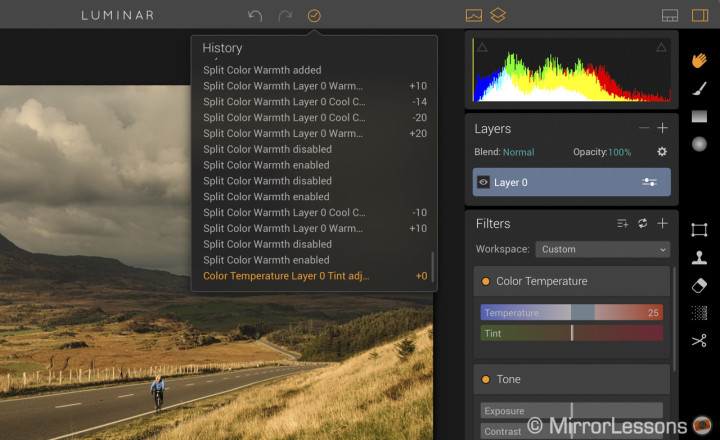
With the top grey bar you can open or share a photo, zoom in or out, visualise the image at 100%, see a quick preview of the original image or compare it to the post-processed version. You can undo or redo the settings applied or display the history tab.
The history tab is an excellent addition and one thing I miss from Aurora HDR.
On the right, you will find tools such as masks (paint, gradient and radial), transform, clone & stamp, erase, denoise and crop tools.
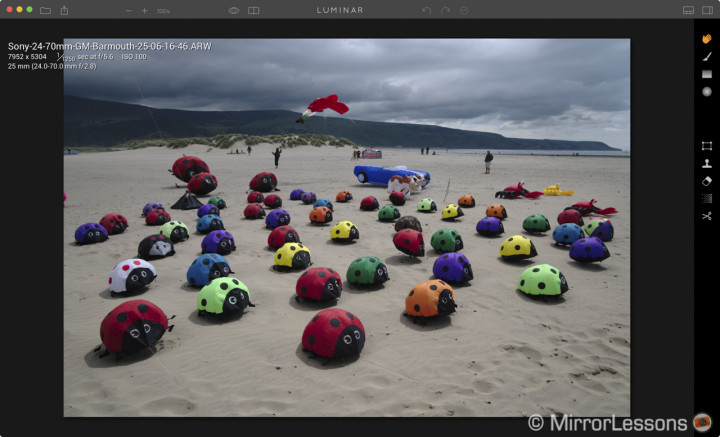
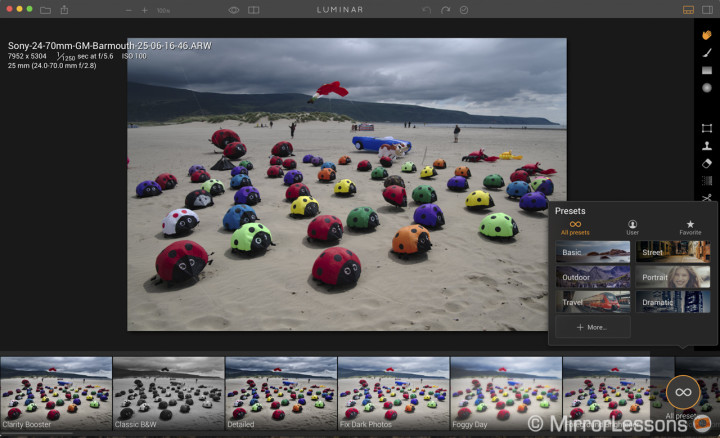
The interface above is pretty basic if you just want to do some cropping and don’t want to bother with more complicated actions involving masks and layers. However you might want to post process your image quickly without dealing with individual settings. This is where the Preset panel comes in handy. Similar to the ones you can find in Aurora HDR, presets give your image a distinctive look with just one click.
[twentytwenty]


[/twentytwenty]
[twentytwenty]


[/twentytwenty]
Like Aurora, you can vary the intensity of the presets with the dedicated slider on the thumbnail. You can choose from 50 different presets subdivided in different categories (outdoor, travel, street, portrait etc). More will be available to download from the Macphun website. Some of these presets are quite punchy and will give you strong vignetting, cross process, colour tint or monochrome effects while others are more subtle.
Overall the presets are a good starting point for beginners but as soon as you become more familiar with the software, you will want to have more control.
This is where you activate the side panel that displays the histogram, layers and all the individual settings that in Luminar are called Filters (more on this in the next chapter).
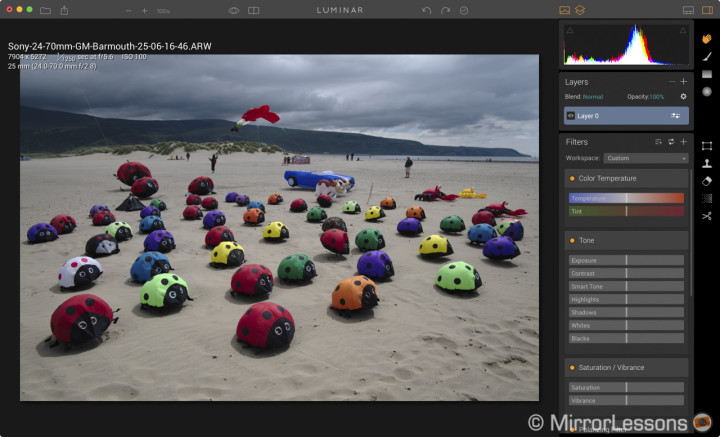
Another relevant point to highlight is that Luminar is compatible with RAW files, meaning it can act as a RAW developer software as well. In fact most of the images you see in this article were edited from RAW files using various mirrorless cameras.
You can export the image in various formats, share it to a social network account or send it to another Macphun or third party app like Photoshop or Lightroom (for the last two you need to install the add-ons that come built-in with the software).
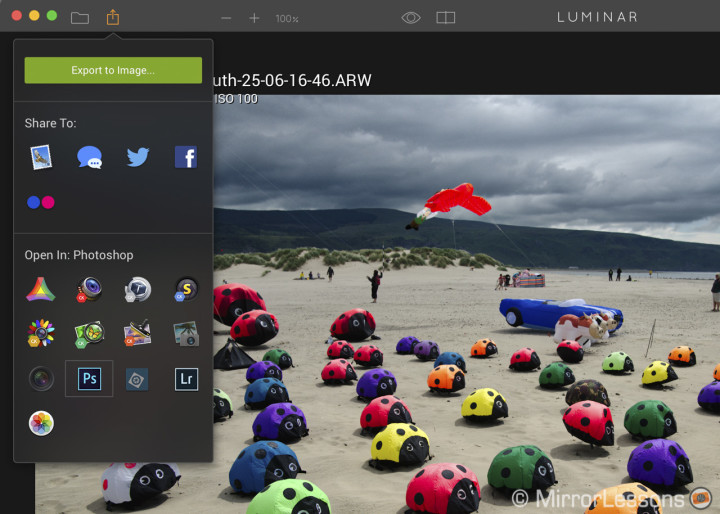
The only option that the export image window doesn’t have is the possibility to include a watermark. A work-around could have been to insert a separate png or other transparent file as an image layer before exporting the file. However Luminar doesn’t recognise transparency on a PNG or TIFF file when imported as an image layer. A partial workaround as suggested in the comments is to use the opacity or blend mode settings.
You can save all the settings and layers applied to your photograph as a proprietary .lmrn file and the history will be saved as well. This means you will be able to access all the adjustments you made at any time by just opening the Luminar file.
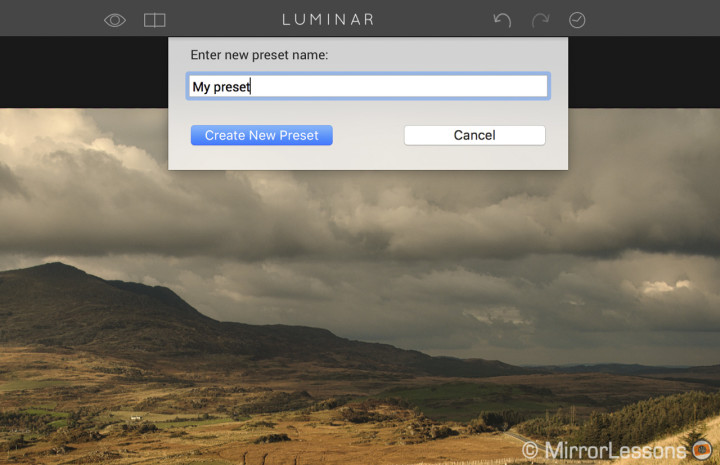
You can open more than one image in Luminar but note that it is not meant to catalogue and sort your pictures like Adobe Lightroom. The workflow of the software is more similar to Photoshop in that sense. If you want to copy and paste the same settings to different images, the best trick is to create a new preset after editing the first image and apply it to the other images.
One thing Luminar is missing is batch processing. It would have been a great addition since the company successfully introduced it to Aurora HDR 2017.
Filters and workspaces
Now that we’ve seen the basics of Luminar, let’s dig a little bit more into Filters, which is another way of calling the individual settings or tools that you need to edit your image.
Filters include basic adjustments such as white balance, exposure, shadows and highlights but also other effects like cross processing, polarising filter, Orton effect, and so on. There are a total of 39 filters. But before digging into some of the most interesting ones, let’s have a look at how filters are organised.
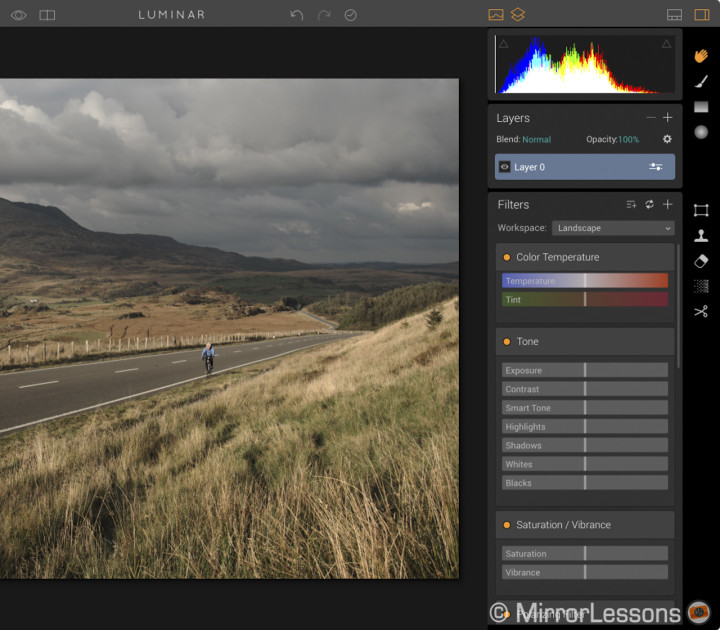
When you activate the side panel, in the filter tab you will notice a drop down menu called Workspace. This is one of the most interesting features of Luminar.
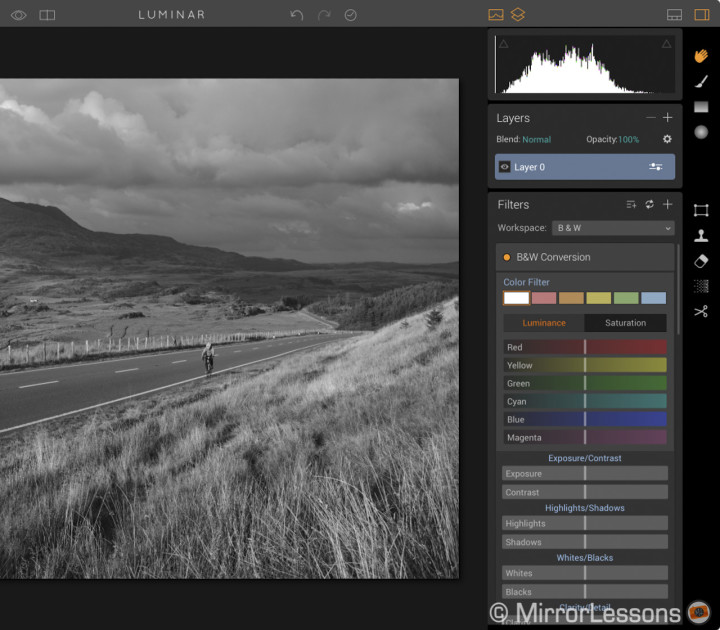
Workspaces allows you to group filters according to the type of adjustments you want to make or the type of image you want to edit.
By default, the software has four workspace templates built-in. For example the Landscape workspace will display adjustments such as colour temperature, tone, saturation and polarising filter, while the B&W workspace will automatically convert your image to Monochrome and display the B&W conversion filter first.
[twentytwenty]
[/twentytwenty]
Of course you can create your own customised workspaces. If for example there are filters in the Landscape workspace you don’t use, you can delete them and the Workspace will automatically switch to Custom. You can then add other filters you like and save it as a new Workspace. This becomes an interesting solution to display the settings you need for a specific image without having to add filters every time or scroll down until you find the adjustments you need.
If we concentrate on filters, there are first some basic options that are very handy. Each filter can be reset, disabled (useful when you want to see the before and after), deleted or duplicated. To each filter you can apply a mask (more on this later on) or a blending mode. The display order can also be re-arranged by simply dragging a filter up or down.
When you want to add a filter, a handy tab on the left will show you a brief description and what the effect looks like when you scroll through the list. Filters are divided by category and there is also a search bar.
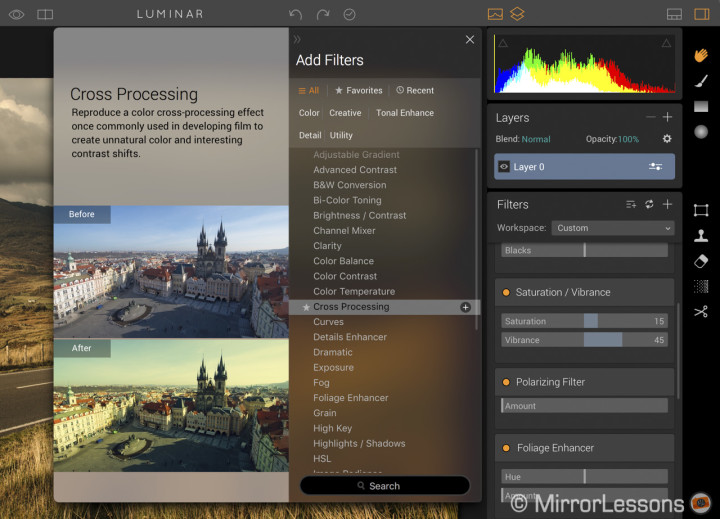
I won’t dig into each one: the basic adjustments like exposure, curves or HSL work exactly as they do on other software. However there are additional settings that I personally really like. Some of them come directly from Aurora HDR and are the following:
- Image radiance: the official description mentions a glow or “dreamy effect”. However it can also be used to soften the contrast and the overall look of the image and gives a subtle yet interesting result.
[twentytwenty]


[/twentytwenty]
- Polarising filter: as the name suggest, it enhances the blue of the sky and cuts through atmospheric haze. It works as long as you adjust it only slightly, otherwise it can introduce too much noise.
[twentytwenty]


[/twentytwenty]
- Structure: it gives an HDR-like effect to your image by increasing clarity and micro contrast. If not abused, it can give your photo a nice punch but beware of noise if you push the slider too much.
[twentytwenty]


[/twentytwenty]
- Top & Bottom Lightning: this is one of my favorite tools in Aurora HDR and I’m glad Macphun included it on Luminar as well. It allows you to control light and exposure separately on the top and bottom areas of your image. This is useful for sunset or sunrise landscapes and other similar images.
[twentytwenty]


[/twentytwenty]
Then we have other interesting filters that can deal with various adjustments. Two that I particularly appreciated are:
- Split Color Warmth: enhance cool and warm tones separately which can result in more contrast and vibrance.
[twentytwenty]


[/twentytwenty]
- Orton effect: includes a selective glow and blur effect without softening what’s in focus. It can be quite powerful for portraits.
[twentytwenty]


[/twentytwenty]
Layers, masks and Erase tool
Like Aurora HDR, Luminar includes layer and mask capabilities. I won’t dig too much into those as their purpose is the same as other software. If you are familiar with Photoshop, you probably know how helpful layers and masks can be.
If you are not familiar with layers and masks yet, Luminar is a great software to learn the tricks of the trade.
You can use layers to separate certain adjustments, use masks to edit only a specific area of your photo, or blend your image with another photograph.
In Luminar you can create different adjustment layers, choose between 14 different blend modes, adjust the opacity of each layer or merge layers together. Alternatively you can create an image layer where you import another photograph on top of the first one.
Concerning masks, you have the option to paint one on a certain portion of your image, create a gradient mask, a radial mask or use luminosity masks on a specific layer or filter. For example I often use radial masks for portraits to give slightly more exposure to the person’s face than the rest of the image.
[twentytwenty]


[/twentytwenty]
A more in-depth edit can be to create a radial mask on the model’s face to soften the skin tone without compromising details and sharpness. If you add to the mask some of the filters like Detail enhancers and Structure filters but use those with negative values, you can soften the skin tone without exaggerating the effect, keeping a natural result that enhances the person’s face. Add some filters like the Orton effect seen before and you get very nice results.
[twentytwenty]


[/twentytwenty]

You can also use masks and layers to replace a sky for example if you want to give it a more dramatic look. Personally I am not a fan of this type of manipulation but the option is there and tells you that Luminar is quite powerful when it comes to manipulation. You also have a clone and stamp tool that is similar to the one seen in Photoshop
Another interesting feature is the Erase tool. It works surprisingly well in some situations if you want to get rid of unwanted elements like a small flare or sensor dust quickly.
Once you activate it, you have the option of painting on the spot that you want gone or creating a lasso tool around it. The more precise you are in selecting the exact element you want gone, the better the result will be. Then you validate and the software will do the rest.


It works well when the element you want to remove is on a uniform background but if there is a more complicated texture around it, the result can be less precise. In this second example, I had to add a mask to increase the contrast and correct the colour cast of the veiling flare, then use the Clone & Stamp tool to fix the rocks texture the best I could.


RAW development
As I mentioned at the beginning, Luminar is compatible with RAW files. I didn’t have any problem opening most files from various mirrorless cameras including Olympus, Panasonic, Fujifilm and Sony models. I could even open some High Res Shot files from the Pen F at 80MP without any issues. Adjusting exposure, white balance and recovering shadows worked well with the software.
The only issue found is with Panasonic GX85 files that show a strong magenta tint. I forwarded the issue to MacPhun and I am sure they will be able to fix it very soon.
For now the limitations for RAW processing include mainly distortion and chromatic aberration. The software won’t correct distortion automatically on all files and there isn’t a distortion correction tool. It also lacks a chromatic aberration removal filter.
Important update: in my initial report after testing the first beta version, I shared interesting results concerning details and sharpness with Fuji RAW files. I showed an example with green foliage by comparing the software to Adobe Lightroom and Iridient Developer to highlight that Luminar was doing a better job than Adobe. However the latest and final version I received seem to have taken a step backwards. I wasn’t able to replicate the same encouraging results I found at the beginning. I will forward my feedback to the Macphun team and hopefully they will be able to correct this in a future update.
Concerning noise reduction, Luminar has a more powerful engine and seems to be a good improvement over Aurora HDR. You have 10 different levels of intensity and a slider that goes from 0 to 100%. The stronger the level, the more the software will get rid of noise but it will also soften the details. You can’t separate colour and luminance noise and that can be a limit. However if you take time to work with the Denoise tool and the sharpening and detail filters, you can obtain decent results. Still I think this is an area where Macphun software programs need additional improvements.

Conclusion
Macphun Luminar is all-in-one photo editing solution that tries to combine simplicity of use with advanced tools. The goal is to be appealing to both beginners and expert photographers and I think the potential is there.
As of now, I find the software excellent especially for amateurs who want to start practising post-production with a simple and affordable app. To this end, Luminar seems to be a perfect choice: the interface is elegant and pretty easy to learn. You can start with presets and basic adjustments and then slowly move to more advanced editing with individual filters, layers and masks without the need to upgrade or switch to any other software. More advanced editing remains easy to do. There are lots of tools for portraits and natural rendering skin tones without overdue. The app is not as powerful or as complete as Photoshop but that’s not the intent anyway.
RAW processing works with most files I was able to test except the Panasonic GX85 (something that will be fixed very soon I hope). White balance is accurate and exposure and shadow recovery is flexible enough. However it lacks distortion and chromatic aberration correction.
The De-noise tool does a good job but I hope the company will consider separating colour and luminance in the future, which could help preserve more details.
The software performs well overall concerning speed and stability but it can be slow to open some RAW files or apply Denoising. As of now it is designed exclusively for Apple computers, which penalises potential Windows users.
Luminar is now available to buy or try for free for a limited period of time. The latter is without a doubt the best way to see how good the software can be for you needs.
Check price of Luminar on Macphun
You can also use the code below to save $10. Note that the coupon may be invalid when the software is on pre-order or on special offer.
 What I like about Macphun Luminar:
- Clean and user-friendly interface
- Can satisfy both beginners who want to start practising post-production, and more expert photographers who want advanced tools
- Workspaces are an excellent idea to save and display your favourite settings with one click
- 39 filters to make all sorts of adjustments and satisfy different tastes
- Nice tools for portraits and skin tone control
- The Erase tool has potential and is useful for getting rid of small artefacts (flare, lens or sensor dust)
 What I don’t like so far about Macphun Luminar:
- Batch processing is missing
- No option to add a watermark
- Noise reduction doesn’t separate colour from luminance
- Lacks distortion and chromatic aberration correction tools and doesn’t always correct these issues automatically when opening RAW files
- Only for Mac computers
Additional read:
