[Read more…] about A multi-purpose zoom for all occasions – Fujinon XF 18-135mm f/3.5-5.6 Review
E1 by Z Camera – The smallest 4K Micro Four Thirds camera with an interchangeable mount
Have you ever wondered what a hybrid of the popular GoPro and the Panasonic GH4 would look like? Well, Z Camera, a two-year-old Los Angeles based company, is trying to bring this concept to life with its new E1 camera, the smallest Micro Four Thirds camera to shoot in 4K. Though launched only a couple of days ago, their Kickstarter campaign has already raised much more than the original goal and continues to amass support and funding.
Say ‘hello’ to the Lumix GX8 – Panasonic GX7 successor has new 20MP sensor!
Today saw the arrival of the successor to the now two-year-old GX7, the Panasonic Lumix GX8. With so many Lumix cameras having appeared over the past year, you would be right to wonder what new and exciting features the GX8 could bring to the system. Well, as it turns out, there’s quite a lot to be said about this new addition to the Lumix line-up!
[Read more…] about Say ‘hello’ to the Lumix GX8 – Panasonic GX7 successor has new 20MP sensor!
Opponents in the APS-C Realm – Sony A6000 vs. Fujifilm X-T1
Being two of the four interchangeable mirrorless systems to house an APS-C sensor, it is quite common and natural for comparisons to be drawn between Sony and Fujifilm.
On one hand, we have the Sony ILCE (Alpha) line-up, formally known as NEX. Mirrorless cameras in this line-up feature Sony’s proprietary E-mount and house either an APS-C or Full Frame sensor. The Fujifilm X Series, on the other hand, consists of a mix of interchangeable lens cameras with an APS-C X-Trans II sensor and premium compacts with either a 2/3-inch or APS-C sensor.
Two models that frequent come head-to-head are the Sony a6000 and Fujifilm X-T1. Despite being classified as a mid-end mirrorless and priced as such, the a6000 is currently the fastest camera in Sony’s Alpha line-up. The X-T1 recently took the X-Pro1’s place as the brand’s flagship model, and features all the latest bells and whistles the Fujifilm X series has to offer, including a fast hybrid AF system, a high quality EVF and sundry external dials.
Want to find out more about how these two popular APS-C sensor cameras compare? Then let’s get started!
[toc heading_levels=”3″]
Main Specifications
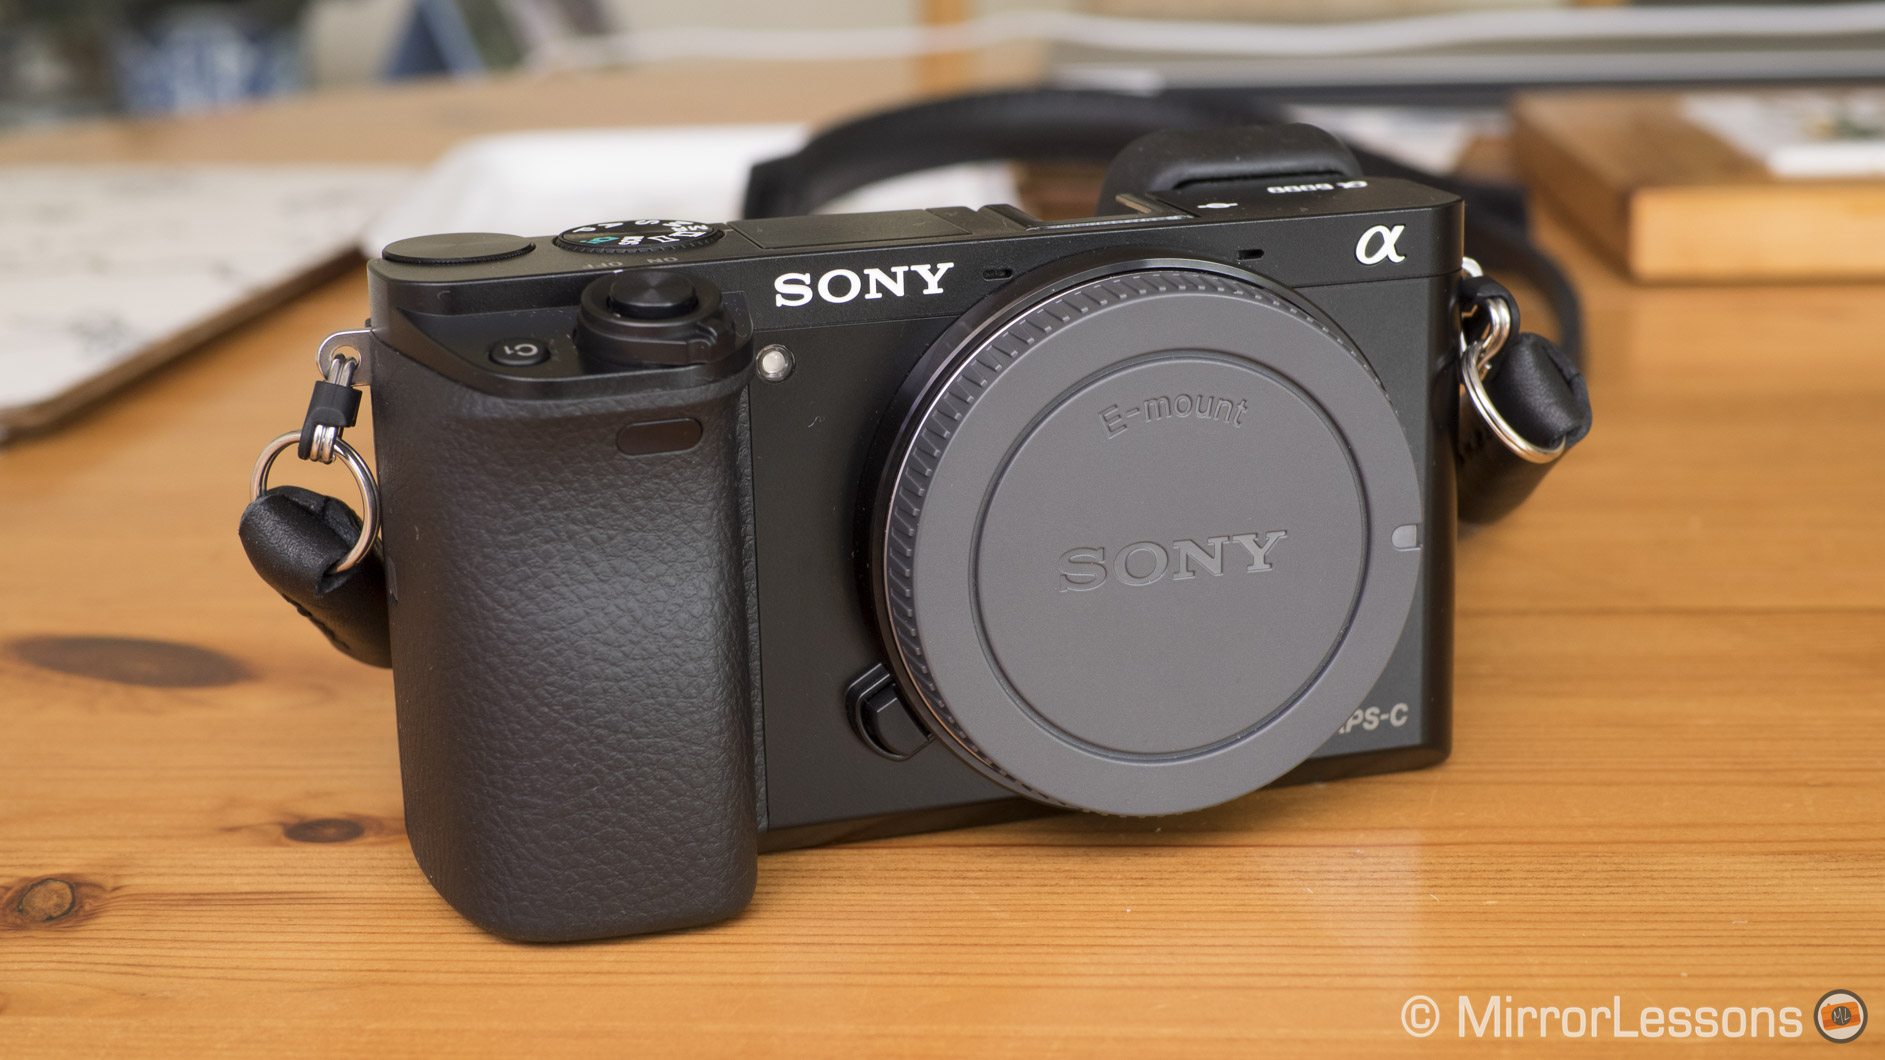
The a6000 is a mirrorless interchangeable lens camera with a 24MP APS-C sensor. It can accept any lens designed for Sony’s E-mount. In accordance with its rangerfinder design, the EVF sits on the left-hand side of the camera.
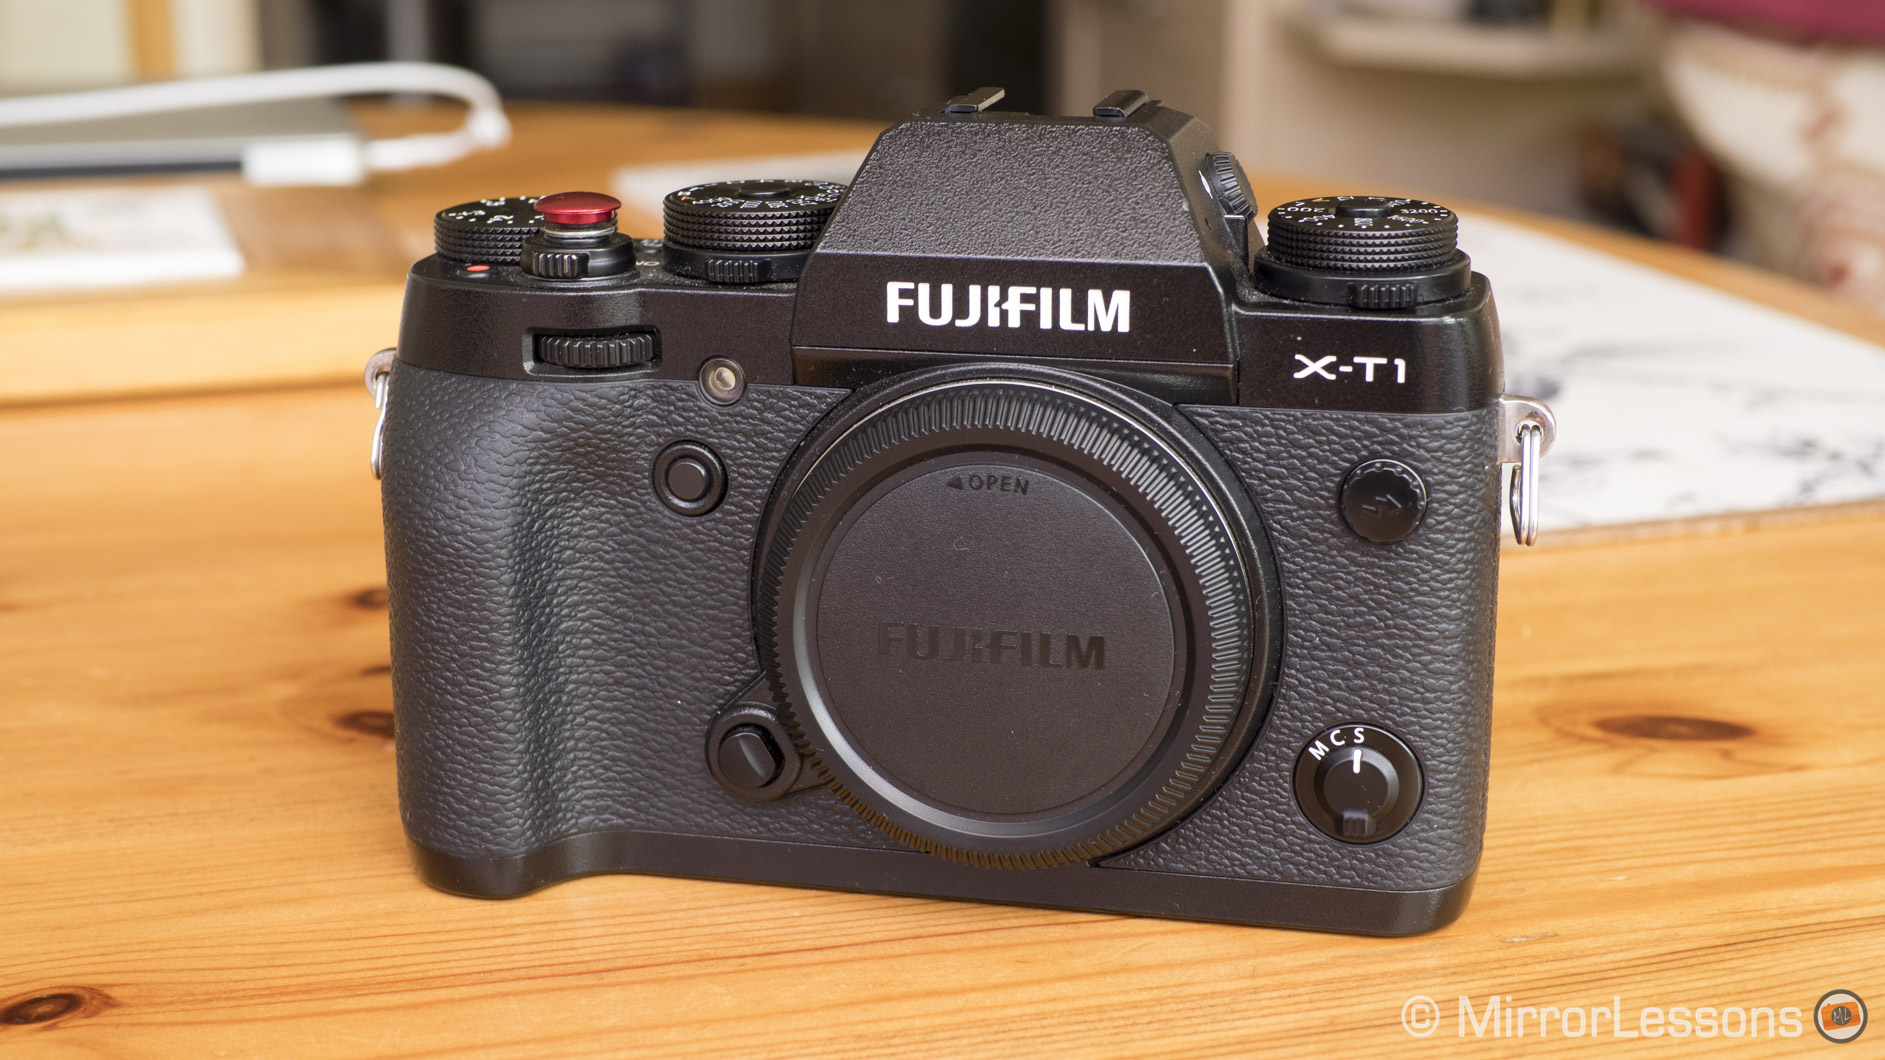
The X-T1 is a mirrorless interchangeable lens camera with a 16MP X-Trans II APS-C sensor. It can accept any XF or XC lens design for the Fujifilm X series. To match its SLR-like design, it has an EVF that sits inside a fake pentaprism in the middle of the camera.
Ergonomics and Design
There isn’t much that can be said against the ergonomics and design of the a6000 and the X-T1. Both are very well-conceived and comfortable to use. However, as I suggested above, there are quite a few differences in their design which may influence your decision:
The a6000 has been designed in the rangefinder style, albeit with a much more contemporary appearance. It has an electronic viewfinder located on the left-hand side of the body and a substantial textured grip on the front that makes the camera a pleasure to hold even for long periods of time. However, it isn’t weatherproof like the X-T1.
The X-T1 takes its design from classic film SLRs. Its electronic viewfinder is located in the centre inside a pentaprism-esque hump. It features a noticeably smaller textured grip than the a6000, which is a shame as it is both slightly larger and heavier than the latter. Attaching a thumb grip to the hot shoe makes all the difference. Unlike the a6000, the entire body is covered in a rugged textured material and is completely weatherproof.
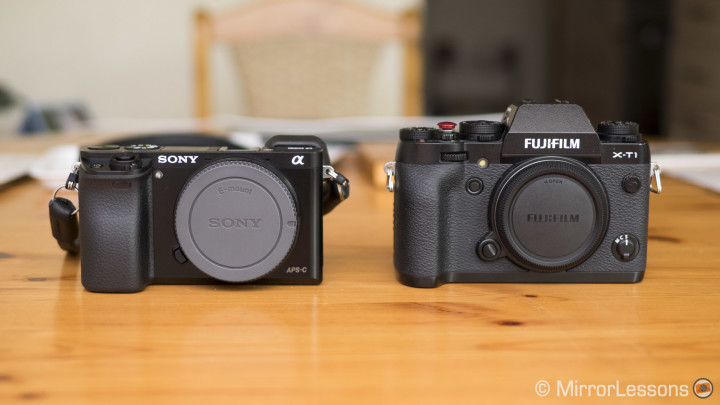
Both cameras feature a number of external dials that are easily accessible on both cameras. However…
The a6000 has fewer external dials than the X-T1. It has a traditional mode dial with PSAM, two intelligent Auto modes, panorama, preset settings, movie and scene modes. The presence of two automatic modes makes sense as this camera is geared towards beginners and advanced amateurs. A secondary dial beside the mode dial and the control wheel are used to change aperture and shutter speed respectively. There are a total of 7 customisable function buttons on the body (three on wheel, one in centre of wheel, two C buttons, and one Fn),
The X-T1 has a plethora of external dials a la traditional SLR. These include exposure compensation, shutter speed, ISO, drive modes, bracketing, double exposure and panorama. On the front and rear, there are two smaller dials that are used to adjust aperture (active with lenses lacking an aperture ring) and fine-tune shutter speed. Being a high-end camera, there isn’t a dedicated Auto mode on the body, but you do have the option to set the shutter speed and ISO dials to A. If your lens has an aperture dial, you can set that to A as well. There are a total of 6 customisable function buttons on the body.
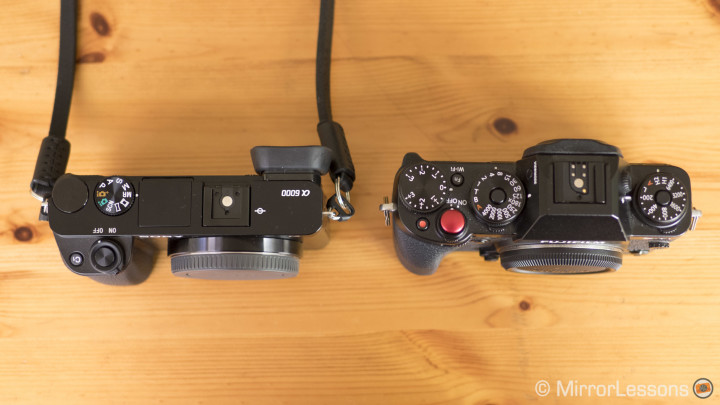
A few features that you’ll find on both cameras are a hot shoe for external accessories, an HDMI and USB port, an on/off switch that surrounds the unthreaded shutter button, and a well-placed movie button that can’t be accidentally pressed.
Most importantly, they both feature a built-in electronic viewfinder…
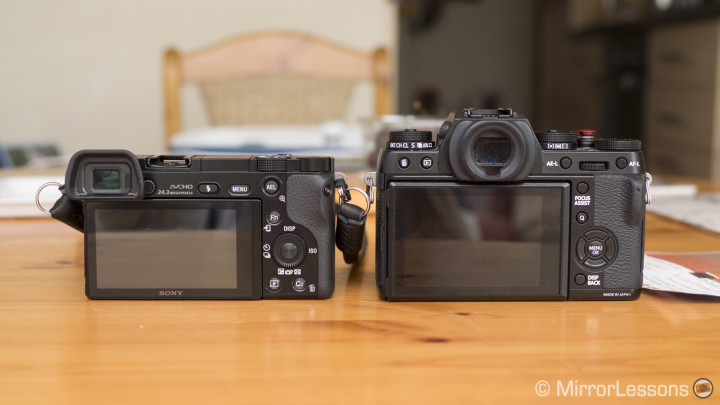
The a6000’s OLED electronic viewfinder is located on the left-hand side of the camera in the rangefinder style. At 1.44 million dots, 0.70x magnification and 0.39 inches in size, not only does it have less resolution than the X-T1 viewfinder, but it is also much smaller. In fact, it is a downgrade from the viewfinder of its predecessor, the NEX 6. That said, the coverage is 100% like the X-T1 and the overall quality is very good. You also get manual assist functions like magnification and focus peaking.
The X-T1 has one of the best electronic viewfinders on the market as of 2015. It is located within the pentraprism-like hump at the centre of the camera. It is OLED, has 0.77x magnification, 100% coverage, and 2.36 million dot resolution. It is also 0.5 inches in size, making it larger, crisper and brighter than the a6000 viewfinder. It also has a time lag of only 0.005 seconds and comes with three different manual assists (focus peaking, magnification and digital split image). What’s more, it is possible to activate a dual screen mode, which allows you to keep an eye on your entire composition while making manual adjustments on another smaller screen.
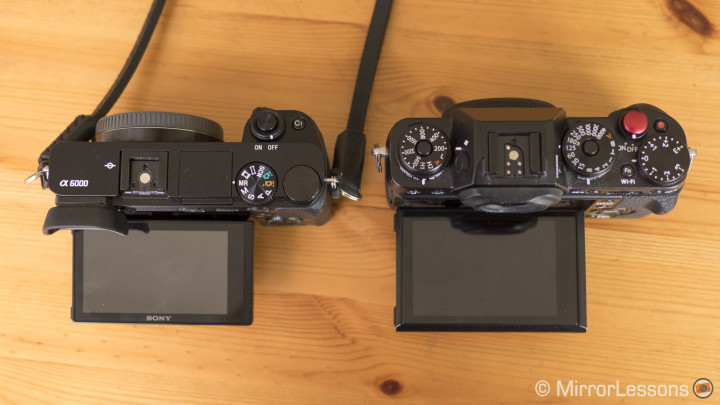
The a6000 and X-T1 both have a 3-inch LCD screen that tilts up 90 degrees and down 45 degrees. Neither are touch sensitive, which is a shame as it is a standard function on many of the competitors’ cameras. The only difference between the two is that the a6000 has a lower resolution (921k dot vs 1020k dot). The menu can be accessed from the LCD or EVF on both cameras. And speaking of the menu system…
The a6000 menu can be quite complicated to navigate at first. I find that the functions are organised and occasionally named poorly. That said, the camera will always take you back to the place you left off in the menu, regardless of whether you simply leave the menu to shoot or turn off the camera completely.
The X-T1 menu isn’t very approachable either but it is more straightforward than the Sony menu. Unlike the a6000, the X-T1 will not return to where you left off in the menu after you turn off the camera. Keep in mind that you won’t need to dig into virtual menus all that much on the X-T1 thanks to its many external dials.
Both give you access to a “quick” menu from which you can access all the most important settings. On the a6000, it can be found by pressing the Fn button on the rear. On the X-T1, you simply press the Q button. These quick menus are far easier to use than the main menus themselves.
As for the other physical differences in the two bodies…
The a6000 has a built-in pop-up flash but lacks a headphone and mic jack. The memory card slot sits beside battery inside the battery compartment.
The X-T1 doesn’t have a pop-up flash but a small external unit is provided with the camera. There is a mic remote jack. The memory card is accessed from a separate compartment to the battery port on the right-hand side of the camera.
Image Quality
Note: Results may vary depending on the Raw converter. For this comparison, I used Adobe Lightroom to edit the Raw files, the program I use for all my post-production work.
Sony and Fujifilm are direct competitors, in part because their mirrorless models both have APS-C sensors. The files produced by both cameras are excellent, and are more than suitable for making large prints, but their specifications are quite different…
The a6000 has a 24MP APS-C size sensor. Due to the high megapixel count, the images produced by this sensor are very sharp and detailed when combined with high-end glass. Subjectively speaking, we have also found that they can assume a more digital appearance than the X-Trans sensor.
The X-T1 has a 16MP X-Trans II sensor. The results produced by this sensor have a very pleasant “organic” rendering. Since 16MP is less resolution than 24MP, the results aren’t quite as detailed as those from the a6000, but in a real world situation, this doesn’t become an issue unless you make extremely large prints.


Colour and White Balance
If you choose the same settings (shutter speed, aperture, ISO, WB, picture profile) on both cameras, the colours are actually quite similar in normal daylight conditions. The X-T1 produces a slightly cooler and more saturated Raw file than the a6000, with stronger shadows, but overall the results are comparable. The same can be said about the JPGs.
If you let the cameras choose their own shutter speed, however…
The a6000’s metering seems to be more accurate, with well-exposed highlights, mid-tones and shadows. This is especially true for scenes with a vast range of highlights and shadows.
The X-T1 tends to overexpose a stop more than the a6000, sometimes blowing out the highlights to preserve the detail in the shadows, especially in contrasty conditions.
If you set the WB to Auto on both cameras, you’ll notice that the a6000 has a noticeably warmer rendering than the X-T1. The difference becomes even more salient in the JPGs.
Dynamic Range
I’ve always been impressed by the dynamic range of Sony Raw files, especially in the highlights. In the shadows, you may notice more colour noise than on the X-T1 if you open the shadows too much.
The dynamic range of the X-Trans II sensor is also very good. It is easy to recover details in both the highlights and shadows.
Below are two original Raw files from the a6000 and X-T1 exported from Lightroom. I purposely chose a location with strong shadows and highlights. For the experiment, I used the 16-50mm kit lens at 35mm on the a6000 and the XF 18-135mm f/3.5-5.6 on the X-T1.
And here again are the same two Raw files after being post-processed in exactly the same manner (highlights: -100 and shadows: +100). As you can see, they do a fairly equal job of recovering the details in the highlights and shadows.
Both cameras have auto dynamic range functions but I find them overly aggressive. I prefer to keep the DR to Off on the a6000 / DR 100% on the X-T1 and post-process my Raw files later on if needed.
High ISO Performance
The a6000 has a native ISO range of 100 to 25600. It produces Raw + JPG files at all values.
You can set the high ISO noise reduction to Normal, Low or Off. We personally recommend setting it to Low or Off as the noise can be quite invasive. It only affects the JPGs.
The X-T1 has a native ISO range of 200 to 6400. Low 100 and 12800 / 25600 / 51200 ISO are extended ISOs and are only available as JPGs.
You can set noise reduction to -2, -1, 0, +1 or +2. We personally recommend -1 as NR can sometimes give your image a mushy appearance. It only affects the JPGs.
Overall, I found the ISO performance very similar up to 800 ISO. Even when you hit 1600 ISO, detail retention remains good from both cameras. However, you start to see some visible colour noise in the darkest areas of the a6000 Raw files at this value, and it gets progressively worse. After ISO 6400, you see a sudden deterioration in the quality of the files from the X-T1, as Raw is no longer available. There isn’t a tangible difference between images shot at ISO 100 and 200 on the a6000, whereas the rendering is different on the X-T1 due to ISO 100 being a JPG.
My feeling is that the Raw files up to 6400 ISO are useable from both cameras, though some people have more tolerance for noise than others. Anything above 12800 is just a gimmick. If you use the JPGs, it is best to keep the NR settings low at the higher ISOs to retain as much detail as possible.
You can see a full series of direct high ISO comparisons in this Smugmug gallery.
Picture Profiles / Effects
The a6000 has your basic picture profiles, or creative styles as they’re called on Sony cameras. They include standard, vivid, neutral, clear, deep, light, portrait, landscape, night scene, sunset, autumn leaves, black and white, and sepia.
There are also many different picture effects: toy camera, pop colour, posterisation, retro photo, soft high key, partial colour, high contrast mono, soft focus, HDR painting, rich tone mono, miniature, watercolour, and illustration. They only become available when you switch off the Raw option.
Instead of the basic picture profiles you can find on almost any camera, the X-T1 incorporates Fujifilm’s well-loved Film Simulation Modes. In total, there are nine: provia (standard), velvia (vivid), astia (soft), classic chrome, pro neg. hi, pro neg std, B&W, monochrome + yellow/red/green filter, and sepia.
Of course you also get a series of advanced filters: toy camera, miniature, pop colour, high-key, low-key, dynamic tone, soft focus, and partial colour.
Both the Film Simulation Modes and advanced filters only affect the JPGs.
In total honesty, the pictures profiles I prefer are the Film Simulation Modes of the X-T1. They provide a pleasant and subtle film-like look to your JPGs that is difficult to reproduce in post-production, unless you use the Fujifilm Adobe profiles.
Below you can see a quick comparison between the rendering of the Vivid profiles on the two cameras:
Autofocus and Performance
A common complaint about mirrorless systems regards the lacklustre performance of their respective autofocus systems. Up until two years ago, it would have been unthinkable to use a mirrorless camera for sports or wildlife. However, recent improvements have instilled confidence in professional photographers, and indeed, many have begun using mirrorless systems for action-rich genres.
The a6000 and X-T1 are two good examples of the positive direction in which mirrorless autofocus systems are developing. While far from perfect, they are both practical alternatives to DSLRs for genres where a reliable autofocus system is required.
Main Specs
The a6000 features a hybrid autofocus system with 179 phase detection points and 25 contrast detection points that cover over 90% of the sensor.
It has a very quick maximum burst of 11 fps in C-AF, and three drive modes (high, medium and low). You can choose between four different focus areas: Wide, Zone, Center and Flexible Point.
Despite being a mid-end model, the a6000 easily competes with high-end models like the X-T1, GH4 and E-M1 in terms of its autofocus performance.
The X-T1 features a hybrid autofocus system that couples contrast (40 points) and phase detection (9 points). The sensor has on-chip phase detection pixels, giving it a swift AF response time.
It is quite a bit slower than the a6000 with its maximum burst of 8 fps in C-AF. It incorporates two burst modes (CH and CL), and you can choose between three different focus areas: Single Point, Zone and Wide/Tracking.
The AF system was recently updated thanks to the recent firmware update 4.0.
Single AF Mode
In good light, the single AF mode of the a6000 is lightning fast and accurate. It immediately locks onto any subject, as long as it features some contrast.
When set to flexible spot, you can choose between three different AF point sizes (small, medium and large). Unfortunately, you cannot set the four buttons on the control wheel to directly change the AF point. To change its position, you must first press the centre button on the control pad to activate the Focus Area function, and then move the point about with the four buttons on the control wheel. It is a bit awkward if you want to quickly change your AF point.
An alternative to AF-S on the a6000 is AF-A. With this mode activated, the camera chooses between AF-S and AF-C depending on whether there is a moving subject in the frame. It works but I prefer not to use it as it hands over too much control to the camera.
The X-T1’s autofocus in S-AF mode is also very quick and accurate in good light, though my impression is that it is a little slower than the a6000.
You can choose between 5 different AF point sizes. Even more importantly, you can quickly change the AF point’s position by simply pressing the buttons on the four-way control pad. Zone AF and Wide/Tracking are also available in S-AF. With the Zone AF you can select a group of AF points while the Wide/Tracking will have the camera automatically select the best AF point.
A new addition to the X-T1 via firmware update 4.0 is a macro mode. Rather than having to go into the menu to activate the macro mode, the camera will automatically detect when you are taking a macro shot and switch the AF over accordingly. We’ve found it very intelligent and reactive.
Continuous AF Mode and Tracking
The three Focus Areas that are the most useful with C-AF are Center, Zone and Wide.
With Center, you can photograph a subject coming towards you in a straight line as long as you keep the subject at the centre of the frame. Zone uses phase detection points to follow moving objects in a restricted area of the frame, while Wide will give you access to all the phase/contrast detection points in the frame.
The only tracking mode you’ll find on the a6000 is actually a combination of settings. By activating C-AF with Lock-On AF and either Wide or Center Focus Area, you can track objects by pressing the central button on the control pad twice. Its implementation is a bit awkward, not least because you have to reactivate it from the button every time the camera loses track of the subject.
In my experience, C-AF works the best with Zone or Centre and is more effective with slow-moving objects. For example, it is fine for runners or slow-moving bikers, but will struggle with extreme motor sports. In Wide mode, the AF has to tendency to lock onto random subjects in the frame, especially if they are moving. Also, bear in mind that having 11fps continuous shooting makes it easier to get a number of frames in focus.
The X-T1 incorporates a predictive autofocus algorithm and thanks to the firmware update 4.0, the useful settings for AF-C are now vaster including single, AF zone and Wide/Tracking.
You can use AF-C with a single point for subjects moving directly towards you. The largest single AF point works better. You can move the point around the 49 areas available but it works better with the 9 at the centre that represent the phase detection points.
For more advanced tracking, you can select AF-C and AF zone for side-to-side tracking. In both this mode and Wide/Tracking, the camera use a subdivision of 77 areas instead of the 49 mentioned earlier. Zone AF is the most convenient setting for tracking subjects. You can choose a set of points (3×3, 5×3 or 5×5) according to your subject size and how wide you want your tracking area to be. We found that 3×3 works best when you want to focus on a single subject. A wider area will cause the camera to jump from the subject to something else in the scene.
You can choose AF-C and Wide/Tracking for unpredictable subjects. This mode will track the subject according to its contrast and colour. Unlike S-AF, you can manually select an AF point to start with. You start by half pressing the shutter release button to lock onto your subject with one of the single AF points available and the camera will follow it. It works well in good light conditions but can confuse your subject with the background if it isn’t distinguished.


MF Mode
I quite enjoy manual focussing with the a6000, but it doesn’t hold a candle to the advanced manual focussing system of the X-T1.
It incorporates focus peaking with three different levels and colours (red, white and yellow). If you choose Manual Assist On in the menu, the camera will automatically magnify the image when you turn the manual focus ring on your lens. The overall accuracy of the focus peaking is good as long as you keep it at the lowest level.
There is also a DMF mode that works very well. It is nearly identical to S-AF with the exception that you can make manual adjustments.
Manual focussing on the X-T1 is an absolute joy thanks to the great magnification of the viewfinder and the various manual assist modes.
You can easily switch between standard manual focus, focus peaking (white, red, blue) and digital split image by holding down the Focus Assist button on the rear. All three can be used with magnification, which can be activated by quickly pressing the Focus Assist button.
When looking through the viewfinder, you can choose between a standard view of your scene, a full view, or a “dual” view that shows you two images – one of the whole scene and a smaller magnified view of the area you are trying to get in focus. These can be accessed from the Disp/Back button.
The cherry on top is that you can quickly change between S, C and M modes via a switch on the front of the X-T1’s body.
This combination of features and functions makes the X-T1 a killer camera for macro photography.
Buffer
The one aspect of the a6000 that lets down its amazing autofocus system is the buffer. Once you’ve taken a High burst in Raw/JPG mode, it takes a while for the camera to prepare itself for another full burst, though much shorter subsequent bursts are possible. You also have to wait 10-20 seconds before you can play back your images.
In Fine JPG mode, the buffer improves a little. You can take a longer initial burst, but subsequent bursts taken right after are still quite short.
The Low and Medium burst modes aren’t very different from the High burst mode, with the exception that each burst last a little longer.
The same problem exists on the X-T1. If you take a High burst in Raw/JPG mode, the camera doesn’t recover right away. The subsequent bursts you take right after the initial burst are a little bit longer than on the a6000, but are still quite short. Unlike the a6000, you can play back your images immediately.
Once you switch over to Fine JPG mode, you can take much longer bursts and the buffer doesn’t fill up as quickly.
Once again, the Low burst mode doesn’t eek much more performance out of the buffer. You get a longer initial burst but each subsequent burst remains quite short.
Face Detection Modes
The a6000 has a few different face detection modes: basic face detection, smile shutter, face registration and eye AF. The basic face detection mode works quite well but I did notice that it takes the camera a second to recognise the presence of a face.
The smile mode is less effective – sometimes it takes the camera 2-5 seconds to recognise that my subject is smiling, and other times it doesn’t react at all.
I wasn’t impressed by the face registration mode either. In a crowd of multiple faces, it doesn’t seem to recognise registered faces before others. If you want to photograph a specific person, it is best to use Flexible Spot and move the AF point to his/her face.
The eye AF mode is hidden deep within the menu. It tends to lock onto the right eye when someone is looking at you head-on.
The X-T1 also has two face detection modes: basic face detection and eye detection AF. The basic face detection mode works well as long as your subject’s face and shoulders fill the frame and he/she is looking directly at the camera.
Eye detection AF was introduced with firmware 4.0. You need to activate Face detection first, then in the AF menu select between auto, left or right eye AF. The camera shows a green rectangle for face detection and a yellow rectangle for eye detection on the screen. It works well for portraits when the subject’s face fills the largest portion of your frame and when you specify either right or left eye. If the face is too far away, it will cease to work and the camera will default to face detection.
Though both modes are effective, I always prefer to place the AF point directly on a person’s face using the four dials on the control pad. It is faster and more accurate.
Other Features
Video Capabilities
There is no question that the a6000 is the better movie making machine of the two. It produces a cleaner file with less noise, aliasing and moiré than the X-T1.
Following firmware update 2.0, the a6000 now records movies in the XAVC S format with a higher bitrate than AVCHD (50mbps). It can record in NTSC at 60p/30p/24p, or in PAL at 50p/25p.
While shooting, you can change all the most important settings, including shutter speed, aperture, ISO, exposure, and focus (either MF or AF-C).
The X-T1 records in Full HD (NTSC: 60p/30p/24p, PAL: 50p/25p). Despite a good bitrate of nearly 40mbps, the quality is nowhere near the offerings of other mirrorless cameras, including the a6000.
That said, firmware update 3.0 brought a few improvements to the X-T1’s video mode including 24p and full manual control over your settings. (Although for some reason, the camera can’t seem to go below ISO 400.) You can also apply the Film Simulation Modes to your videos and the large viewfinder facilitates manual focussing.
The movie button is well-placed but you have to press it and hold it for what seems like an eternity to start/stop your videos.
Below you can check out a short video that compares the video produced by the two cameras. Both were set to 50p and matched exposure.
Panorama
The two cameras have a Panorama mode that can be accessed from an external dial and produce a JPG after stitching the images together in-camera. However, the X-T1 gives you much more control over the settings than the a6000…
Once you’ve switched the a6000 into Panorama mode, the camera’s automatic mode takes over, which means you can no longer make manual adjustments to shutter speed, aperture, ISO or exposure. This is fine in normal daylight conditions but in low light, I’ve noticed that the a6000 maintains a fairly low shutter speed (between 1/60 and 1/100), which causes motion blur in your panorama.
You can choose between two different Panorama modes (standard and wide) as well as the direction in which you prefer to pan (right or left).
On the X-T1, you have total control over all the settings including the shutter speed, aperture, ISO and exposure. What’s more, if you do switch the X-T1 to automatic, it will choose a higher shutter speed in low-light conditions (usually between 1/220 and 1/250). As such, it is easy to avoid motion blur.


Silent Shooting
Another advantage the X-T1 has over the a6000 is the inclusion of a silent shooting mode. It is very useful for situations where silence is paramount, like a theatrical performance or wedding ceremony. The a6000 would seriously benefit from a silent mode, as its shutter is fairly loud for a mirrorless camera.
WiFi and NFC
The a6000 has built-in WiFi /NFC connectivity.
By downloading the free Sony PlayMemories app to your smartphone, you can use your phone as a remote control. To do this, go to Smart Remote Embedded in the Application List menu on your camera and connect your phone to the camera’s WiFi hotspot. From there, you can take pictures with the remote shutter and change all the most basic settings like aperture, shutter speed, ISO and exposure. It works very well.
If you want to download other apps, however, things can get a bit tricky. You must have a Sony PlayMemories account and be able to access a WiFi connection. While I was able to connect the camera to our home’s WiFi, I wasn’t able to access the PlayMemories store due to an error. Looking online, I discovered that many other Sony camera owners (but not all) have encountered the same issue.
Keep in mind that not all apps on the PlayMemories website are free, and some useful features like time-lapse must be downloaded via an app.
The X-T1 also has built-in WiFi connectivity, but lacks NFC.
You can connect the camera to your phone via the Fujifilm Camera Remote app. From there, you can use the phone as a remote control, transfer photos, browse your camera and geotag.
The apps work very well on our iPhone 5 and are straightforward to connect. All Fujifilm apps are also free to use. Unlike the a6000, you don’t have to download important features like time-lapse via an app (it has a built-in intervalometer).
Sorry, Sony, but Fujifilm wins here!
Preset Settings
The a6000 has a function on the mode dial called MR (Memory Recall). By entering the menu and selecting Memory, you can save three different preset settings. This is very useful if you find yourself frequently switching between very different settings at the same event.
The X-T1 allows you to choose between seven custom settings from the menu. Your chosen custom setting will automatically become accessible from the Q menu, which is quite handy.
Lenses
There are a total of 16 E-mount lenses for the Sony APS-C range. Though the average optical quality of these lenses is good, it isn’t quite as high as the Fujinon range. Since Sony’s full-frame mirrorless cameras also have an E-mount, you can use full-frame E-mount lenses on the a6000 with a crop factor of 1.5x. There are also a number of third parties like Zeiss, Samyang, Sigma and Tamron that produce lenses for the E-mount.
There are a total of 21 lenses in the Fujinon X-mount line-up, 19 of which have already been released. Third-parties such as Samyang and Zeiss have also produced a number of lenses for the X-mount. Fujifilm’s lenses are renowned for their top quality optics, and therefore tend to be quite expensive.
Price
It is impossible to beat the a6000 in terms of value for money. It costs about half the price of the X-T1, yet manages to keep pace in terms of overall image quality and autofocus performance, and even delivers better video quality. If you are looking for a powerful camera at a low price, the a6000 is your best bet.
The X-T1 is certainly more expensive than the a6000 but it also comes across as more of a complete photography product, with its incredible viewfinder, silent shooting mode, manual dials, and seamless operation. What’s more, Fujifilm cameras constantly receive significant firmware updates, extending their life and value on the digital market.
Conclusion
I realise that we often conclude our comparisons in this way, but the truth is that both the a6000 and X-T1 are both perfectly valid options. They fulfil the role of a good camera by producing high-quality images that can be viewed on a screen, shared online, printed or used for commercial assignments.
Since image quality basically a non-issue, whether you choose one or the other will ultimately come down to personal preference. Of course, there are a few features that may tempt you in one direction or the other. For instance, the X-T1’s excellent viewfinder and manual dials may tempt those who prefer to avoid virtual menus and LCDs. Likewise, the a6000’s advanced movie mode makes it an interesting choice for those who like both stills and video.
Choose the Sony a6000 if you…
– prefer a compact rangefinder
– are a beginner who would prefer having the option of a dedicated automatic mode
– shoot a lot of video
– are on a budget
Choose the Fujifilm X-T1 if you…
– prefer the SLR design and manual dials
– do a lot of manual focussing
– tend to shoot in very quiet environments and would benefit from a silent shutter
– tend to use OOC JPGs more than Raw files and would appreciate the Film Simulation Modes
Check out our reviews of the Sony a6000:
A Colourful Afternoon: Hands-On with the Sony a6000
Speed in a small and simple package: Review of the Sony a6000
Check out our reviews of the Fujifilm X-T1:
Let’s shoot some action! – An in-depth look at the Fuji X-T1 autofocus capabilities
Three days walking through the Cinque Terre with the Fuji X-T1 & XF 10-24mm f/4
Getting in close – The Sony FE 90mm f/2.8 Macro Review
The first encounter we had with the Sony FE 90mm f2.8 macro G OSS was at last year’s Photokina, a mere prototype sitting inside a glass display alongside the other upcoming FE lens prototypes. Now, nearly a full year later, the lens is finally on the market and ready to be enjoyed by the macro-loving community.
[Read more…] about Getting in close – The Sony FE 90mm f/2.8 Macro Review


